


Using the wrong type of EQ for the job in hand
If you want to apply equalisation successfully, having full understanding of the technical options available to you, and their distinct corrective and creative specialities, is imperative. Different situations call for different types of EQ – the smooth, ‘musical’ curves of a Pultec emulation, for example, are often quicker and more effective for beefing up a bassline or drums bus, or sweetening a vocal, than a more surgical modern design, while the opposite will be the case when looking to tame a wildly resonant snare drum, say. The only way to develop this knowledge is through practise and experimentation, but you can bone up on the fundamentals with our Beginner’s Guide to EQ.
Optimistically EQing irreparable sounds
One of the key skills every mix engineer needs to develop is the ability to recognise (and admit) when a particular sound simply isn’t working and no amount of manipulation is ever going to make it work. We’re talking overly sibilant vocals, agonisingly ringy snare drums, awkwardly resonant pianos and so forth. You can do amazing, transformative things with today’s supercharged EQ plugins, but there are limits, and if an instrument or vocal is badly captured at source, it’s far better to re-record than waste time trying to salvage a compromised version of it.
Unnecessarily EQing perfectly good sounds
On the other side of that coin, don’t feel that you have to EQ every instrument and sound in a mix just because you can. Yes, most parts will demand some degree of spectral adjustment to bed them in and avoid clashes with other signals occupying similar frequency ranges, but if a given part sounds ‘right’ and just doesn’t feel like it needs any equalisation at all, leave it alone. Of course, as other elements are reshaped around it, that part might require revisiting, but EQ is, at the end of the day, a destructive process, so don’t just use it for the sake of it.

EQing in solo mode
Ah, the comforting allure of the Solo button, enabling us to hear the individual sound we’re working on in total isolation. Surely it makes sense to make EQ tweaks in Solo mode, without letting the rest of the mix get in the way? Well, no – quite the opposite in fact. A mix is very much the sum of its parts, and as its component channels coincide, interact and mask or reinforce each other, their frequency profiles are profoundly altered. EQing in solo, then, is pointless at best (if you pick up on consequent issues when the channel in question is reintroduced into the mix and subsequently correct them) and damaging at worst (if you don’t).
So, resist the temptation to reach for that S button and instead apply EQ in situ, using your EQ plugin’s bypass function to compare the processed and unprocessed sounds as they appear in the mix – which is, after all, the only way they’re ever actually going to be heard.

High-pass filtering everything
It’s oft-imparted ‘wisdom’ that every channel in a mix should have a high-pass filter inserted, set to a certain frequency below which nothing but rumble, hum and noise are thought to reside – somewhere between 30 and 90Hz. While many parts can indeed be improved by being rolled off in this way – vocals, guitars, hi-hats, high strings, etc – such filtering certainly shouldn’t be applied universally. Basslines, for example, are often defined by those super-low frequencies, so when you need to get a grip on their volume levels, shelve them down rather than cut them off altogether, or duck them to the kick drum with sidechain compression. And with regard to vocals and other, higher instruments, judge each individual case on its specific sonic profile and in the context of the broader mix, and only filter them if decluttering really seems necessary.
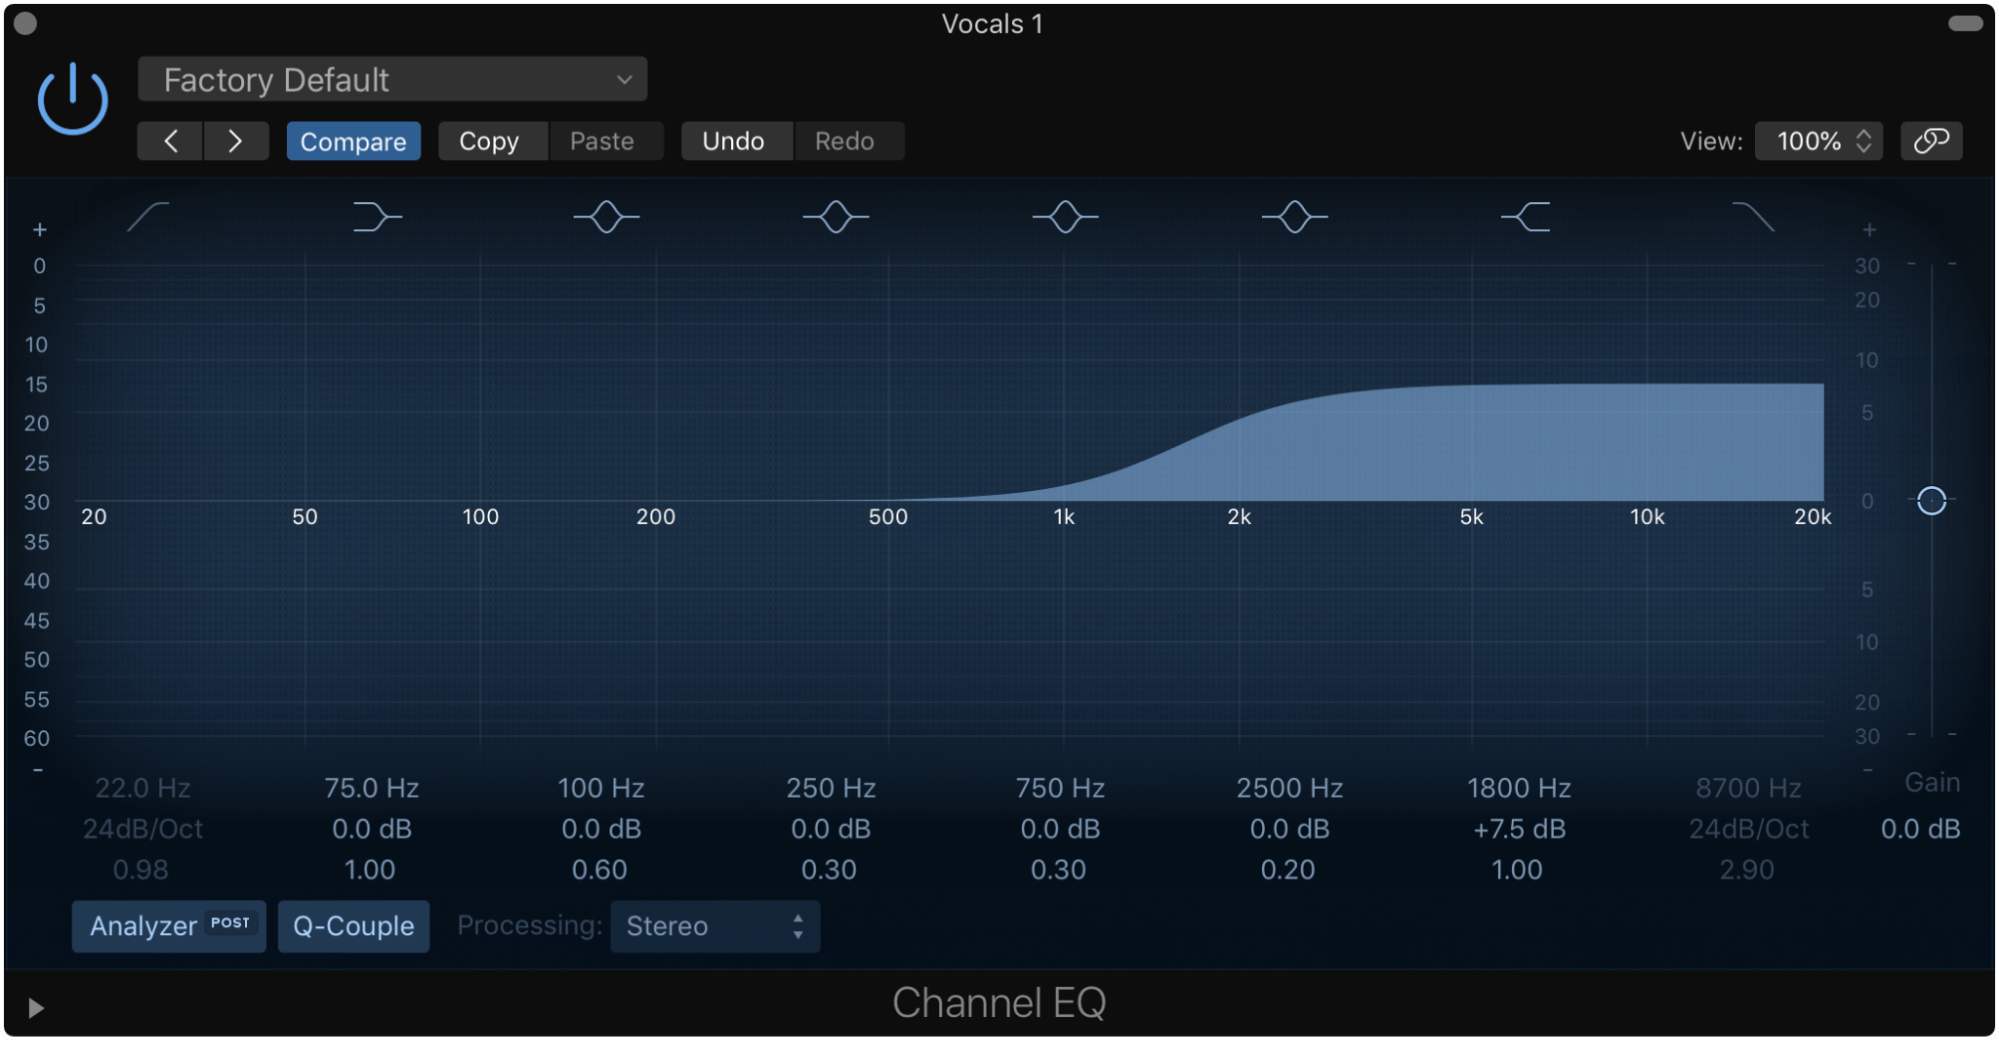
Boosting high frequencies too much
When it comes to achieving the lustrous high-end sheen that’s a feature of any professional sounding mix, high shelving EQ is an indispensable tool. However, high frequency boosts always sound immediately appealing and exciting when applied, which makes it all too easy to get carried away as you work through the channels, shelving every viable signal in the quest for sparkle and air, but ultimately yielding a harsh, ‘brittle’ track that might grab the ear at first but quickly becomes fatiguing. Common contributors to this syndrome when over-boosted in the uppers include hi-hats, snare drums, brass, strings, guitars and vocals.
Instead, try keeping your EQ response curves flat above the high-mids in general, and gently boosting the highs in just a few key elements – the vocals, the lead guitar or synth, and the reverb return, perhaps. And when you think you’ve got the top end sounding great, take a break to give your ears a rest, then re-assess with renewed objectivity.

Neglecting the mid-range
Most of us naturally concentrate on the high and low ends of the frequency spectrum when mixing, with the mid-range tending to get overlooked or forgotten about entirely. This is a problem, because the fundamental frequencies of the vast majority of instrumental sounds fall somewhere between 500Hz and 2kHz or thereabouts, so it stands to reason that much of our EQ’ing attention should really be given to that area. With our ears being very sensitive to the mid-range, even small adjustments there will have a major effect on the sound of the whole mix, so this is certainly the trickiest area in which to operate. Get it right, though, and your mixes will benefit from improved definition, musicality and spectral consistency. And who doesn’t want that?
For more on frequency-shaping and equalisation, check out our Beginner’s Guides to EQ, Filters and the audible frequency range.


Our Products
-

2in | 2out Audio Interface
-

10in | 6out Audio Interface
-

10in | 14out Audio Interface
-

20in | 24out Audio Interface
-

24in | 32out Audio Interface
-

2in | 2out Audio Interface
-

4in | 4out Audio Interface
-

24in | 24out Audio Interface
-

Everything you need to start recording
-

8 Channel Smart Preamp with AD/DA
-

8 Channel Mic Pre & ADC
-

8 Channel Mic Pre + Tone Control
-

Modular Analogue Recording Console
-

Small Format Analogue Recording Console
-

Small Format Analogue Recording Console
-

Immersive Audio Interface and Monitor Controller
-

Desktop Monitor Controller