


Comping
Short for ‘compiling’, comping is the process of splicing together the best sections from multiple vocal takes in order to build the ideal composite of all of them. Not so long ago, this would have involved recording each take to a separate track, then painstakingly cutting and pasting the best bits from them to a dedicated comp track; but these days, pretty much every DAW features some form of built-in comping system, making the procedure much quicker and easier, and even, dare we say, fun.
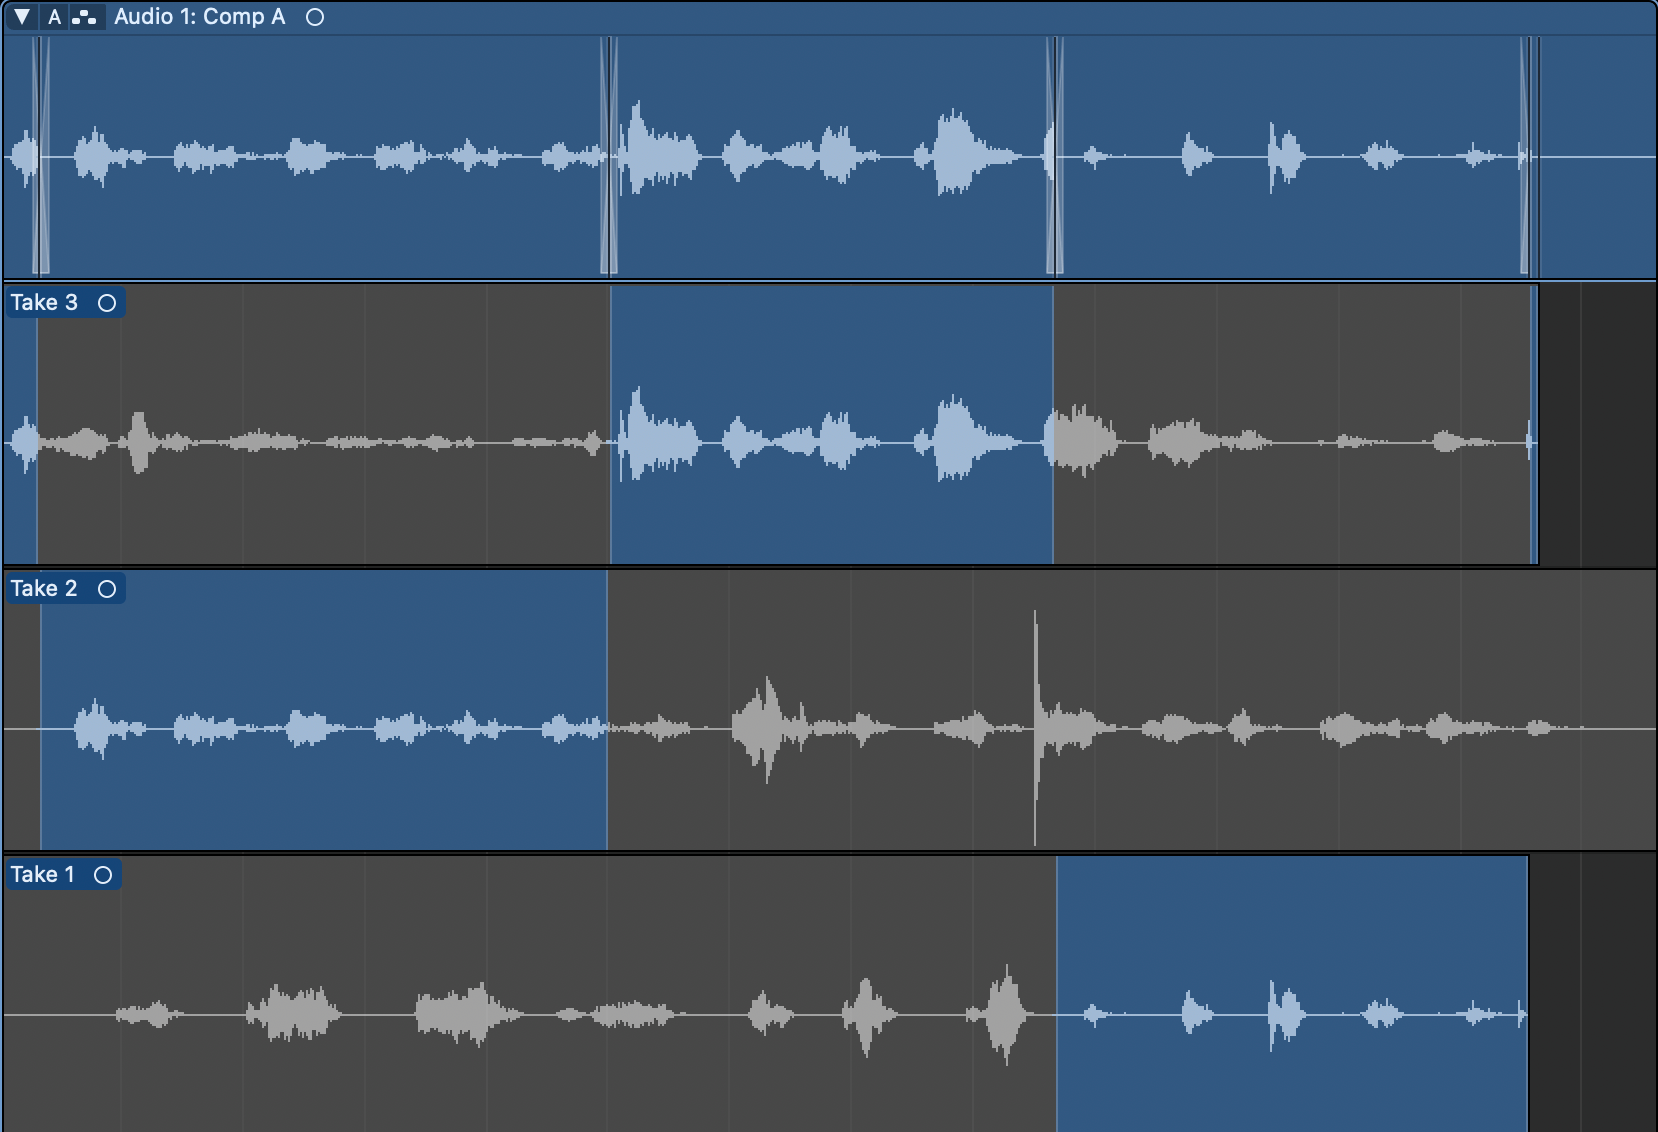
Deploying such systems generally starts with cycling the relevant section of the song for the singer to record as many takes over as they need to, each of which is captured on a nested sub-track of the top-level comp track. Comping is then done by highlighting the sections in each take that you want to include in the comp (often referred to as ‘swiping’), rather than actually moving them, thereby creating a contiguous series of sub-track selections – shown as a single-track continuum on the main comp track at the top – that automatically jumps playback between takes. Easy!
Tuning and pitch correction
Whether or not you need to tune your vocal after the fact will depend on how tight the performance was, and how natural and organic a sound you’re ultimately aiming for. It’s important to understand that a great vocal doesn’t have to be perfectly in tune all the time, and if it sounds good as it is, with no overly wayward pitching in evidence, then you shouldn’t feel compelled to apply a pitch correction plugin just to give yourself the reassurance that every note is rigidly snapped into place. After all, most of the greatest music ever made was recorded before such things were even possible, proving that there’s much more to a top-notch vocal than the simply accuracy of its pitching.
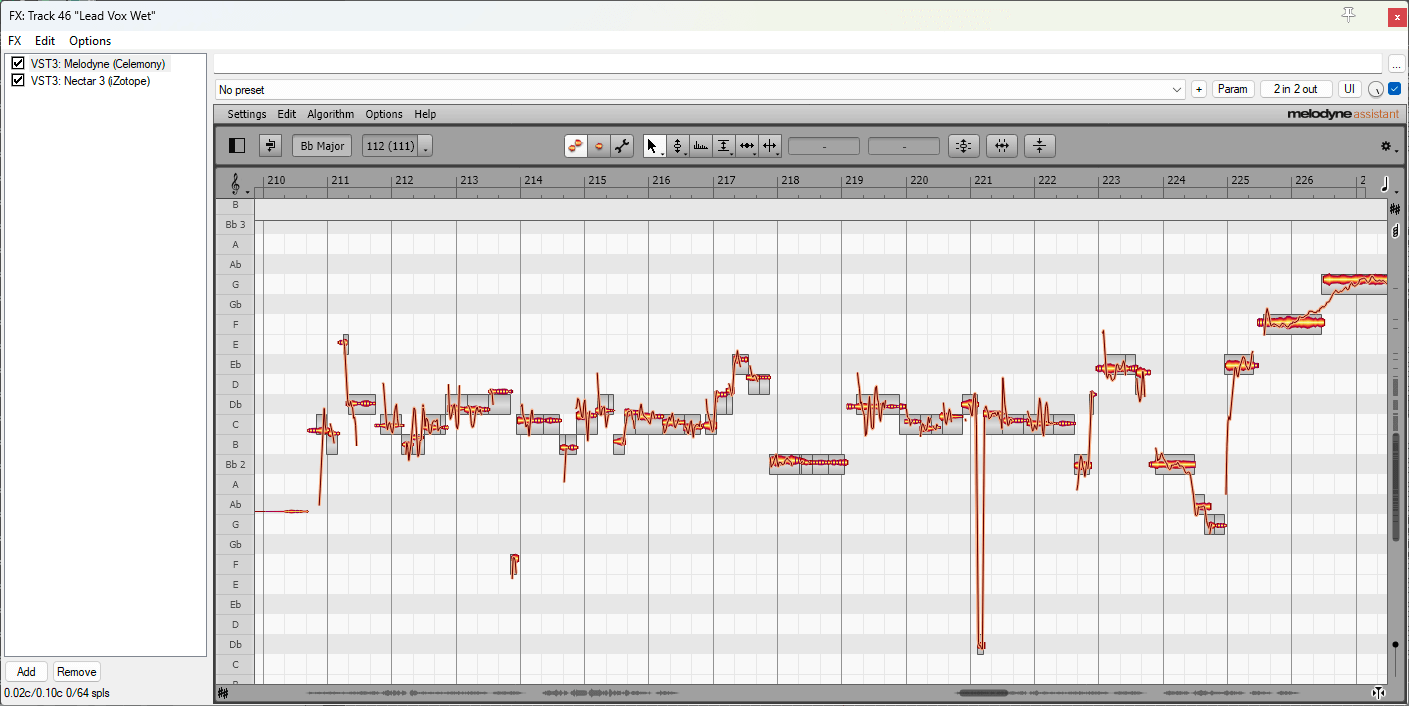
However, if you do hear the odd note straying beyond the bounds of acceptability, don’t hesitate to fire up Auto-Tune, Melodyne or whatever pitch correction tool your DAW might offer, and use it to get your singer back on track. Just be careful not to compromise the ‘human’ authenticity of the vocal with over-enthusiastic correction speeds and amounts, as even the best tuning plugins can only go so far before unpleasant artefacts and other unnatural weirdness become apparent – use your ears and judgement. Unless, of course, you are in fact shooting for that super tight contemporary pop sound, in which case, set your plugin to fast correction and 100% snap, and have at it.
De-noising and clean-up
As with any live recording, vocal tracks are susceptible to background noise, microphone handling sounds and other unwanted intrusions, but happily, there are numerous high-tech options available to you for eliminating theme. Audio restoration plugins such as iZotope RX and Acon Digital Restoration Suite make light work of nuking electrical hum, computer fan noise, mouth clicks and over-exuberant plosives, excessive breath sounds, and even traffic noise leaking in to your studio from outside. Err on the side of caution with them, though, as the hugely complex processing they deploy can easily end up damaging the vocal itself if laid on too thick – hit the bypass button regularly to maintain perspective. And once you’ve got your vocal in place on the arrange page – with or without de-noising plugins – we’d always recommend cutting out all those stretches of silence between its constituent phrases and words, to ensure that literally nothing is happening on that channel when the singer isn’t actually singing.

Compression and EQ
As the two most vital of audio engineering processes, compression and equalisation are the keys to getting your vocals sounding clear, upfront, punchy and present. You can bone up on the fundamentals of both in our Beginner’s Guides to EQ and Compression, but beyond that, there are a few things to bear in mind with specific regard to vocals.
Compression-wise, the type of plugin you select can be guided by the style of vocal you’re producing: for smooth, unobtrusive levelling, for example, you might turn to a languid optical compressor emulation such as Universal Audio’s LA-2A; while a more in-your-face, rocky treatment could call for something quicker and more aggressive – a Urei 1176 emulation, perhaps. Don’t stress about this too much if the only compressor you own is the one built into your DAW, though, as that will have been designed with versatility in mind and thus should be at least good enough for any vocal compression situation.
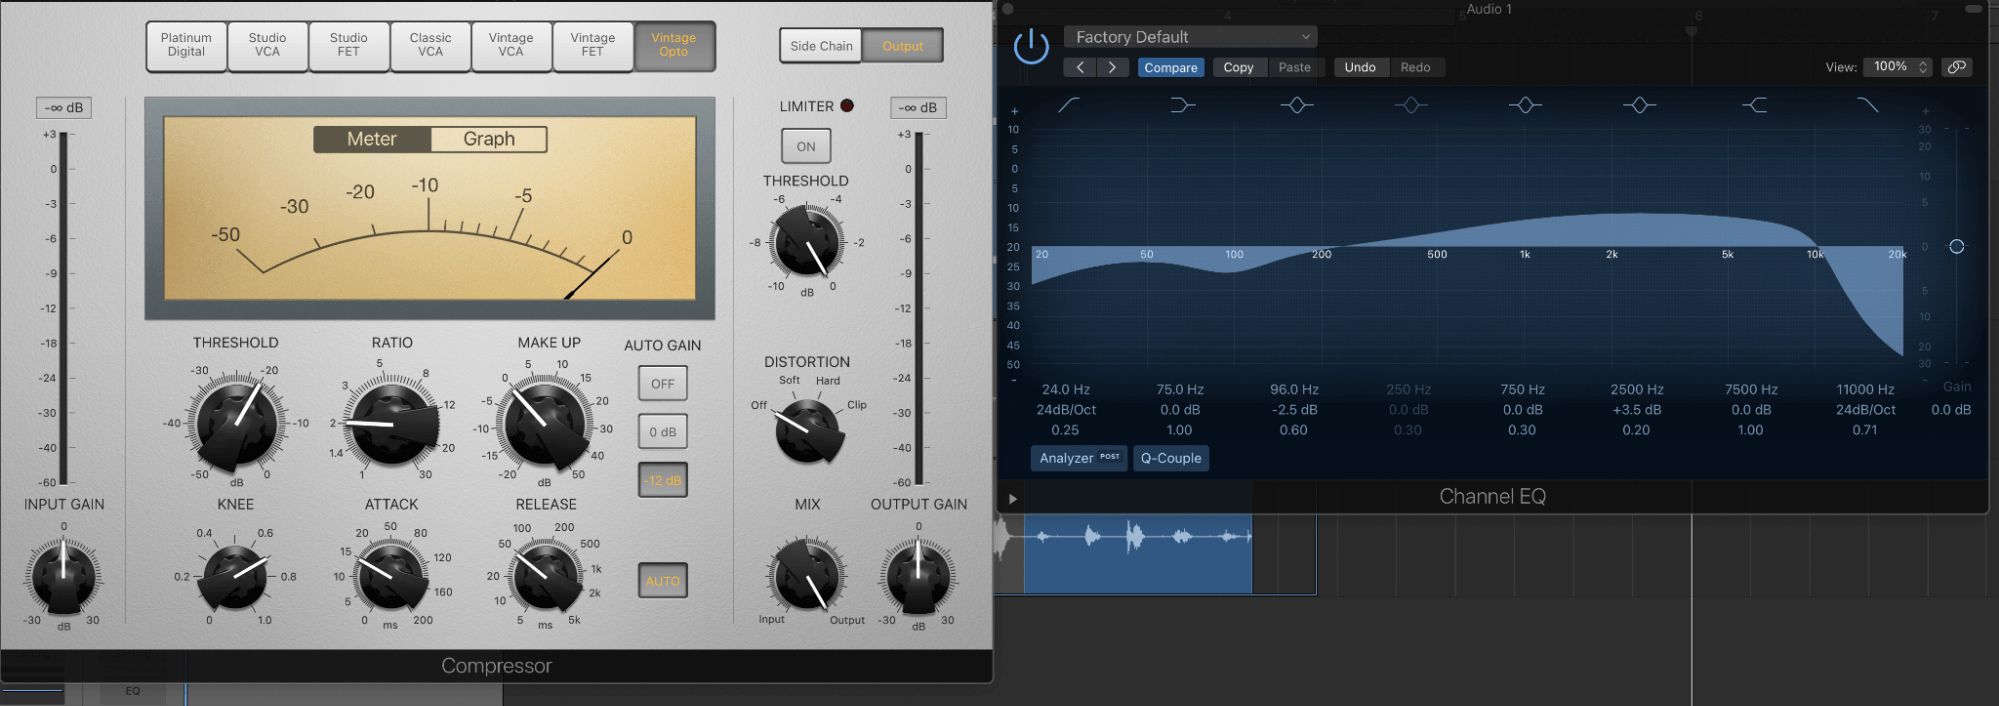
When it comes to EQ, keep your vocal sounding natural by minimising the size of any cuts or boosts. Suppress unpleasant resonances with surgical peaking cuts, use low shelving bands or low-cut filters to rein in excessive low frequencies, and raise the gain on a high shelving band to bring out air and breathiness.
Also worth mentioning here are the recent innovations of ‘dynamic’ and ‘automatic’ EQ. The first acts like a cross between a compressor and an equaliser, attenuating or boosting the dialled-in frequency range only when the signal exceeds a specified threshold, and is particularly useful on vocals, with their highly variable delivery. And even more technically impressive than that, an automatic EQ constantly applies hundreds of dynamically responsive filters in real time to impose what the plugin deems to be the optimal spectral profile on your vocal (or other part), with minimal – if any – user input required. Truly amazing stuff: check out FabFilter Pro Q-3 and oeksound Soothe 2 for great examples of dynamic and automatic EQ, respectively.
De-essing
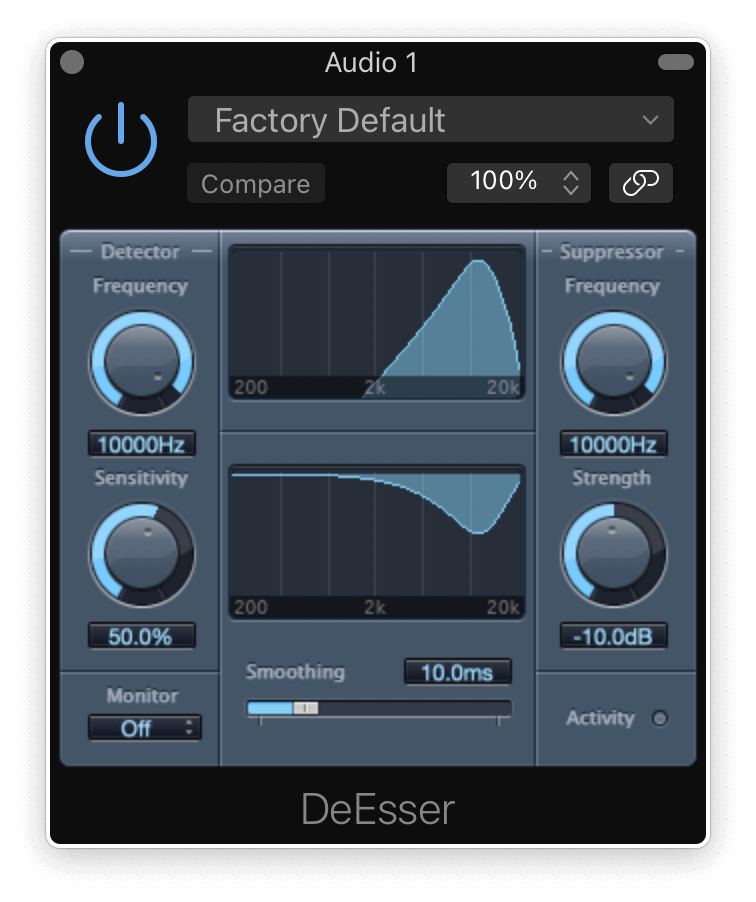
Finally, a very common issue with vocal recordings is excessive sibilance – that is, distractingly over-emphasised ’S’ sounds that can’t really be addressed at source and so must be dealt with in the edit. That dealing is done by a de-esser – a specific type of frequency-conscious compressor that listens out for sibilant frequencies and automatically drops them in volume by whatever amount you choose. Your DAW may have a de-esser built in, but if not, there are plenty of excellent third-party options available, including FabFilter Pro-DS and Sonible smart:deess. Alternatively, the aforementioned dynamic EQ can be used for de-easing as well.
With these five techniques in your locker, you’re equipped to produce thoroughly professional sounding vocals in any style. Where you take them after that point, through the deployment of reverb, delay, distortion, extreme, tuning and other more creative effects, is up to you and the needs of the project. Have fun!


Our Products
-

2in | 2out Audio Interface
-

10in | 6out Audio Interface
-

10in | 14out Audio Interface
-

20in | 24out Audio Interface
-

24in | 32out Audio Interface
-

2in | 2out Audio Interface
-

4in | 4out Audio Interface
-

24in | 24out Audio Interface
-

Everything you need to start recording
-

8 Channel Smart Preamp with AD/DA
-

8 Channel Mic Pre & ADC
-

8 Channel Mic Pre + Tone Control
-

Modular Analogue Recording Console
-

Small Format Analogue Recording Console
-

Small Format Analogue Recording Console
-

Immersive Audio Interface and Monitor Controller
-

Desktop Monitor Controller