


The purpose of any audio mixer – be it a hardware console/desk or a virtual representation thereof in a DAW – is simply to facilitate the blending of multiple disparate and individually controlled input signals for presentation at a final stereo (or, these days, possibly multichannel) output. Within that straightforward proposition, though, every mixer will allow for the collective routing of multiple signals together for various purposes via groups, buses and/or auxiliaries. While these three somewhat interchangeable concepts are easy enough to get a handle on, it’s important to be aware that different DAWs realise and name them in different ways, which can cause confusion. Ultimately, though, what we’re dealing with here are a variety of systems for routing signals around a mixer internally, in order to simplify the mixing process, apply effects to multiple sounds at once, and more, before the whole lot arrives at the master output, itself also a bus.
Buses and groups: all or nothing
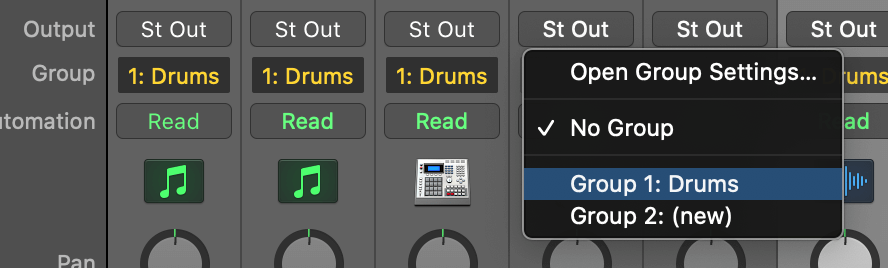
Groups and buses are pretty much the same thing, really, differing only in their naming (‘bus’ being the original title, from the pre-DAW days of hardware mixers and tape) and certain peripheral aspects of their functionality. In a nutshell, both are dedicated mixer channels to which any number of main input channels can be routed and summed (ie, added together), so that their overall volume can be adjusted by a single fader, and effects applied to all of them together.
Although in some DAWs, grouping a set of tracks links them so that moving the volume fader of one also moves all the others, the term ‘group’ in the sense that we’re dealing with it here is either an alternative name for, or a modern hybridisation of, a bus. In the latter definition, a group might combine track organisation with collective signal processing, appearing as a sort of ‘folder’ track in your DAW’s arrange page containing all the individual tracks assigned to it, as well as a channel in the mixer. Whatever your DAW calls them, routing channels to groups or buses will involve nothing more than selecting from the Output menu on the channel in question, or selecting all the channels you want to group then invoking a menu command.
Any time you need to bring a collection of tracks under the authority of a single channel fader, a bus or group is the way to do it. Prime examples include pulling the multiple channels of a drum kit recording together for compressing and EQing into a cohesive whole; combining vocal harmonies, guitars, strings or any other instrumental ‘subgroup’ for one-fader volume adjustment; and configuring stems for bouncing or export.

Auxiliaries: the effective solution
While buses and groups can only receive the full output of their assigned input channels, an auxiliary channel takes a user-specified amount of input from any number of other mixer channels and outputs the aggregate submix in parallel with those channels, effectively duplicating the signals on a bus.
The main use case for auxiliaries is hosting effects in a ‘send/return’ configuration, enabling one or more input channels and/or buses to be processed in parallel with their dry output signals. Again, how any given DAW caters to this will vary in its nomenclature and setup, with some calling them ‘FX Tracks’ or similar, and others simply using general purpose auxiliaries as effects returns with no specific naming.
The most ubiquitous auxiliary effects are reverb and delay, both of which are usually applied to several tracks together, and almost always require the balancing of dry (unprocessed) and wet (processed) signals. Running your reverb or delay on an auxiliary return means you only need a single, shared instance of it, rather than one inserted into every track, and allows you to easily tweak the dry/wet mix on each input channel using the Send controls, which we’ll come to momentarily. You won’t want to call on auxiliaries for effects intended to process the entire signal – EQ, compression, distortion, etc; that’s what buses are for, as described above.
The ‘send’ in the ‘send/return’ pairing mentioned earlier refers to the output from the source track, while the ‘return’ is the auxiliary channel itself, which returns the signal to the mix, having processed it with the effects loaded onto it. With your auxiliary return in place, and your effects chain inserted into it, raising the Send knob assigned to that auxiliary on any mixer channel (be it a regular input channel, a bus or another auxiliary return) routes as much of that signal as you choose to the auxiliary and thus its hosted effects, without affecting the signal coming out of the main channel at all – ie, the main channel and its effected duplicate are both heard in parallel. Thus, your single reverb can be applied to varying degrees to as many sounds in the mix as you want to send its way.
Your DAW will allow for a good number of auxiliary returns in a project (although probably not infinite), and when a new one is added, a corresponding Send knob will appear in every viable channel in the mixer. You might also be able to switch individual sends between pre and post fader routing, determining whether or not changes made to the channel’s volume fader also effect the Send level: pre fader means they don’t, post fader means they do, as the names suggest.
Another common deployment for auxiliaries is setting up separate headphone cue mixes for the various members of a band. In this scenario, everyone gets an auxiliary return routed to their headphones via an audio interface or dedicated headphone mixer, empowering them to dial in their own mix using the (pre-fader) Sends from each input channel.

Last but not least: the master bus
At the very end of every mixer’s signal flow, the master output channel (aka the mix bus or 2-bus) is, in the literal sense, nothing more than a stereo or multichannel bus to which every input channel, bus and auxiliary in the mix is eventually routed, for delivery to the main monitoring system and the host DAW’s rendering engine for export. As the end point of the mix, and thus absolutely mission-critical when it comes to levelling and processing, however, the master bus is a subject in itself that we’ll return to in a future post.
Understanding groups, buses and auxiliaries is key to effective and efficient mixing, so be sure to bone up on your DAW’s particular implementation of them. The manual is of course a good place to start, and YouTube is well stocked with videos covering the mixing architecture of every DAW under the sun.


Our Products
-

2in | 2out Audio Interface
-

10in | 6out Audio Interface
-

10in | 14out Audio Interface
-

20in | 24out Audio Interface
-

24in | 32out Audio Interface
-

2in | 2out Audio Interface
-

4in | 4out Audio Interface
-

24in | 24out Audio Interface
-

Everything you need to start recording
-

8 Channel Smart Preamp with AD/DA
-

8 Channel Mic Pre & ADC
-

8 Channel Mic Pre + Tone Control
-

Modular Analogue Recording Console
-

Small Format Analogue Recording Console
-
Small Format Analogue Recording Console
-

Immersive Audio Interface and Monitor Controller
-

Desktop Monitor Controller