


1. Must Have Equipment
1. Must Have Equipment
Moon Gel/Dampening
There are a million and one ways to ‘dampen’ drums and reduce overtones but ultimately, as a drummer at the very least you should carry a pot of gels or something such as a Snareweight.
There are of course plenty of very good hacks for this too which means you don’t have to pay out of the nose for branded drum dampening.
I personally stock pile of Ladies high heel gel pads which you can get in almost any fashion outlet or drug store. Boots do a set of 8 for about £2.00, M&S do some really excellent ones for about £3.00.
The other benefit of these is that they are only adhesive on the one side which means they don’t collect all the grub and crud you get from stick ware etc. Plus the adhesive tends to be far more sticky than a standard Moon Gel.
If you’re looking for something more ‘pro’ then I would thoroughly recommend investing in a few Snareweights. This is a product that I cannot fault however, at £17.99 for the base level one in the UK, you have to be willing to spend a bit.
Brick of Sticks
I can’t begin to count the amount of times that I have had drummers come to the studio with a single pair of sticks that they have been playing for months and they are all chewed up and bits of the acorn are missing etc and I have to send them into the store to buy new pairs of sticks.
You can’t play drums without sticks and beaten up sticks play horribly and sound even worse. Buy yourself a brick of 6 or 12 pairs and you’ll be laughing.
In Ear Monitors (or at least your own pair of Headphones you find comfortable to play in.)
Yes, all studios have headphones as standard however most studios don’t have the capital to pay for ridiculously good headphones so you’ll end up with something fairly cheap and when you’re asking for more kick in your monitors or more click it will inevitably start to crap out on you.
Invest in some in ear monitoring ie Shure SE215 or even if you want to play with your iPod headphones, just get some sound cancelling over-ear defenders so your engineer can isolate your mix and you’ll get what you want out of your performance.
Drum Key
This may seem basic and obvious but it is such an essential piece of gear and so inexpensive and small theres no reason for you not to own about 14 of them. I keep about 20 dotted around the studio but that is 90% due to the fact I’m also a touring drummer.
All studios will have one but all engineers will like you more if you turn up with one. That is a fact. There are numerous types of key and nearly every major drum brand will have their own key.
Tama, Pearl, Evans, Mapex, Gretsch all have different types and styles but just make sure you have at the very least just a standard key which you keep on your person at all times.
2. Prep Yourself
2. Prep Yourself
Like with most things in life, preparation is normally 90% of what makes whatever you’re doing a success. This is no different when it comes to recording and especially when it comes to recording drums.
Here are a few key pointers I have picked up and held onto over the years both as a drummer but also as an engineer.
Practice To A Click Track
As a drummer you should really be doing this anyway. Some drummers will find it perfectly normal to have a click blasting into their ears whether it’s live or in the studio or just for practice purposes but there is nothing more important than being able to play to click.
It opens up a world of possibilities both live and when recording in terms of time effects and playing to a track on stage etc.
There are a million and one free metronome apps which you should download and practice to. Better yet, make your own in a DAW, this way you can chose your own sound for the click itself, something that suits your taste, and then just bounce out around 5 minutes at a load of different BPMs or take it one step further and create click maps for your songs and practice all your parts to these.
This also means when you get into the studio you are able to just hand over the bounced click track to your engineer and there’s no faffing and time wasting creating new click maps to work from. Just tell the Engineer the BPM and give him your stem bounce of the click track. Sorted.
Understand The Sound You’re Looking To Achieve
It’s absolutely fine to assume that your engineer is going to be able to get a great drum sound from your session, especially since that is pretty much their job however, remember that 99.9% of engineers are also musicians or come from a musical or creative background, this means that, like you, they enjoy being creative in the studio, they aren’t their just to stick a couple of mics up in front of your instrument and hit record.
What sound are you hoping to achieve? Are you looking for a monstrous, stadium filling, Zeppelin/ Foo Fighters esq drum sound or are you looking for something more low key, more along the lines of The Beatles or even some Folk kits?
Once you know what you’re looking for sonically, then do your research on those drum sounds. The internet is awesome, don’t forget to use it.
If someone tells me they want a specific type of sound and references a particular track or album, I spend time before the session researching how that sound was captured and you should be doing this too, so that when you walk into that live room, you can immediately start a conversation with your engineer about the sound you want to achieve and you’ll know what kind of drums you want to use, maybe what mics and placements you think might be good, how to play the parts to get the best sonic response.
These kind of conversations will get you in a good headspace and get you excited for your session which typically results in a great performance and capture. Conversation is key between the engineer and artist, make sure you give yourself something to get nerdy over.
Choosing Your Instrument
This one is again is pretty obvious and is connected to the previous paragraph in a lot of ways. Naturally all drums sound different and there are a lot of variables which alter the sonic property of any drum.
What is it made out of? What is the size of the drum? What skins are you using? What sticks are you playing the drum with, are they nylon or wooden tips, acorn or barrel?
All of these things make a difference and should be considered. All of this changes again when you put any drum inside a space so again, this is to be considered once you’ve arrived at the studio or location you are tracking in.
If you’re going for a stadium esq, big room kind of sound, a Fusion size kit isn’t going to work. You’re going to need something bigger, something with an overall more bombastic sound. Something with a 22-24” Kick drum, 13” Rack Tom and a 16 or 18” Floor tom would do the trick. These don’t all have to be from the same kit, don’t be afraid to make yourself a Frankenstein set.
If a kick from a Gretsch kit but the Toms from a Ludwig and a Pearl Snare drum are the perfect match, then use them! On the flip side of all of this, if you’re going for a bright, tight, poppy kind of drum sound, perhaps the Fusion size kit isn’t a bad move
. A small bright sounding room will help with the overall sound as well. Shallower drums (particularly Snares and Toms) are great for this style as they tend to naturally pitch higher allowing you to tune to a much tighter, cleaner, snappy sound.
All of this is the same when it comes to cymbals. The most important thing to remember with cymbals and drums is this: A cheap kit can (with hard work) sound great recorded. Cheap cymbals will never sound good. To any drummer going to record that has less than desirable cymbals, ask whether the engineer has cymbals, if he/she doesn’t then beg, steal and borrow anything you can.
My recommendations for recording are as follows; Dream Bliss and Vintage Bliss series, any Istanbul series but Traditional works great, Zildjian K and A Custom, Meinl Traditional Byzance series. These are all incredible cymbals which I have worked with and never been disappointed by the results.
In terms of choosing the right cymbal for your recording here is where I suggest you start. For pop, funk, fusion and pop rock style genres, go for slightly smaller cymbals and pick a bright/ brilliant cymbal with quick attack and short decay.
Ideal set up, something like 14” Hi Hats, 16” Crash, 22” Ride, 18” Crash. Something like the Zildjian A Customs, Dream Bliss or Istanbul Xist range will provide a great sound.
For heavier, slower genres spanning anything from Hard Rock, some Metal sub genres, Grunge through to Jazz, Blues etc I would tend to opt for slightly larger cymbals that offer a longer decay, slightly slower attack and more complex tonality.
Something like the Dream Vintage Bliss or Dark Matter series, Zildjian K Customs Dark series, Meinl Byzance etc. 15” Hi Hats, 18” Crash, 22 or 24” Ride and an 18 – 20” Crash.
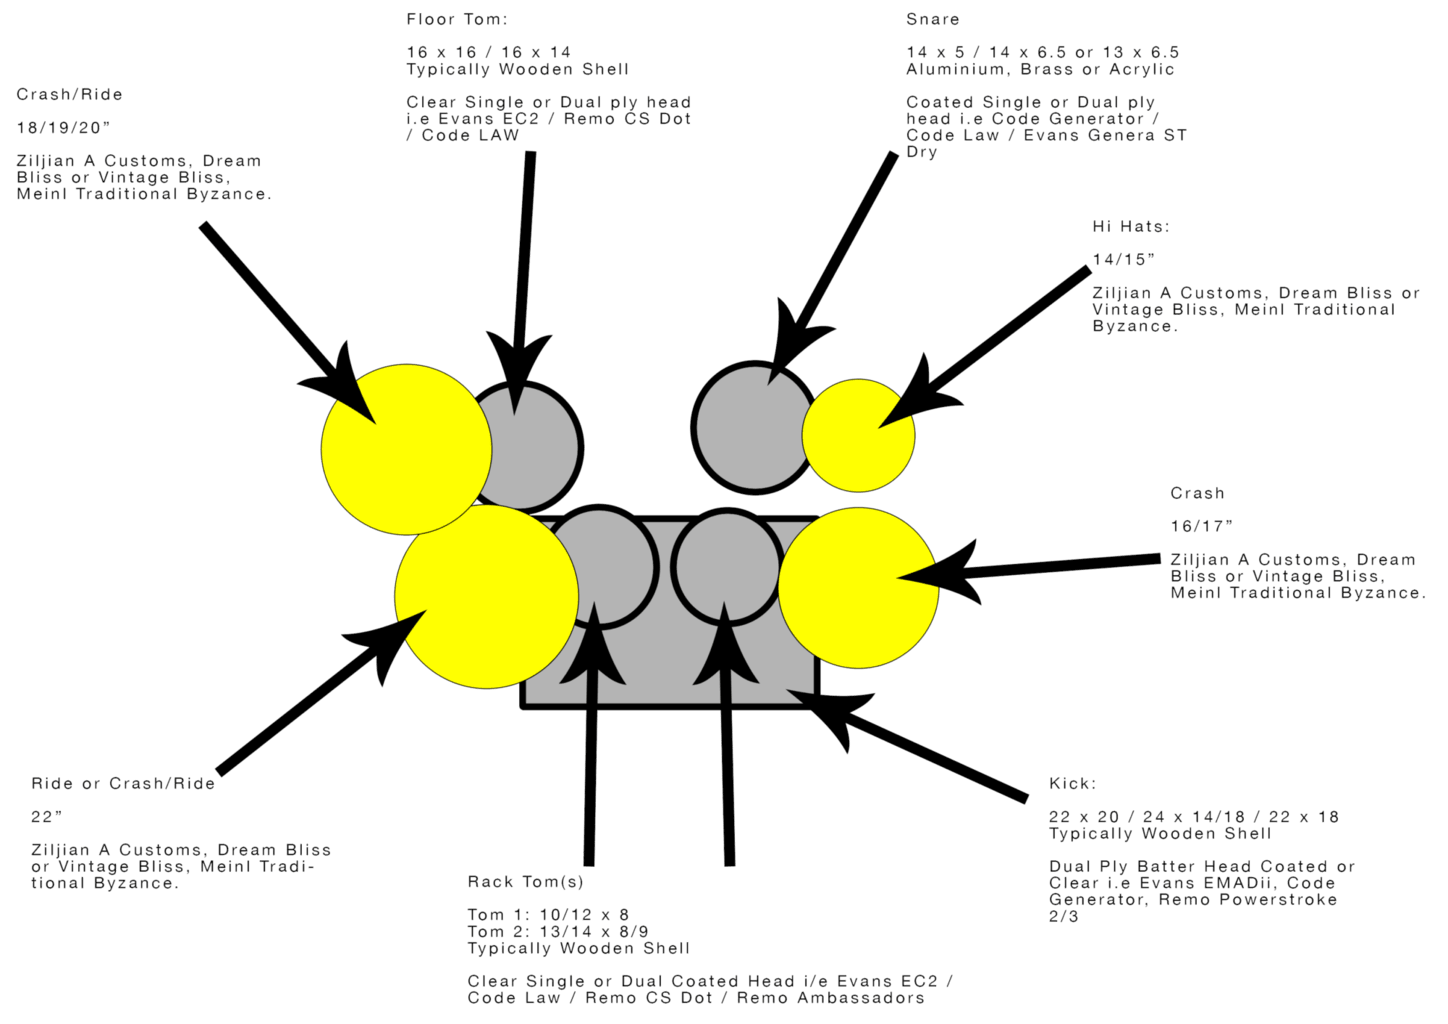
See below for a couple of more in depth kit set ups for a couple of different genres:
Rock/Pop
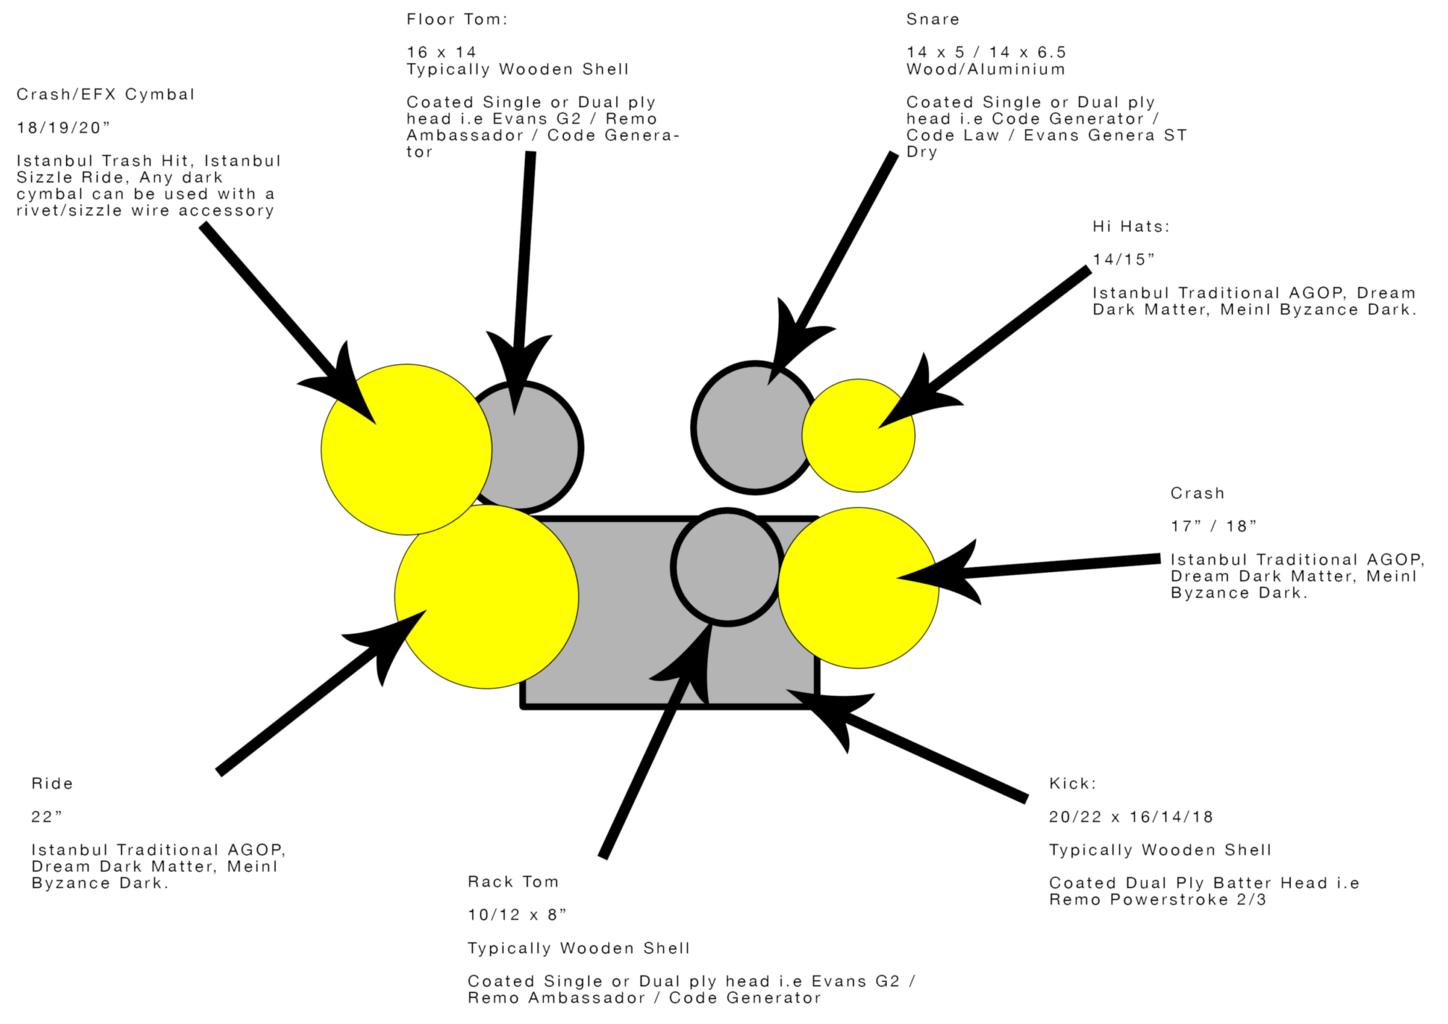
Jazz/Folk
3. Prep Your Kit
3. Prep Your Kit
So once you’ve got to grips with everything in the above sections, it’s time to prep your kit for the studio. Really at this point all that’s left is to re-skin your kit. This is absolutely essential. Fresh heads will make any kit sound infinitely better.
Again, like a lot of the above, heads all sound different, coated, clear, single ply, dual ply, triple ply, reverse dot, power centre etc. This is ultimately down to personal preference but as both a drummer and an engineer my basic tips are to use clear drum heads on the Toms (both rack and floor) something like an EC2, Code Law or Remo CS Dot for rock, metal, pop etc.
They have a very quick attack and ‘thwack’ while maintaining a clear, shortened decay. With Snares I tend to go for coated head, something along the lines of an Evans ST Dry, Code Zero. Using coated heads on snare drums still retains the top end most artists look for while the coating provides a slightly lower mid bump which in a lot of recordings I find tends to get lost. Coated heads will give you a bit more ‘body’ of the drum without having to EQ a lot of 100 – 200Hz.
When it comes to kicks, I have an absolute go to for almost every genre and it is yet to let me down. This is an Evans EMAD2.
It’s a dual ply, clear kick batter head with built in EQ dampening rings. The head is supplied with two different size EQ rings so you’re able to choose whichever suits the song best.
Once your kit has fresh heads on and you’ve tuned it up, the last thing you as an individual need is to play consistently.
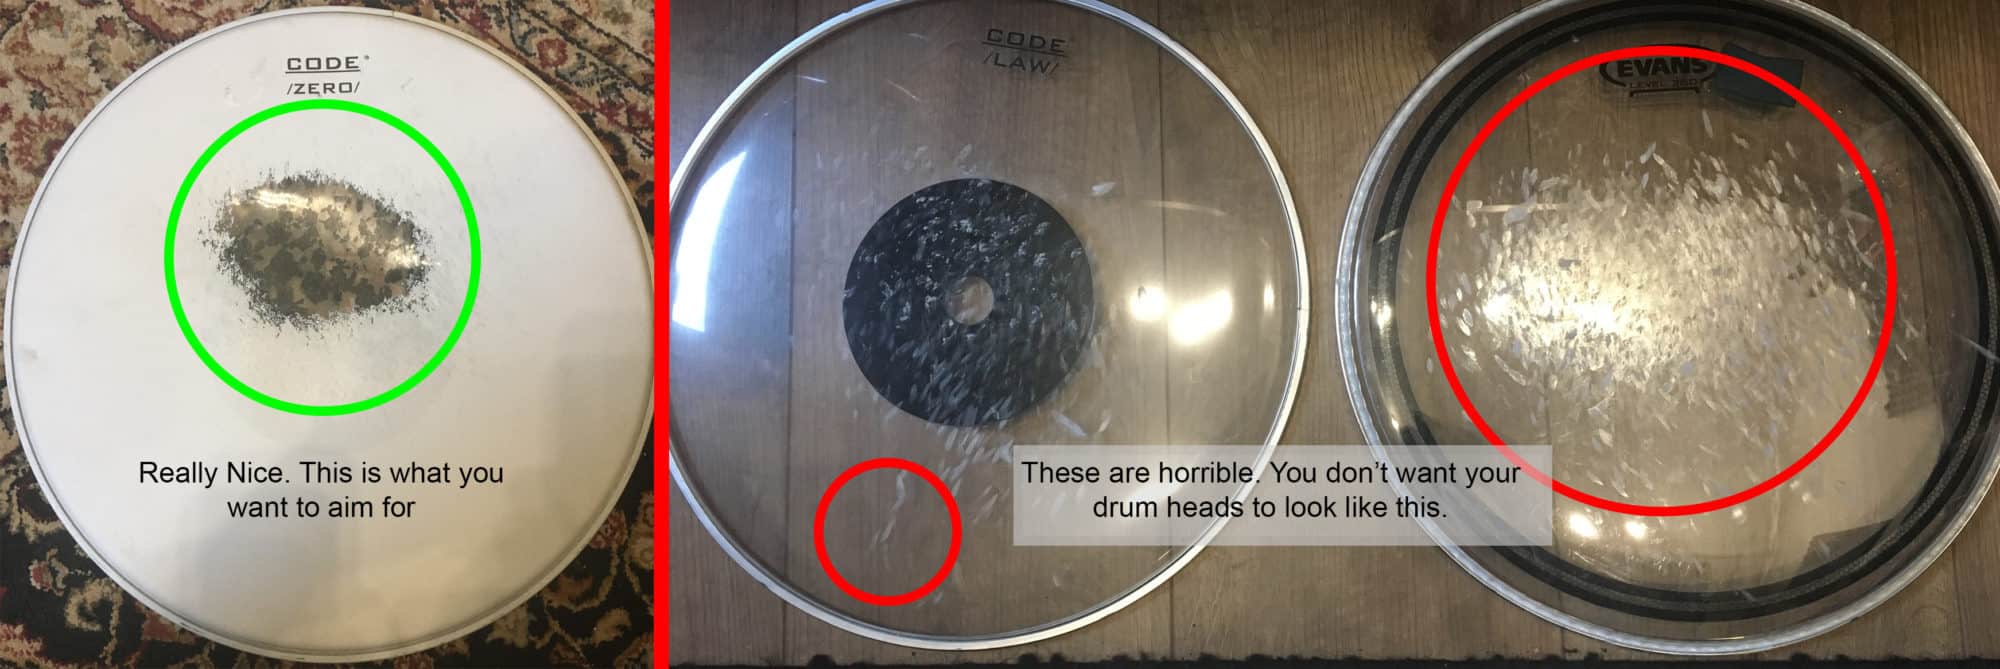
This is a huge part of great drum recording. The centre of the drum head is where your stick is supposed to make contact because this is where the drum sounds best. If you’re hitting all around the drum head you will end up with a very inconsistent overall sound.
Some hits will sound really weak and others will have a huge amount of depth. This is almost impossible to ‘fix in the mix’ without sample replacing the entire stem so the key is to just play as consistently as you’re able. See below for examples of what you should be aiming for:
3. Prep Your Kit
3. Prep Your Kit
The second part of this relates to dynamics, as important as it is to ensure you play your hits consistently, it’s really important to understand your dynamics. Dynamics are key to a ‘human’ performance, if you’re playing every hit at 127 velocity you may as well be using a drum machine however on the flip side, if every hit is all over the place dynamically, you’re recording will be unenjoyable to listen to.
Practice your parts relentlessly, to click, and really focus in on the dynamics of your playing. Do all of this, and you’re in for a quality drum tracking session.
In my experience the key to being the best musician you can be and subsequently the best recording musician you can be is to fully understand the capabilities of both yourself and your instrument together. Get to know your instrument through continuous practice and ‘tinkering’. This goes for essentially all instruments.
There are very few instruments that don’t have auxiliary variables, violas, violins, cellos all have strings, different bows, made of different woods or in some cases plastics. All of these things change the core sound of that instrument just like sticks, heads, material and tuning change the timbre of a drum.
So get to know your gear and experiment and try with different things. Don’t be afraid to mess up tuning or try a metal snare instead of a wooden one, you can only learn from it if it doesn’t work out as well as you’d hoped. After all this, just practice. Non stop. Always practice. Practice anywhere, anytime you’re able to and you’ll be on the way to a much better recording experience and outcome.

About the author
Hamish Dickinson & Phoenix Sound provides a personal, individually tailored recording experience for musicians and businesses in a beautiful purpose-built studio in Mansfield, Nottinghamshire. Hamish works one-on-one with bands and artists across different genres, producing their albums and E.P.s, from first recording, through mixing and mastering, to the final product.
Our Products
-

2in | 2out Audio Interface
-

10in | 6out Audio Interface
-

10in | 14out Audio Interface
-

20in | 24out Audio Interface
-

24in | 32out Audio Interface
-

2in | 2out Audio Interface
-

4in | 4out Audio Interface
-

24in | 24out Audio Interface
-

Everything you need to start recording
-

8 Channel Smart Preamp with AD/DA
-

8 Channel Mic Pre & ADC
-

8 Channel Mic Pre + Tone Control
-

Modular Analogue Recording Console
-

Small Format Analogue Recording Console
-

Small Format Analogue Recording Console
-

Immersive Audio Interface and Monitor Controller
-

Desktop Monitor Controller