


The first step to piecing together a studio is making a list of all the essential gear you’ll need. You’re likely to do loads of research on studio monitors, microphones, headphones, etc. There is one piece of the studio puzzle that deserves extra attention, and that’s an audio interface.
An audio interface is the centerpiece of all your studio gear. Everything communicates through your interface to your source, whether it be a computer or a hardware sequencer. These little devices are powerful and can vastly improve your recording and playback abilities in the studio.
Understanding an audio interface down to the finest detail is something that might seem unnecessary to you, but I’m here to show you why it can be beneficial to do so. The iD14 (MKII) is a prime example of everything an audio interface is capable of, and it will be the star of the show as we move forward.
What Makes Audio Interfaces So Important?
Most computers, tablets, and smartphones have built-in sound cards that convert digital signals to audio signals. In this case, we’re probably talking about the sound card on your computer.
The reality is that the built-in sound card on your computer is pretty rudimentary. It has limitations in the number of signals or channels it can handle. It simply wasn’t made for professional quality audio recording or playback. Not only that, the computer itself probably doesn’t have the right amount of connectivity options you need for your gear.
That’s where an audio interface comes in. To put it simply, an audio interface is a supremely upgraded sound card.
A quality interface, like the iD14 (MKII), is built to handle almost anything you throw at it. It will allow you to record/playback multiple channels of audio with ease, and with almost no latency. It will also immensely upgrade your connectivity options.
An audio interface serves as the main hub of your studio. You’ll need it to connect your studio monitors, your microphones via XLR or TRS, and so much more. In a nutshell, if you plan on recording or monitoring audio in a music production or sound engineering setting, you’ll undoubtedly need a powerful interface.
How Do Audio Interfaces Work?
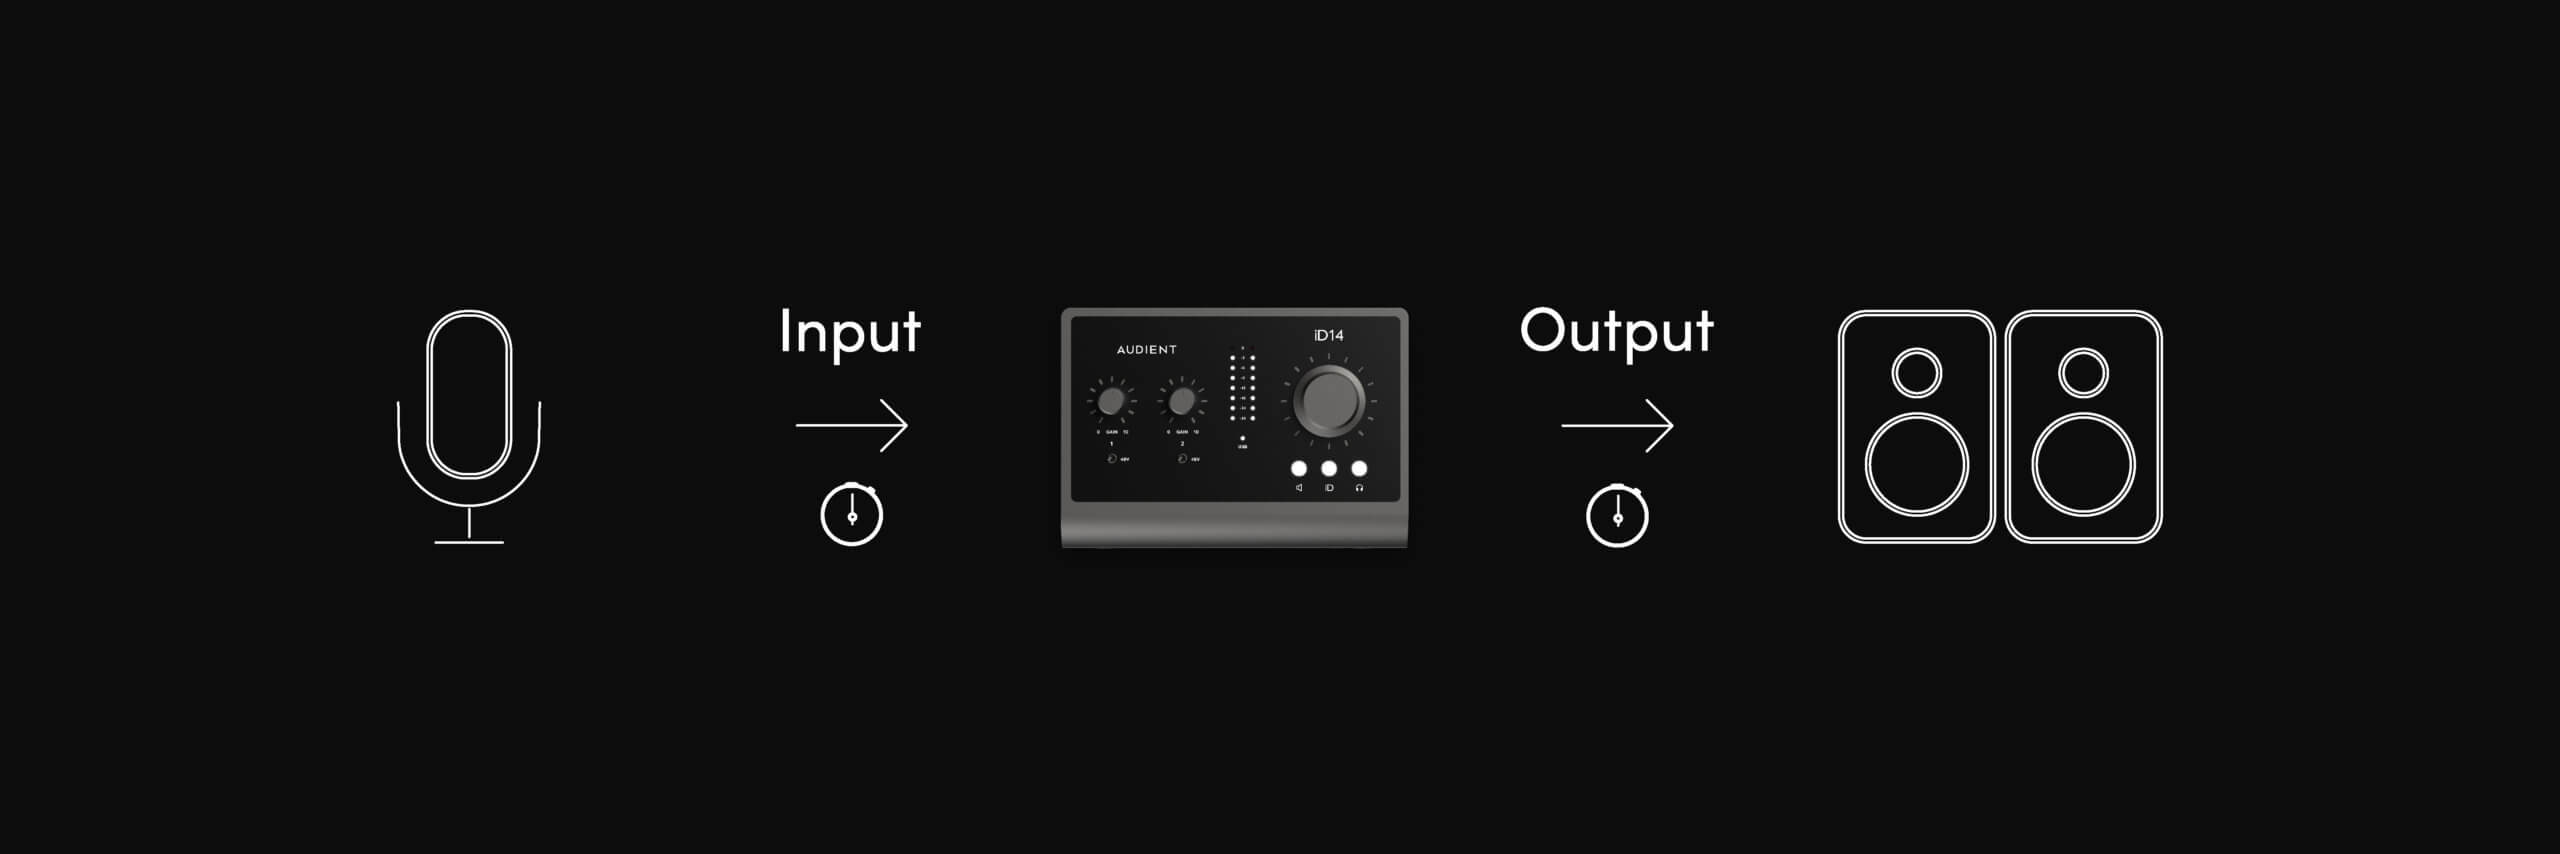
Audio interfaces provide many different important functions, but their main job is conversion. Back in the day, when audio recording was strictly analog, everything was siphoned through a mixing desk and put on tape.
Nowadays, in the digital era, everything related to audio recording is done in a series of signals. An audio interface simply takes both digital and analog signals — like those that come from guitars, microphones, MIDI keyboards, etc. — and converts them into a format that your computer can recognize and then back to analog so you can monitor them from your headphones or speakers. Once on your computer, you can further manipulate the signal in your DAW or any other type of sequencer.
Most interfaces can convert these signals two-way, meaning in both analog to digital (ADC) and digital to analog (DAC). These types of conversions are carried out by the interface itself, and most audio interfaces feature multiple channels of each.
Audio interfaces also come with built-in microphone preamps, which are incredibly important for capturing studio quality recordings. Preamps are needed for bringing microphones up to line/mic-level, but we’ll get into that in more detail later on.
Additionally, certain interfaces — like the iD14 (MKII) — can serve as amplifiers for high-impedance headphones so you don’t need to get a separate, dedicated device to handle that.
Overall, in every input and output on an audio interface, a conversion of signals is happening. Also, a “gain boosting” of certain signals is happening as well. All of this signal conversion goodness helps to create high-fidelity audio recording and playback in your studio.
Now, let’s pop open the hood of the iD14 (MKII) and get into the technical stuff. Let’s start off with connectivity.
Connectivity
When looking closely at an audio interface, the first consideration should be how you’re going to connect it to your computer. Audio interfaces offer a number of different ways to do this; some are better than others.
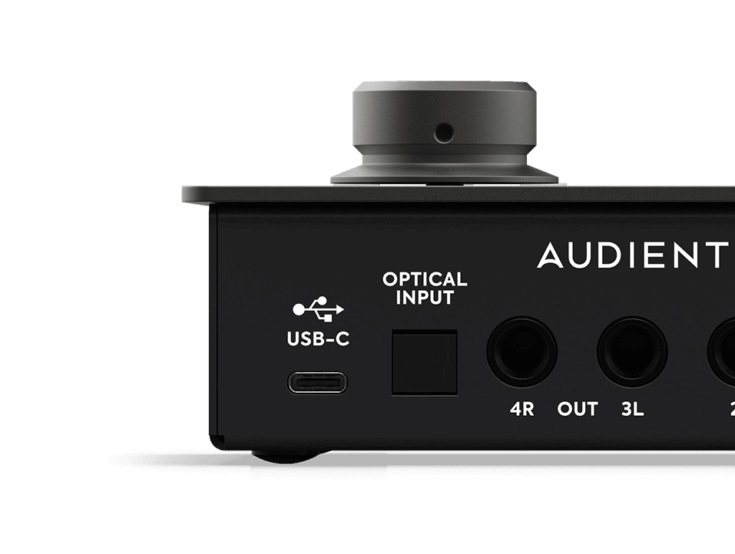
For instance, the iD14 (MKII) connects to your computer via USB-C, which is among the fastest connection types. USB-C interfaces, such as the iD14 (MKII), are also bus powered. This means it doesn’t require an external power supply.
USB-C has quickly become the gold-standard in terms of connectivity on an audio interface, but it isn’t the only form that exists on the market. Here are a few other popular options that you’re likely to encounter:
• USB 3.0, 2.0 and 1.1 – standard USB connectivity is probably the most common type you’ll see offered on audio interfaces. Standard USB interfaces are convenient and easy to set up, but they typically introduce more latency than other connection types.
• Thunderbolt – USB-C and Thunderbolt 3 or 4 are universally compatible. In fact, nowadays they’re pretty much one in the same. There are some interfaces that have dedicated Thunderbolt ports, but it’s all interchangeable. All in all, Thunderbolt is by far one the fastest and most reliable forms of connectivity offered on interfaces today.
• FireWire – at one point in time, FireWire was the standard connection type among interfaces. It was able to transfer data more consistently than USB, and was generally more reliable. You’d be hard pressed to find an audio interface that supports FireWire nowadays though. Almost no computer has a FireWire port anymore, and you’ll only find interfaces that offer it in used markets.
• PCIe – this is a card-based interface that you install directly into your computer’s motherboard. PCIe does a great job of diminishing latency to almost zero, and it gives you the ability to monitor/record virtually limitless tracks. PCI Express interfaces are very expensive and require quite a bit of technical know-how to install.
So, which connection type is the best? Well, that’s up to you to decide. In my opinion, the best universal option is USB-C. Being compatible with Thunderbolt 3 and 4, on top of the fact that it provides bus power, makes it the most ideal choice.
Inputs & Outputs
In order for an audio interface to do its job, it needs to have plenty of onboard inputs and outputs so you can connect your gear to it. The input/output (or I/O) count of a particular audio interface is the most important specification to keep in mind. The I/O count you need is entirely dependent on what you plan to do with your studio recordings.
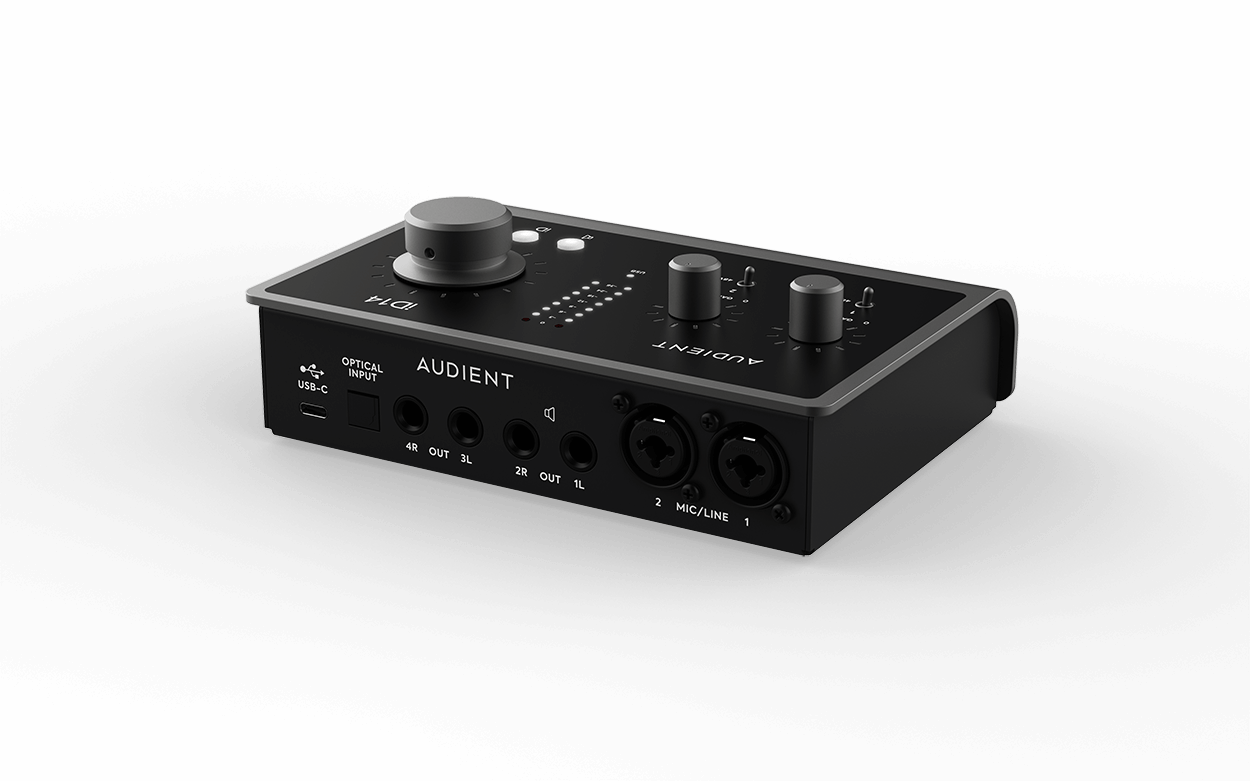
The iD14 (MKII) has a total I/O count of 10 x 6 (10 in by 6 out), which is more than enough for small bands or podcasters. If you’re planning on recording an entire orchestra, then you might need a higher I/O count like what’s offered on the iD22 or iD44.
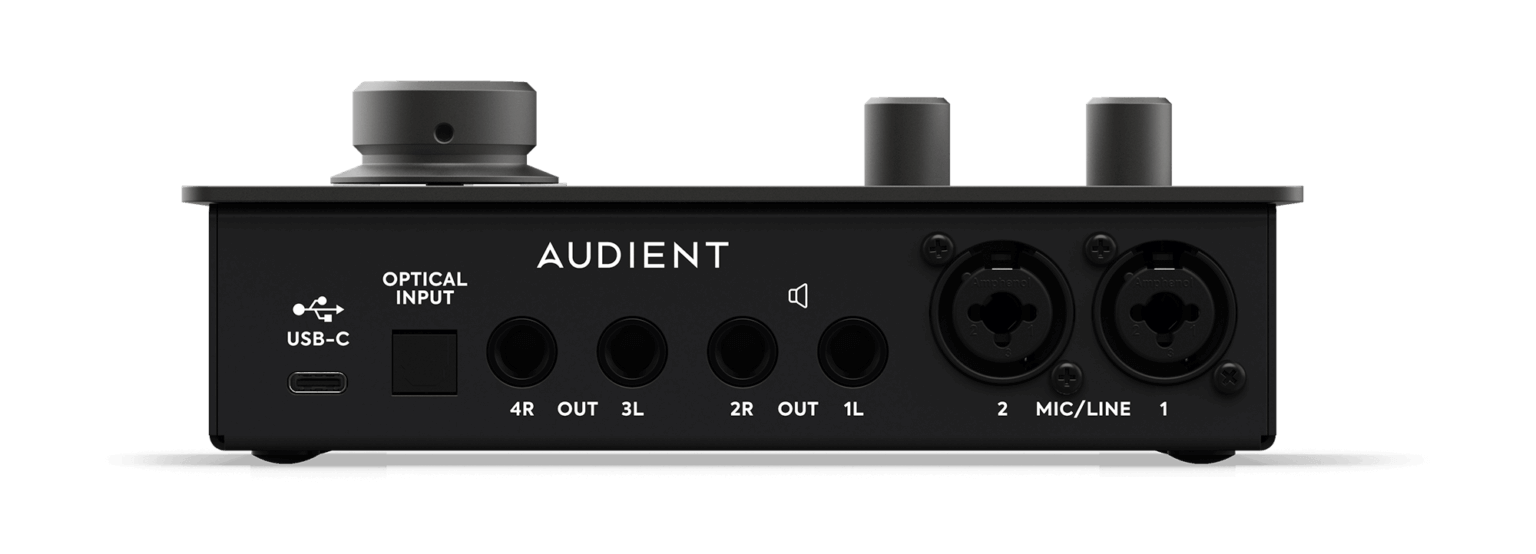
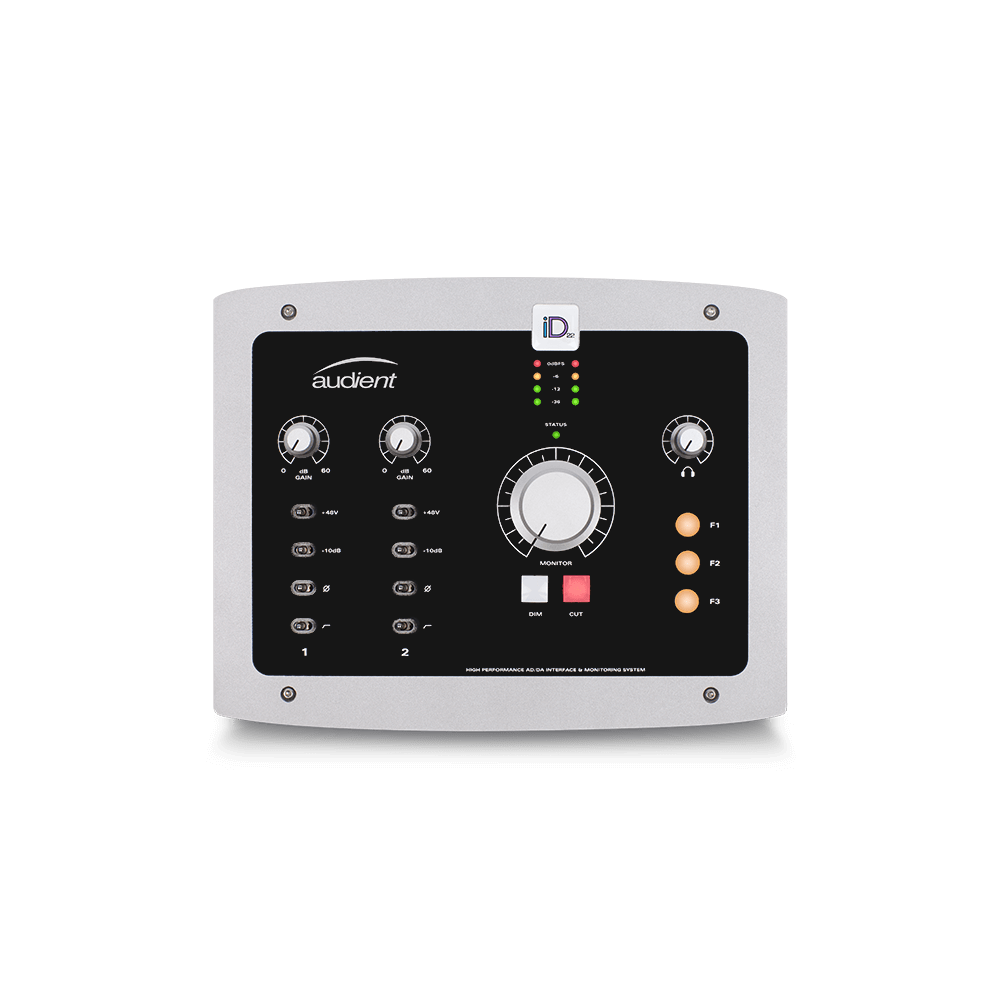
Focusing on the iD14 (MKII), you’ll see that there are a number of ports on the back panel. It includes 2 XLR/¼” combo line/mic-level inputs, 2 pairs of ¼” balanced line outputs, and 1 Optical Toslink input that supports ADAT or S/PDIF.
Let’s break these down individually:
• XLR/¼” Combo Line Inputs – XLR inputs allow you to record audio signals captured through a microphone. Every XLR input on an audio interface usually has a mic preamp that powers it and brings the low-level signal to line/mic-level. You can also use ¼” line-level TRS jacks. We’ll talk more about preamps later on.
• ¼” Balanced Line Outputs – certain devices, like studio monitors, need a balanced line-level output to receive the power they need. Without it, your studio monitors would sound dull, or they might not reproduce sound at all. That’s the important role these outputs have for routing audio to studio monitors or any other low-level external gear.
• Optical Input – the digital optical input supports either ADAT or S/PDIF, giving you the ability to expand the interfaces I/O count by adding up to 8 mic pre inputs. This is especially useful for those of you planning to record an entire band. As time goes on, and you expand your gear, your interface can expand with you using this handy input.
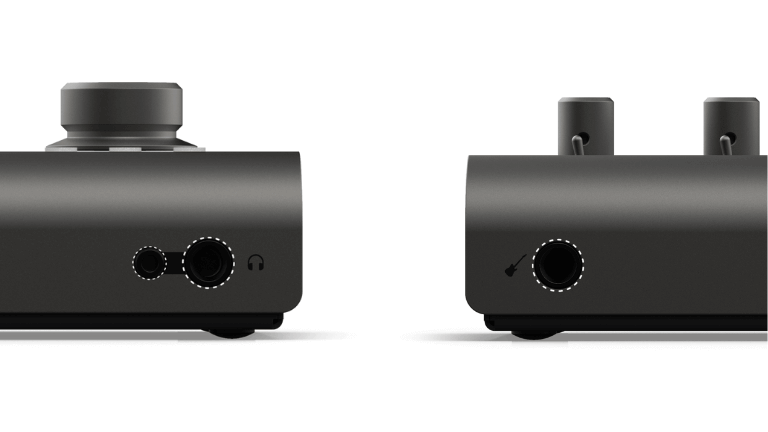
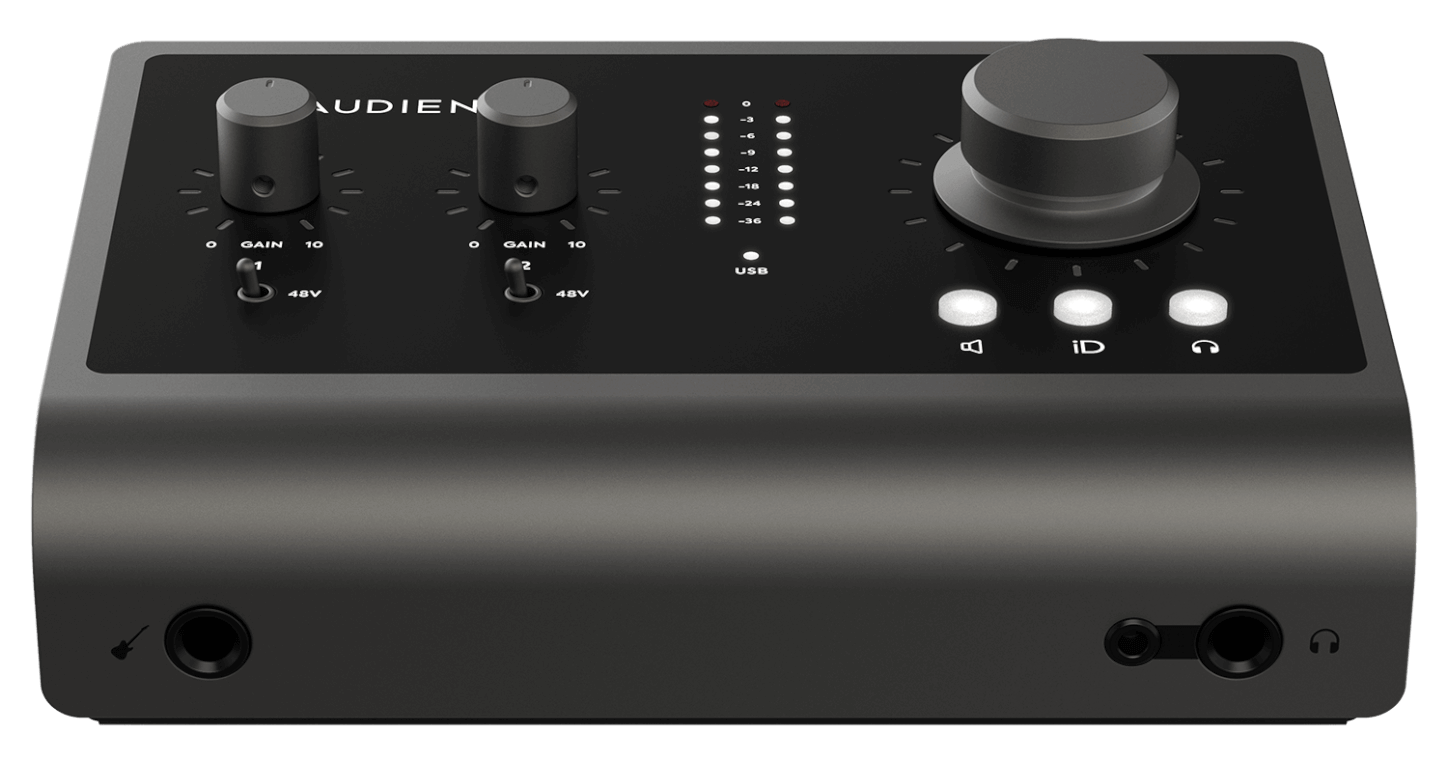
On the front panel, the iD14 (MKII) has dual headphone outputs, one being ¼”, and the other being a ⅛” jack. There is also 1 JFET instrument input.
Once again, let’s look a little closer at these:
• Dual Headphone Outputs – you won’t see this on every interface out there. Usually you’ll see one or the other, but the iD14 (MKII) has both a ¼” output and a mini ⅛” headphone jack. This is great if, like me, you tend to lose your headphone adapter regularly. The built-in headphone amp can also power headphones up to 600Ω.
• JFET Instrument Input – this input runs through a discreet DI (direct injecting) circuit that helps to ensure accuracy when recording. In most cases, you’d need an external DI box to record guitar, bass, synths, or any other external instrument directly through an audio interface. This can be a pain to set up. The JFET input makes the process a whole lot easier. Don’t forget that you’ll need a standard ¼” TRS jack for this port.
The I/O offerings on the iD14 (MKII) should be more than sufficient for most small home studios. It gives you all you could ever need to record multiple channels of audio simultaneously. It also gives you plenty of line outputs for hooking up your studio monitors and whatever else you might need them for. If that wasn’t already enough, you also have the ability to record instruments directly through the iD14 (MKII), which is a feature that’s seldom seen on other interfaces.
Plan For Expansion
Now, there’s a plethora of other input and output types out there, such as Word Clock, DB-25, and 5-pin MIDI, just to name a few. Most of these are found on ultra-advanced rackmount interfaces and are only necessary when you really start leveling-up your studio down the road.
In the meantime, it’s extremely important to find an interface that offers some form of expansion. You never know where your music will take you. The optical input on the iD14 (MKII) is a good example of setting yourself up for the future.
Latency
Latency refers to the lag between your audio signal and source reproduction. If a device has a high amount of latency, it will introduce a significant delay to the signal flow. Imagine striking a chord on your keyboard and you hear the playback a half second later. This is a problem that can easily snowball into something much larger in your studio.
What’s worse is that these delays can be hard to notice by the untrained ear. You might only notice it after you’re deep into a project.
The point is that you should try your hardest to avoid introducing latency into your studio, and a good first step is investing in a great audio interface.
I mean, as I’ve said many times, the audio interface is the hub of your studio. You can stop the latency snowball before it even starts with an interface like the iD14 (MKII). The USB-C connectivity, in conjunction with the iD Mixer software, both help to achieve ultra-low latency. The Thunderbolt 3 and 4 compatibility certainly helps as well.
Keep in mind that there are many factors that contribute to latency, not just the audio interface. Make sure that all of the devices you put through the interface are as “low-latency” as possible.
Mic Preamps
An audio interface wouldn’t be an audio interface without onboard microphone preamps. Mic pres boost levels specifically in “gain” which can potentially introduce a lot of white-noise or high-frequency feedback. With that, higher-quality preamps tend to only introduce a desirable warmth to the audio signal as opposed to unwanted noise.
Preamps are sure to add some color to your recordings; it’s just the nature of how they work. This isn’t a bad thing by any means. In fact, every preamp in every audio interface will sound slightly different.
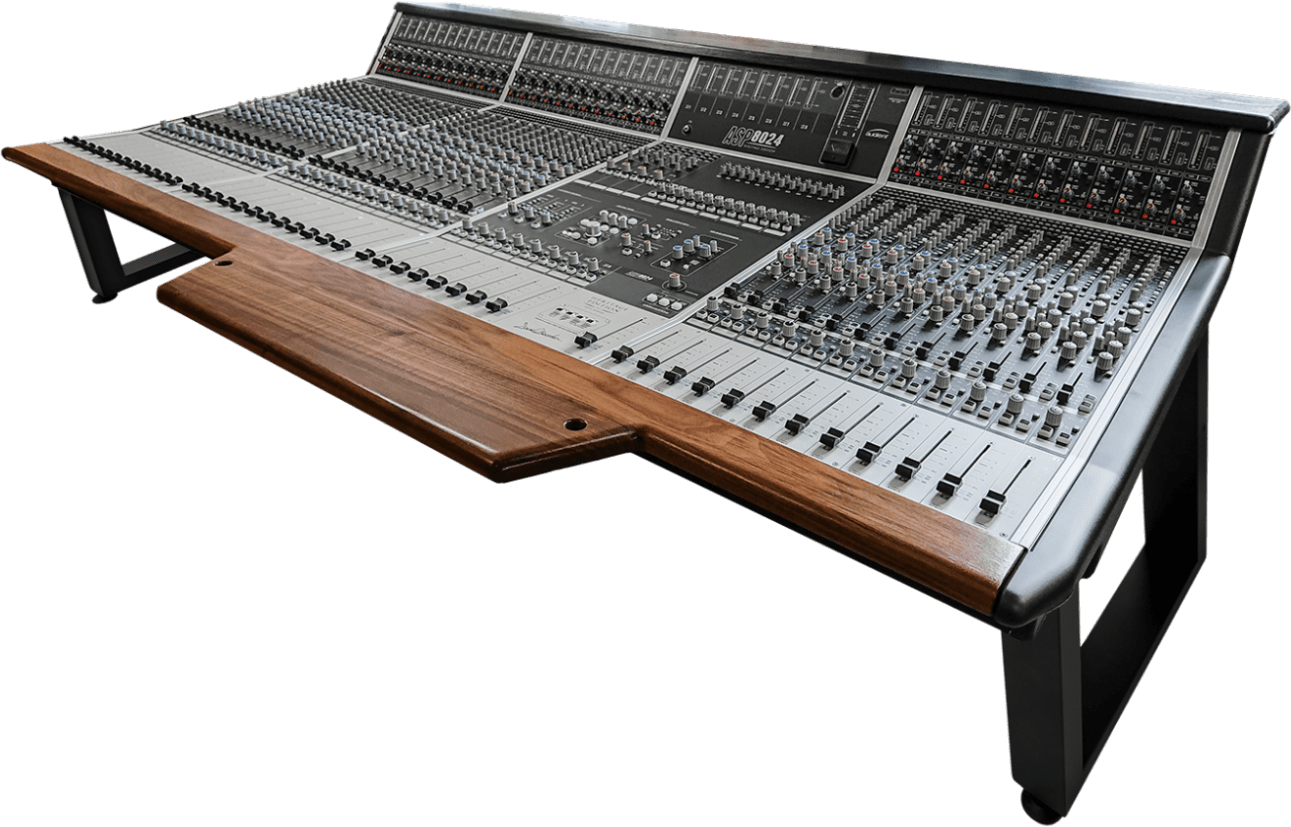
For example, the iD14 (MKII) features two Audient Class A console mic preamps with true 48v Phantom Power. These are the same preamps seen in the renowned ASP8024 Heritage Edition recording console. These mic pres are specifically designed to deliver ultra-low noise and little to no distortion, all while adding a touch of analog warmth to your recordings.
The mic pres on the iD14 (MKII) have a specific sound that you’d have to hear for yourself. That’s the case with most audio interfaces for that matter.
The important thing with preamps is not to cut corners. They are a very important factor of an audio interface that warrants a lot of research to make sure they’re of the utmost quality.
Phantom Power
Phantom power (+48v) has only one role, and that is to provide the proper amount of power to condenser microphones. It works by sending a DC current through a compatible XLR cable to power the microphone’s diaphragm and internal amp.
Without internal Phantom power, you’d need an external power source to bring a condenser mic up to mic-level. Unlike many modern audio interfaces, the iD14 (MKII) has true Phantom power in each of the two mic pres as opposed to ‘always on’ global phantom power found in other interfaces
In summary, microphone preamps, Phantom power, and XLR cables all work together to bring condenser mics up to mic-level so you can create high-fidelity audio recordings.
Converters
Converters are where all the magic happens in an audio interface. As I said before, most modern interfaces convert signals two-way; analog to digital (ADC) and digital to analog (DAC). The iD14 (MKII) features class-leading converters that do exactly that.
The specs that come into play here are dynamic range, sample rate and bit-depth, all of which you’re very likely to come across when looking at audio interfaces. Most interfaces nowadays will come with adequate specs in this regard, but they’re worth learning about nonetheless.
Sample Rate, Bit Depth & Dynamic Range
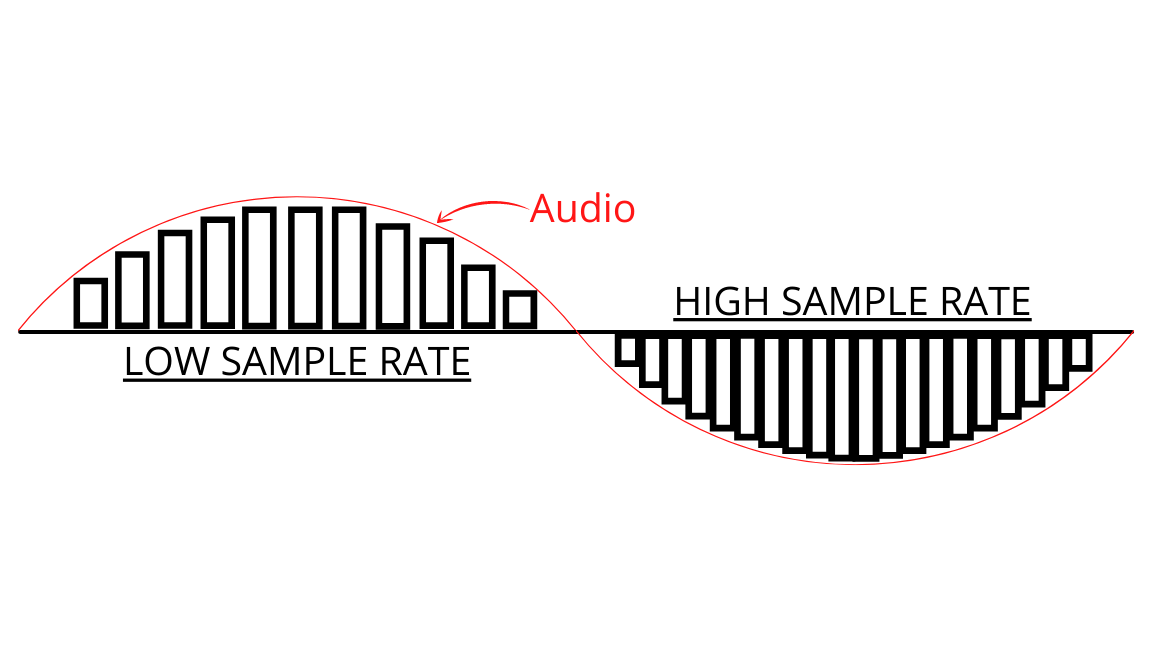
Sample rate refers to the number of audio samples carried per second. This is measured in Hz or kHz. For example, the iD14 (MKII) has a sample rate of 96kHz.
Bit depth describes the resolution of the sound data that is captured and stored in an audio file. The iD14 (MKII) has a max bit depth/resolution of 24 bits. To put this in perspective, the standard bit resolution typically found on CD’s back in the day was 16 bits. A bit depth of 24 or higher means a cleaner sounding sample and a more accurate representation of the source recording.
You don’t have to go crazy with these specs either. 44.1kHz/24bit is a good minimum to shoot for.
Dynamic range describes the difference between the loudest signal and the quietest signal that an audio interface can process. This is measured in decibels (dB). Again, the higher the number the better. For instance, the iD14 (MKII) has a dynamic range of 126dB when converting digital to analog, and 120dB when converting analog to digital.
Onboard Controls
Onboard controls on an audio interface are a necessity. Without them you wouldn’t have any way to adjust volume and gain levels of your headphones or monitors, nor would you be able to tame your recordings as they run through the device.
Typically, control options found on audio interfaces are pretty basic. You’ll usually see one or two gain knobs, Phantom power switches, preamp toggle buttons, and an overall volume control knob.
Most of the time, basic controls are all you need. As long as you can perform basic adjustments, you’re already set.
That being said, some interfaces go the extra mile with their controls. An audio interface with more advanced controls becomes another tool in your arsenal, rather than just a paperweight that you plug your gear into.
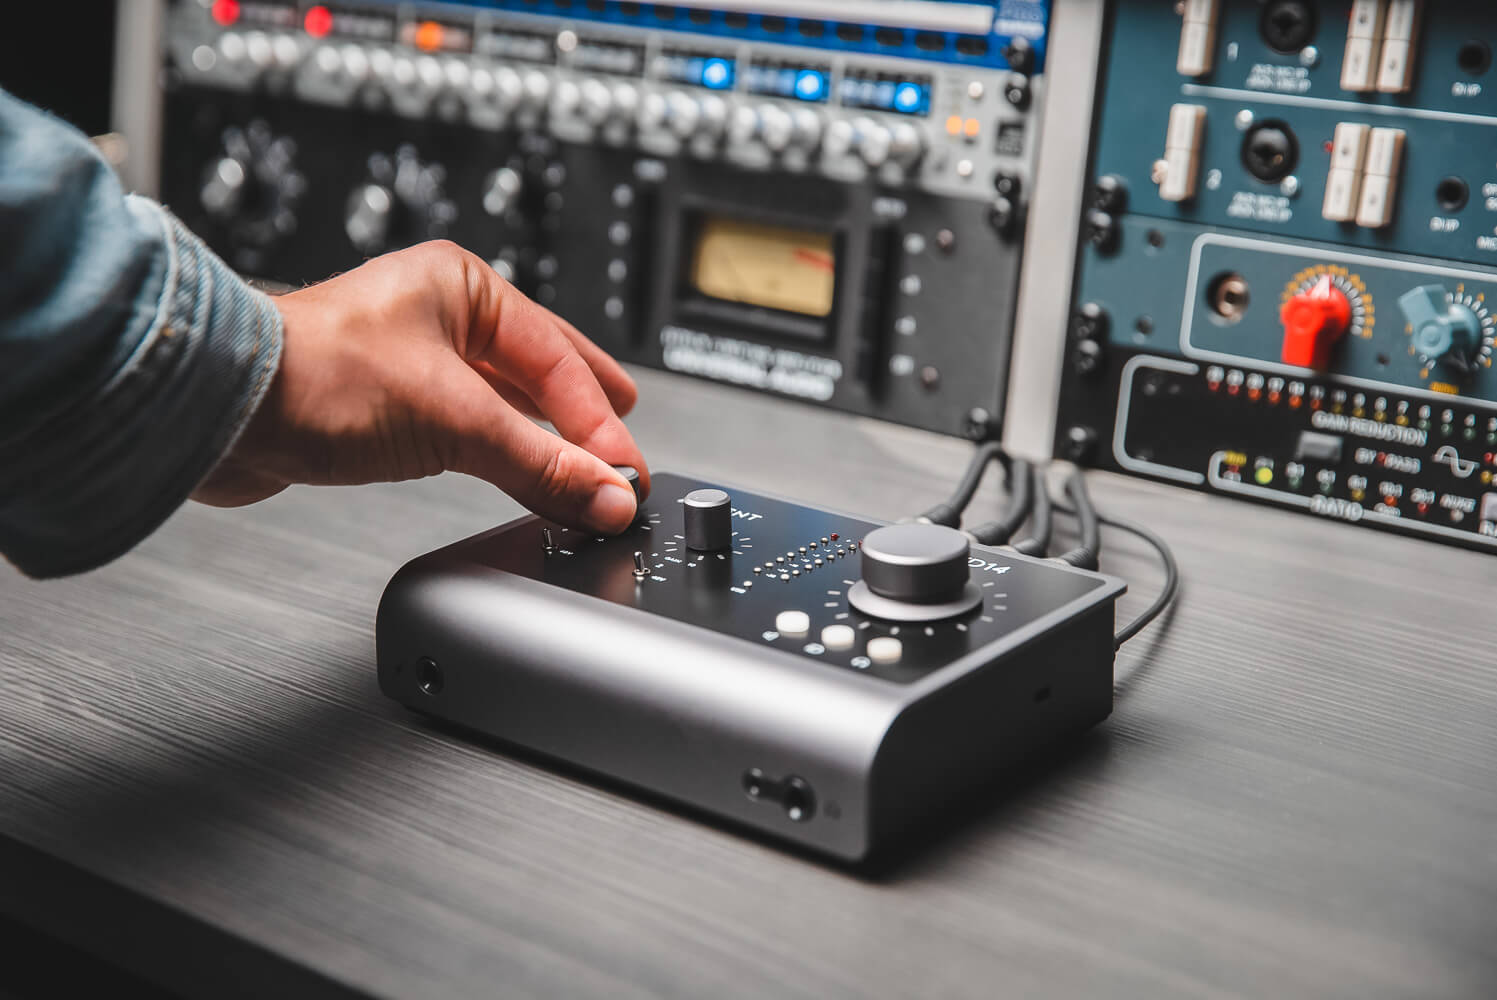
The iD14 (MKII) is one of those audio interfaces that takes onboard control options to the next level. There are the standard rotary gain control knobs, two Phantom power switches, and speaker and headphone toggle buttons.
The controls that go above and beyond are the iD toggle button, and the Advanced Monitor Control/volume knob. Let’s break these controls down a bit more.
When you hit the iD button, it activates the ScrollControl feature and transforms the hardware volume knob into a virtual scroll wheel. It can then be mapped to a number of compatible software parameters. For example, you can set it to control certain bands on your EQ or even the cut-off frequency on a filter. The possibilities are endless!
Outside of ScrollControl, the iD button can be assigned to a number of different monitoring features including DIM, CUT, Polarity Reverse, TalkBack, and much more.
All of these advanced features allow you to have complete and utter control over your studio. There’s nothing wrong with basic audio interfaces with basic controls, but more control options will only improve your workflow in the studio.
Utilizing What You’ve Learned
So, what does all of this mean for you?
Well, now that you have learned everything about the technical side of audio interfaces, it’s time to use this information to choose the right audio interface for your needs.
Again, this is a very important decision to make, so let me ask you a few key questions to lay the groundwork for your research.
How Do You Plan To Use An Audio Interface?
To answer this question, you first need to consider what kind of producer you are, as well as what kind of producer you hope to become. I’d recommend making a two-part list. First, write down what your immediate needs are, and second, write down your goals for the future. From there, you can eliminate audio interface options that don’t fit your criteria.
How Many Simultaneous Inputs/Outputs Do You Need?
If you’re wondering what I/O count to look for, then stick to the rule of thumb — always give yourself more I/O’s then you think you’ll need! That way you’re not limiting yourself from the get-go.
What Connection Formats Does Your Computer Have?
This step is sure to significantly cut down your audio interface options. Ideally, you’d have either USB-C or Thunderbolt 3 and 4 readily available. USB 3.0, 2.0, and 1.1 are adequate fallback options, if that’s all you have.
Final Thoughts
There you have it! I think we’ve gone over just about everything there is to know about audio interfaces. We’ve covered a lot of ground, but these devices definitely require a detailed explanation.
I think the main takeaway here is that you shouldn’t settle for a halfway decent audio interface. Consider putting away a few extra bucks here and there, and save up for a more capable interface.
The iD14 (MKII)I is a great representation of an audio interface that checks all of the boxes. It makes for a great starting point for beginners, but also gives veterans everything they need and more. It encapsulates everything we’ve learned today to the finest degree.
Remember, sound production of any kind is a never-ending, ever-expanding journey. A versatile audio interface is the first step in laying the path for your passions, and moreover, your career as a producer.

About the author
Jeremy Bongiorno has been a musician for over 15 years. From touring the country in a 5-piece band, to producing his own sounds at home, he’s seen all sides of the industry. When he’s not working on a new song, you’ll most likely find him writing about all things related to home studios on his site Studio Frequencies.

Our Products
-

Interface audio 2 entrées - 2 sorties
-

Interface audio 10 entrées - 6 sorties
-

10in | 14out Audio Interface
-

Interface audio 20 entrées - 24 sorties
-

24in | 32out Audio Interface
-
Interface audio 10 entrées - 14 sorties
-
Interface audio 10 entrées - 4 sorties
-

Interface audio 2 entrées - 2 sorties
-

Interface audio 4 entrées - 4 sorties
-

24in | 24out Audio Interface
-

Tout ce dont vous avez besoin pour débuter l'enregistrement
-

8 Channel Smart Preamp with AD/DA
-

Préampli micro 8 canaux avec CA/N
-

Préampli micro 8 canaux + Tone Control
-

Console d'enregistrement analogique modulaire
-

Small Format Analogue Recording Console
-

Small Format Analogue Recording Console
-

Immersive Audio Interface and Monitor Controller
-

Contrôleur de monitoring de bureau
-
Contrôleur de monitoring multicanal