


In the world of audio, ‘dynamics’ refers to the volume contour of a signal over time, whether that signal is an individual instrument or voice, a full mix or anything in between. Clearly, dynamics are an essential consideration in all forms of music production, and knowing how to take control of them, both correctively and creatively, is essential if you want to get your tracks sounding as professional and polished as possible.
As well as those that come bundled with your DAW, there are endless dynamics shaping plugins on the market with which to automatically apply volume changes, and most of them fall into one of a few very well established categories. Here, then, we’ll guide you through those categories, and tell you what you need to know to get started with them.
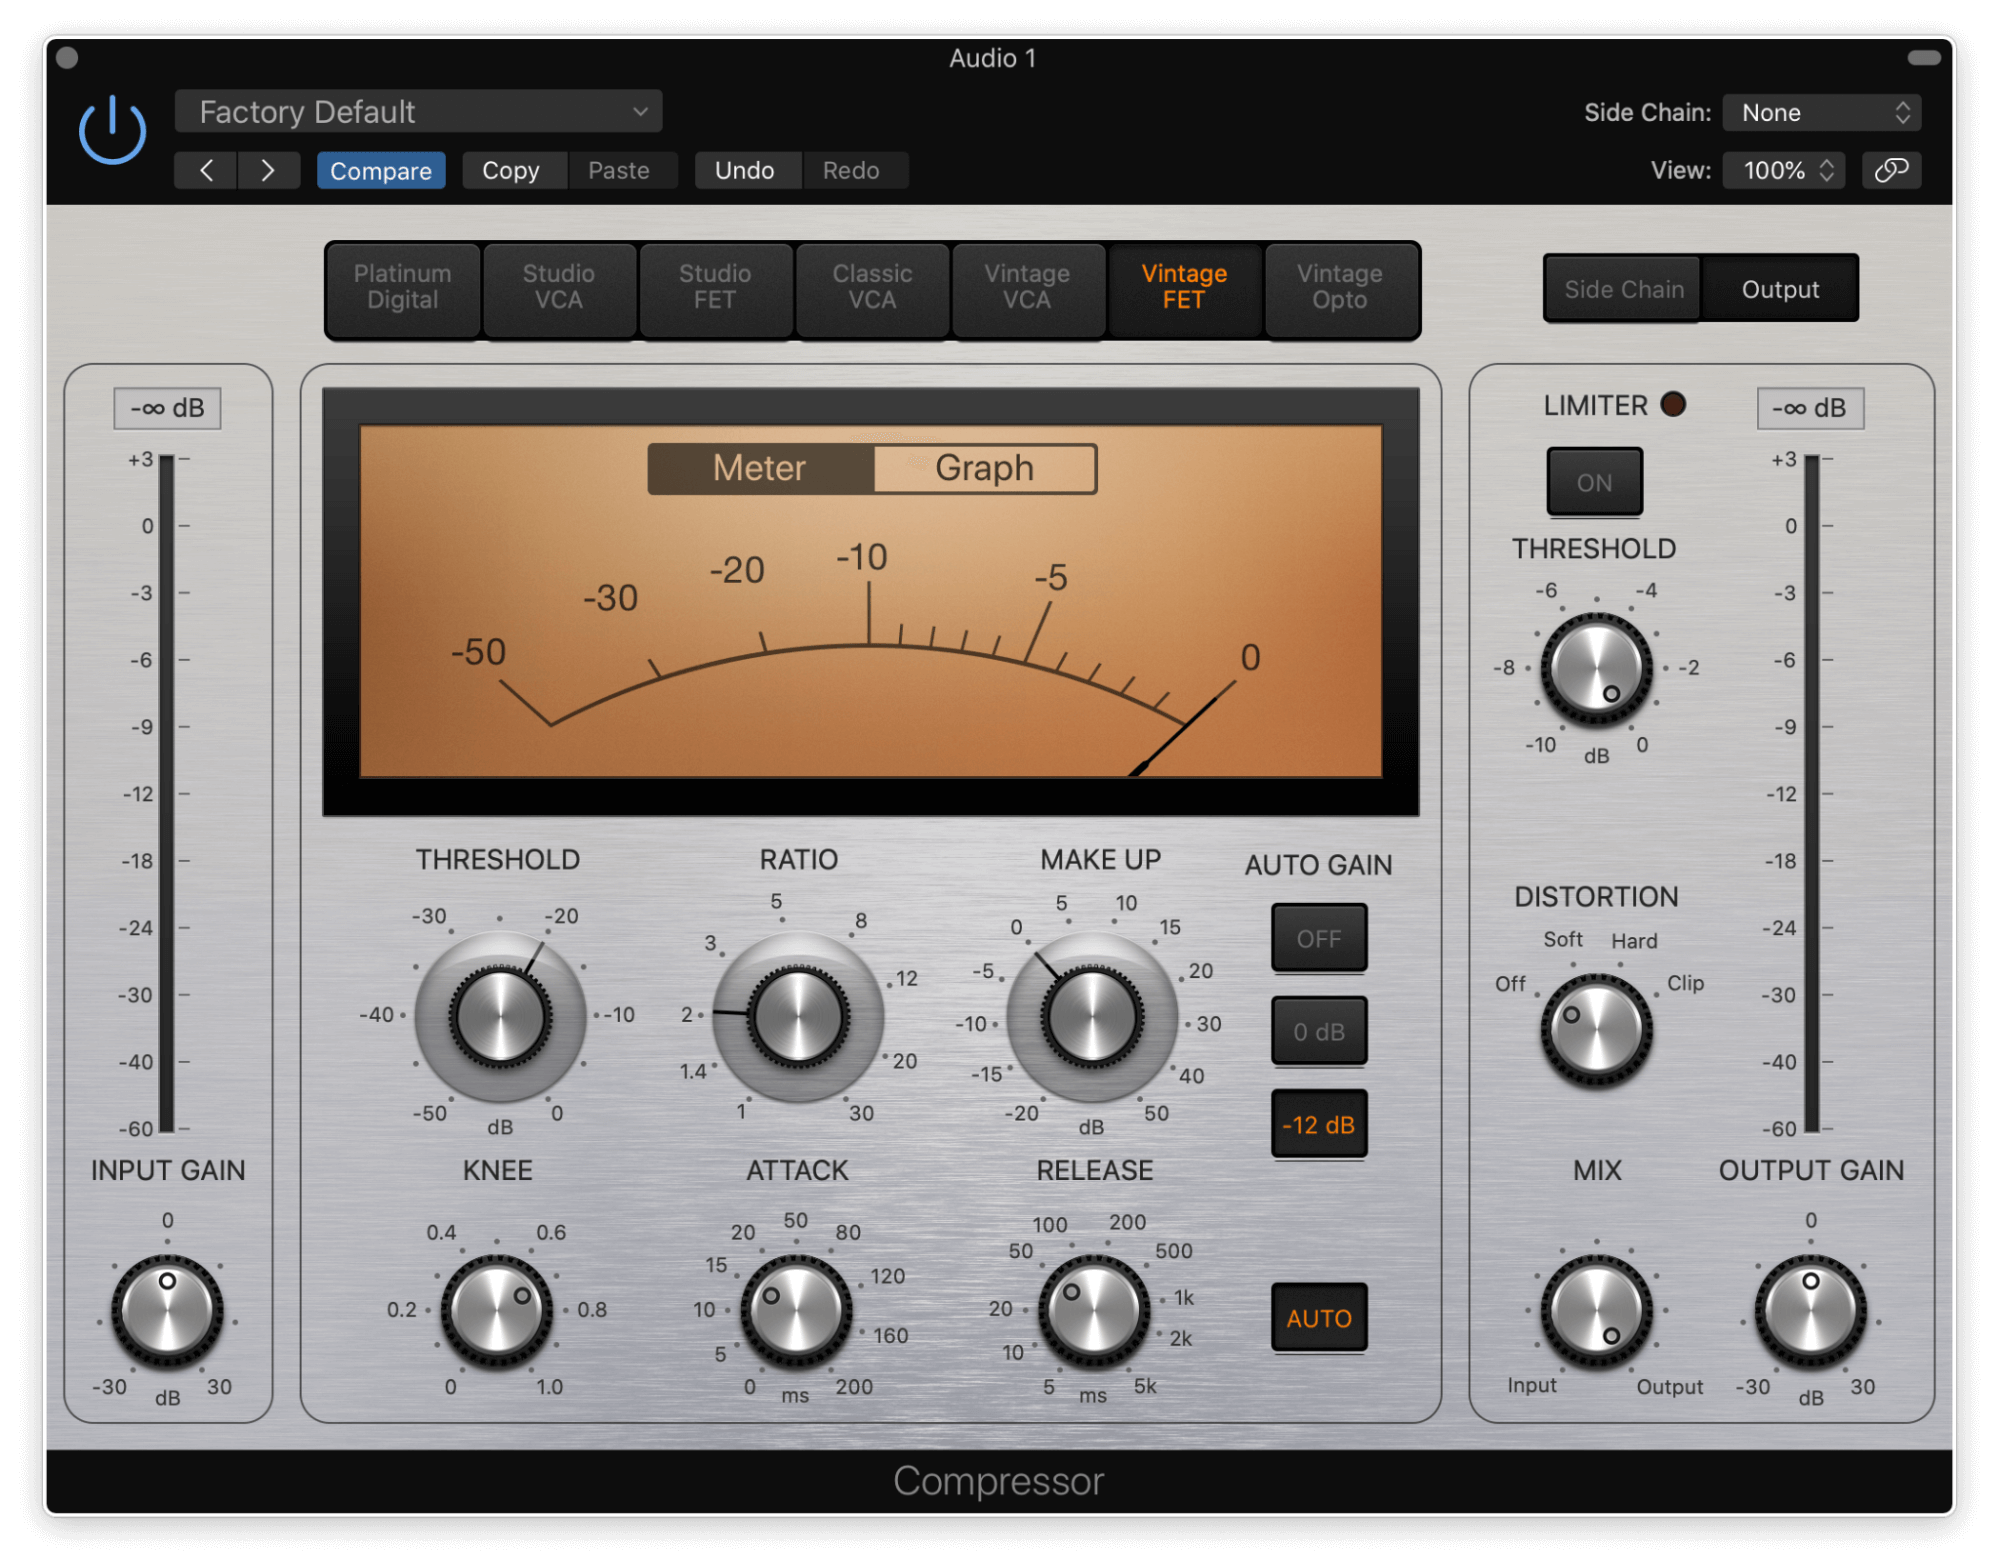
Compression
One of the most ubiquitous processes in music production, compression is the reduction in dynamic range of a signal – that is, the difference in volume between its quietest and loudest parts. It’s called on for everything from simple levelling out of fluctuant vocal and instrument tracks to adding weight, thickness and energy to drums and percussion; and in a general sense, you can think of compression as your go-to tool for making any sound more dynamically consistent and/or louder as a whole.
The reduction in dynamic range is brought about by lowering the volume of the loudest parts of the signal, thereby bringing them closer to the quietest parts. Two fundamental controls govern how this is implemented: the Threshold sets the level in decibels (dB) that the signal coming into the compressor has to exceed to trigger compression, while the Ratio determines just how much compression is applied. The first number in the Ratio specifies the amount by which the signal has to exceed the Threshold to rise in volume by the second number, which is always 1dB. So, for example, if your Threshold is set at -10dB and your Ratio is set at 5:1, the input signal will need to exceed -10dB by 5dB – ie, reaching -5dB – to actually rise in level at the output by just 1dB. Thus, the difference between the parts of the signal below and above the Threshold is reduced.
As well as Threshold and Ratio, your compressor will likely feature Attack and Release controls, and these establish how quickly the compressor applies compression after the Threshold is exceeded (Attack), then ‘withdraws’ it once the signal drops below the Threshold again (Release). The idea is to set the Attack so that the initial transient of, say, a snare drum is allowed through with full force – maintaining the instrument’s vital power and punch – before the compressor takes control of the rest of the sound, then backs off again at a musically meaningful rate afterwards. We’re usually talking about very short periods of time when it comes to Attack – milliseconds or even microseconds – while Release times will be longer, sometimes ranging up into several seconds.
Your compressor might also include a Knee control, which sets the shape of the transition curve from uncompressed to compressed at the Threshold. In the default ‘hard’ Knee state, the compression amount ramps up in linear fashion as the input gain increases, while a ‘soft’ Knee introduces compression more gradually, working the Ratio up to its full value as the gain rises above the Threshold.
Finally, at the very end of the compressor’s signal path, the Makeup Gain control is used to raise the volume level of the compressed signal at the output, which will inevitably have dropped somewhat. The end result of all this is an increase in overall loudness!
Compression is a cornerstone of audio engineering, and you can expect to use it a lot, since most instrumental and vocal recordings will require at least a bit of volume levelling to maximise their presence in the mix – not to mention the hugely beneficial creative possibilities it brings to drums and percussion. Find out more in our dedicated Beginner’s Guide.
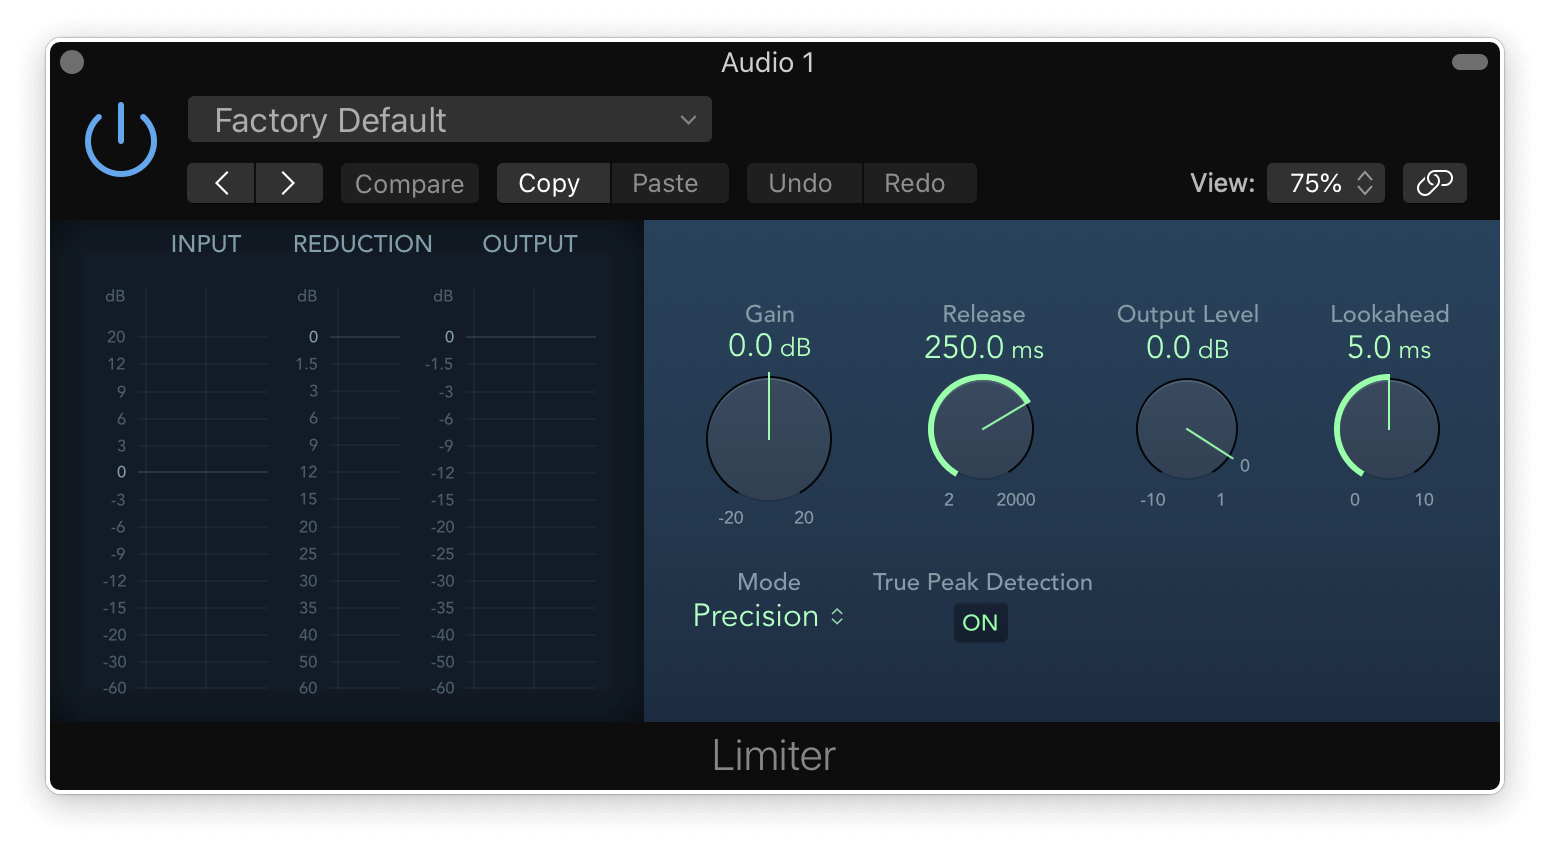
Limiting
Limiting is essentially extreme compression, imposing a super high (all the way up to infinity:1, in fact) Ratio to effectively prevent the input signal from exceeding a specified volume level at all. The most important control in a Limiter is the Ceiling, which sets the maximum level at the output: whenever the input rises above the Ceiling, it’s ruthlessly compressed to bring it back down. A limiter’s attack time will usually be instant and fixed, but the Release time will be adjustable in order to correct for distortion artefacts and audible ‘pumping’.
Limiting is primarily deployed when you need to prevent a digital audio signal from exceeding 0dBFS, that being the point at which wholly undesirable clipping distortion occurs. It’s a key component in the mastering engineer’s processing chain, since clipping is obviously a strict no-no at the mastering stage, but is also useful for reining in wildly peaky instrument and vocal tracks, and busses.
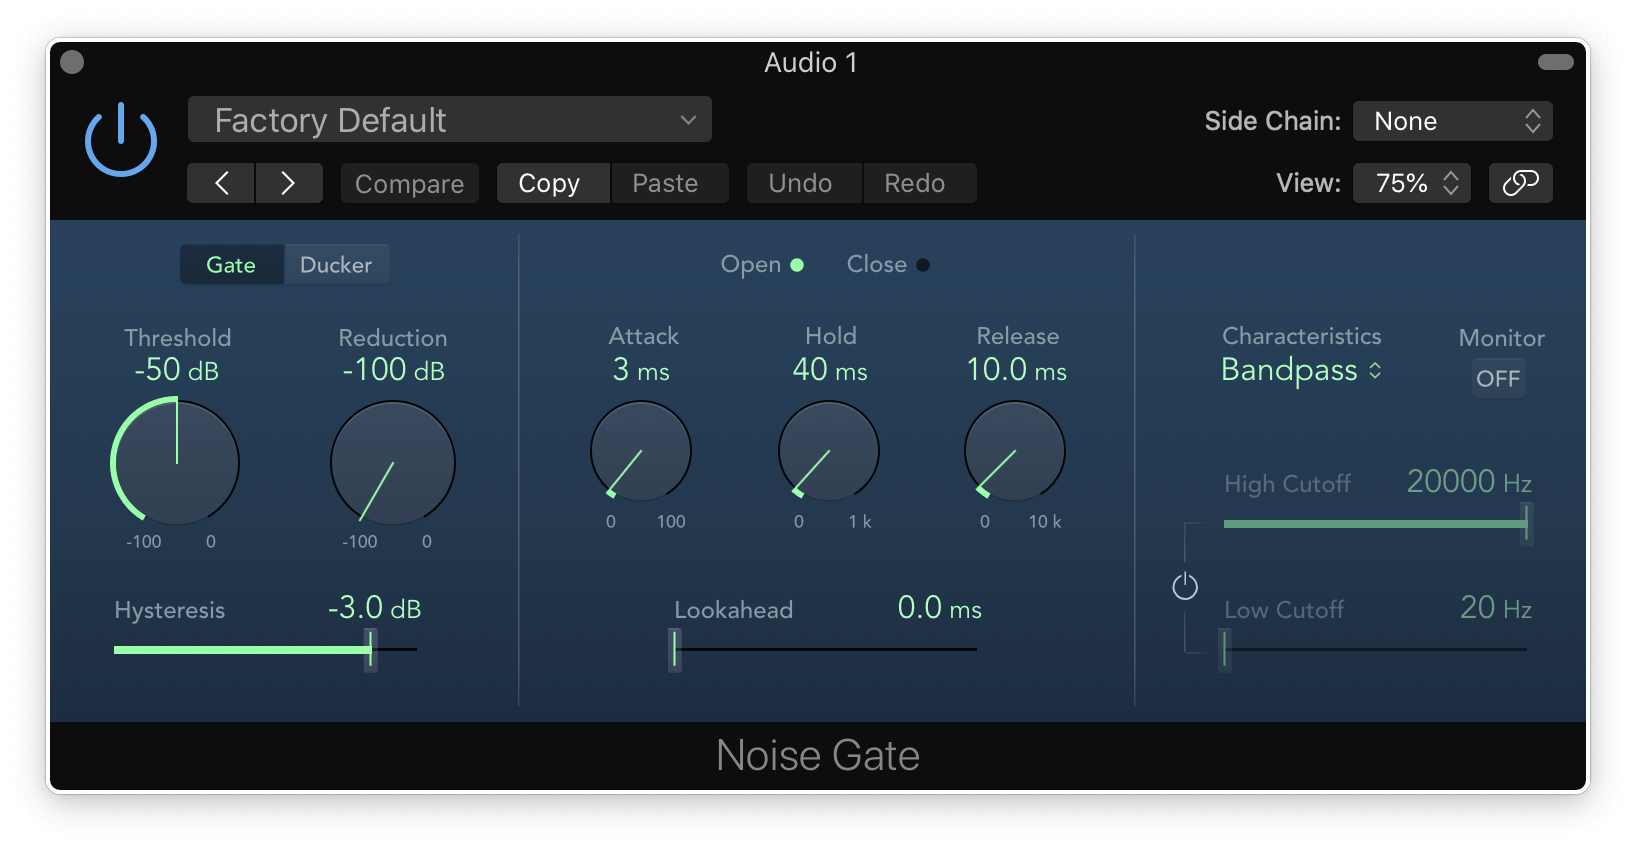
Expansion and gating
Expansion is the opposite of compression, increasing the dynamic range of a signal by either lowering the volume of the input signal whenever it falls below the Threshold (‘downward’ expansion) or raising it when it goes above the Threshold (‘upward’ expansion), according to the specified Ratio, which, logically, is inverted from its compression equivalent – 1:5, for example. The main reason to fire up an expander is to reduce background noise in live recordings – amplifier hum, microphone bleed in individual multitrack drum channels, etc – but expansion can also be used to restore dynamic variance in over-compressed parts, to an extent.
Just like limiting relative to compression, gating is an extreme form of downward expansion, dropping the signal to silence (-inf dB) whenever it falls below the Threshold – or, to put it more literally, only allowing the signal through the conceptual ‘gate’ whenever it rises above the Threshold. A gate will include Attack, Hold and Release controls for adjusting the speed at which it opens and closes, and possibly separate ‘open‘ and ‘close’ Thresholds, which can be handy for preventing the gate rapidly opening and closing (‘chattering’) when the input signal fluctuates around a certain volume level. When you want to completely eliminate background noise, a gate is the processor to reach for.

De-essing
Our final category of dynamics processing is dedicated to solving a very common issue when recording vocals: the capture of overly harsh ‘s’ and ‘sh’ sounds, also known as sibilance. A de-esser is a specialised type of compressor designed to only lower the volume of the input signal within the frequency range in which such sonic irritants reside whenever they exceed the Threshold. As well as sorting out vocals, de-essers can be helpful in taming overly bright cymbals, uncomfortable guitars and other harshness-prone sources.
Hopefully we’ve given you enough insight here to get you started on the road to dynamics processing mastery. There’s much more to be discovered on this subject, of course, including such esoteric subcategories as multiband compression/limiting and dynamic EQ, but we’ll look at those in future articles.

Our Products
-

Interface audio 2 entrées - 2 sorties
-

Interface audio 10 entrées - 6 sorties
-

10in | 14out Audio Interface
-

Interface audio 20 entrées - 24 sorties
-
Interface audio 10 entrées - 14 sorties
-

Interface audio 2 entrées - 2 sorties
-

Interface audio 4 entrées - 4 sorties
-

Tout ce dont vous avez besoin pour débuter l'enregistrement
-
Interface audio 10 entrées - 4 sorties
-

Préampli micro 8 canaux avec CA/N
-

Préampli micro 8 canaux + Tone Control
-

Console d'enregistrement analogique modulaire
-

Small Format Analogue Recording Console
-

Small Format Analogue Recording Console
-

Immersive Audio Interface and Monitor Controller
-

Contrôleur de monitoring de bureau
-
Contrôleur de monitoring multicanal