Sean Intro
As more drummers begin the journey of learning to record themselves, whether it be for personal enjoyment or a way to create a new source of income, I believe that a great amount of attention should be put on capturing the best room sound possible. I have learned that the use of a stereo microphone can make a drummer’s pursuit of sonic excellence much easier and with quality results. Starting with the best and most crucial application for a stereo microphone, I will talk about three different mic positioning techniques: XY, Blulein, and Mid-side.
1.Stereo Mic
Stereo Microphone: XY Configuration?
Using a stereo room mic to record drums makes all applications where two microphones are needed much more effortless for a number of reasons. One of the biggest reasons is complete phase coherence.
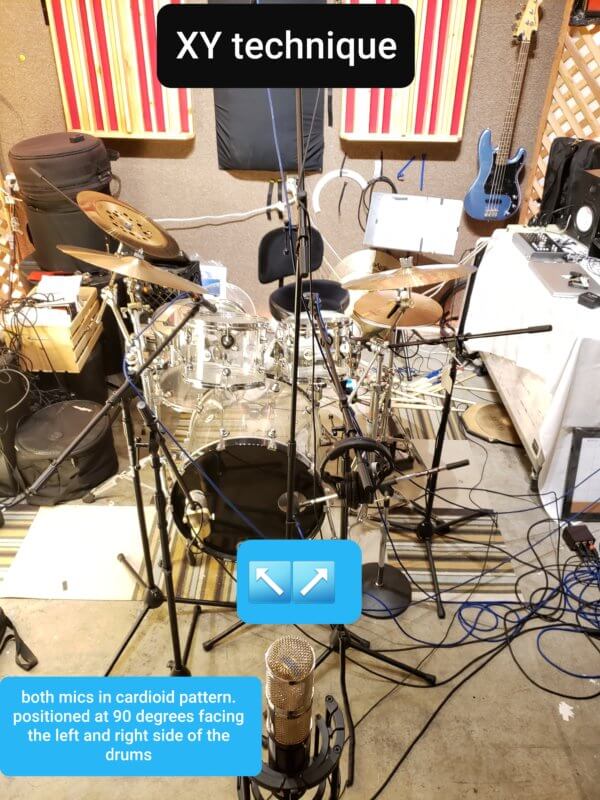
In the picture below, the stereo mic is facing the drum set with one of the two mics facing to the left, and the other at a 90 degree axis to the right, thus creating a perfect XY configuration that is already phase aligned.
XY Technique
XY Mic Image
1.XY Technique para
Using a stereo mic to record drums with with an XY configuration is as simple as finding the best sounding spot in your room and the phase alignment is taken care of.
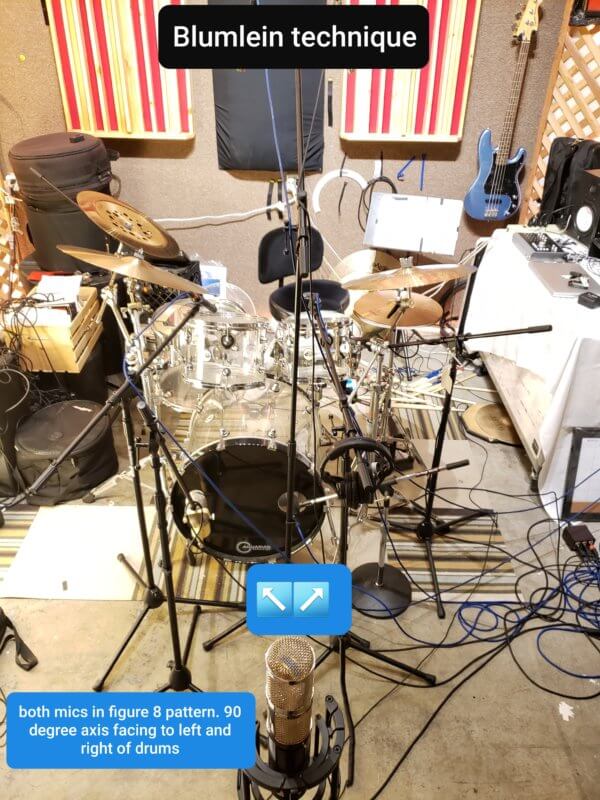
Being able to keep the mic exactly where it is, we can move straight into the Blumlein configuration, where as you will see in the next picture, all you have to do is switch the polar patterns of both microphones from cardioid to the figure 8 pattern.
With both microphones being in a figure 8 pattern, it gives the listener a better sense of the spacial qualities of the room.
1.Blumlein Technique
Blumlein Technique
Blumlein Technique Image
1.Blumlein Technique para
Keeping the microphone, again, exactly where it is, we can manage to execute a third mic technique called Mid-side. All that needs to be done is positioning the bottom mic so it is facing directly at the drums and the top microphone being faced at a 90 degree axis, so the diaphragm is facing the walls to the right and left.
Changing the bottom mic back to cardioid pattern and the top mic staying in figure 8, the key to Mid-side is after recording, taking the audio information from the figure 8 pattern microphone, copying it to a separate track, and flipping the polarity of the audio.
However, with the microphone I am using from Vanguard audio, their splitter box allows me to input a third channel straight into my interface.
1.XY Overhead Technique
XY Overhead Technique
Mid side Image
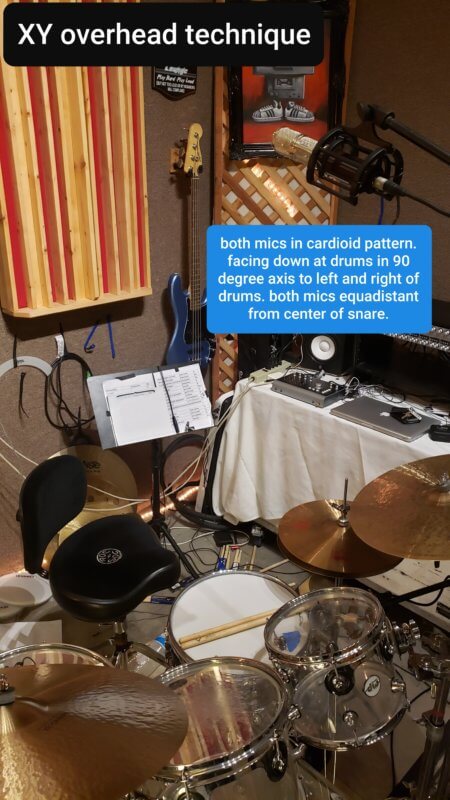
1. Over the shoulder para
In the picture below, it shows only one mic stand being used and only one cable coming from the mic, streamlining the setup, which works well in smaller studios while getting results that envelop the same astuteness as multiple microphones.
Having such a handy tool available leaves you open to experimenting with many options for effectual placement techniques. One in particular that I have been trying is the “over the shoulder” mic placement. As shown in the image below, the mic is literally over my right shoulder at about ear level, facing downward slightly at the drums.
1. Over the shoulder technique
Over the Shoulder Technique
Over the shoulder image
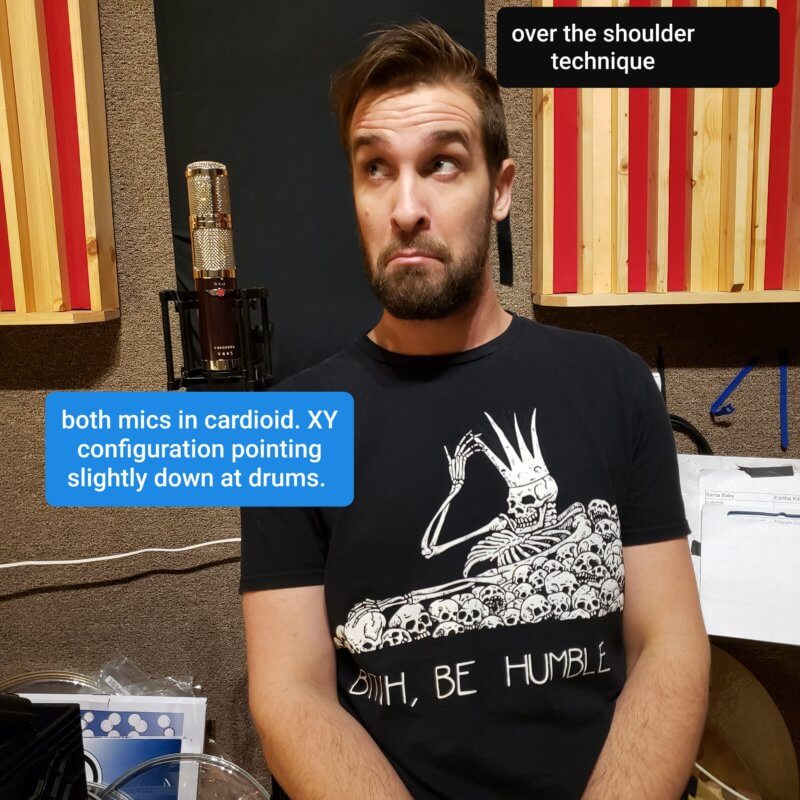
1. Over the shoulder technique
This is an attempt to capture what the drummer hears when they are playing. As an added bonus, my body is acting as a sound barrier between the mic and a good portion of the snare and hi-hat. This is only one option of many placements that you can try on your own to get your desired result.
I have found these to be the most beneficial and a good starting point to continue trying more techniques on my own. Streamlining my recording process has allowed me to listen to my instrument in new ways and encourage me to be more creative when I am in the studio.

About the author
Sean Winchester is a Los Angeles studio & touring drummer with credits including Everclear, Buckcherry, Smashmouth, Strung Out, Giants of Rome, Josh Todd and the Conflict, and more. A graduate of the Berklee College of Music, Sean currently spends most of his time working out of his North Hollywood studio Wolf Den Recording
Our Products
-

Interface audio 2 entrées - 2 sorties
-

Interface audio 10 entrées - 6 sorties
-

10in | 14out Audio Interface
-

Interface audio 20 entrées - 24 sorties
-

24in | 32out Audio Interface
-
Interface audio 10 entrées - 14 sorties
-
Interface audio 10 entrées - 4 sorties
-

Interface audio 2 entrées - 2 sorties
-

Interface audio 4 entrées - 4 sorties
-

24in | 24out Audio Interface
-

Tout ce dont vous avez besoin pour débuter l'enregistrement
-

8 Channel Smart Preamp with AD/DA
-

Préampli micro 8 canaux avec CA/N
-

Préampli micro 8 canaux + Tone Control
-

Console d'enregistrement analogique modulaire
-

Small Format Analogue Recording Console
-
Small Format Analogue Recording Console
-

Immersive Audio Interface and Monitor Controller
-

Contrôleur de monitoring de bureau
-
Contrôleur de monitoring multicanal
