


Dan Lenard Intro
Let’s not overthink the audio quality for your podcast. The idea is not to sound “great.” It’s to not sound “bad.” Bad audio will turn off a listener in 5 seconds. I know you want sound “great.” By using proper methods, your audio will always be clean crisp and not a distraction to the message you are presenting. To me that’s what “great” is.
1.Three things create proper audio:
Three things create proper audio:
1.Proper acoustics- Minimal to no sound coming in from outside your recording space and no sound bouncing around and creating an echo your recording space. Two totally different things!
2.Proper mic technique – Depending on the mic you use, and in podcasting you have many choices, how you address your microphone will determine how natural you will sound.
3.Setting proper input levels – which is the subject of this article.
2. Waveforms
Waveforms
2. Waveform Para
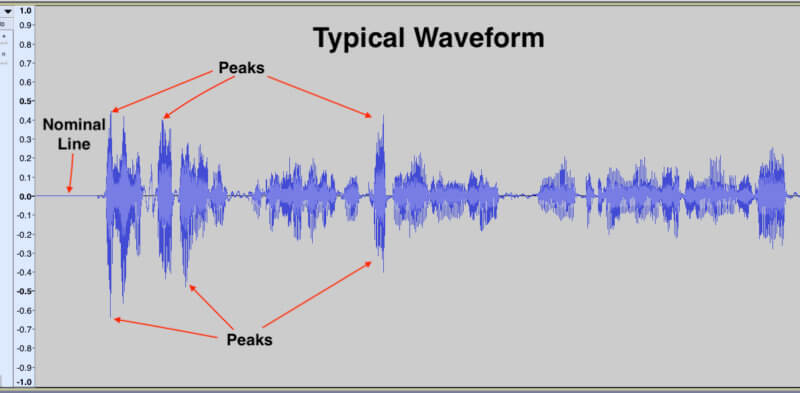
What is that squiggle? It’s called a waveform. The waveform is a graphic representation of how loud or soft your recording is over time.
Contrary to what many think, you are actually looking at this graphic from the top, not the side. The top peak is loud as is the bottom peak. The point of no sound is between the two, what we call the “nominal” line, and thats where the VO scale shows “0.” If your waveform shows peaks way below the -6 to -4dB range, you are recording too low.
If the peaks go all the way to the top and bottom and beyond, your recoding will distort. You’ll hear it. The sound will break up. You want the waveform to be nice and even with the peaks uniformly getting between that -6 and -4 threshold. Yes, sometimes we get too loud when we get excited and the peak gets much hotter. Plan ahead, if you think you will get louder, back off the mic a bit when you do talk louder. It takes some practice but it will save you time in post.
Waveform Diagram
Waveform Levels
3.Understanding Modulation
Understanding Modulation
3. Understanding Modulation para
There’s no real need to understand exactly what modulation is except to say your microphone, digital interface and recording software do, and if you over modulate, (Get too loud) your audio will distort, or if you set your levels too low, it will sound far away, and then bringing the gain up in post will create background noise.
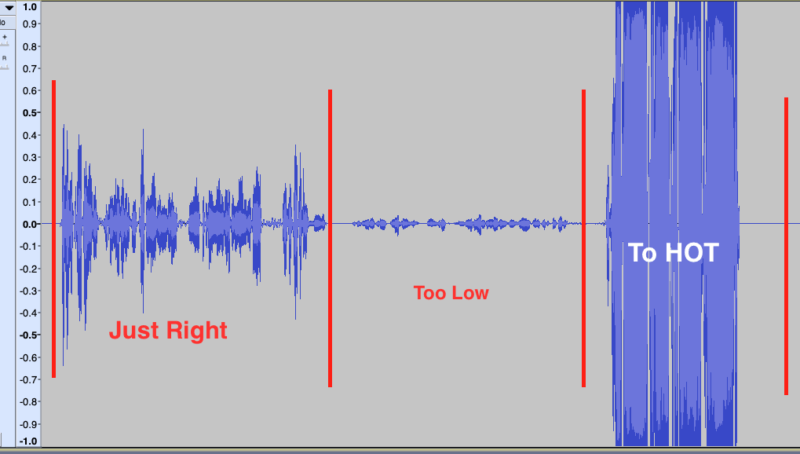
Looking at a waveform in your recording software, you’ll probably notice the scale on the side. Some have a numbered scale (Like Audacity)1-10 and others have what’s called the dB scale which is usually -60 to 0 and then into the “red zone.” +1 +2 +3. We refer to this meter as a VU meter which simply stands for “Volume Units.” You don’t really need to know what a decibel is (dB), just that you don’t want your input levels to go over “0 VU.”
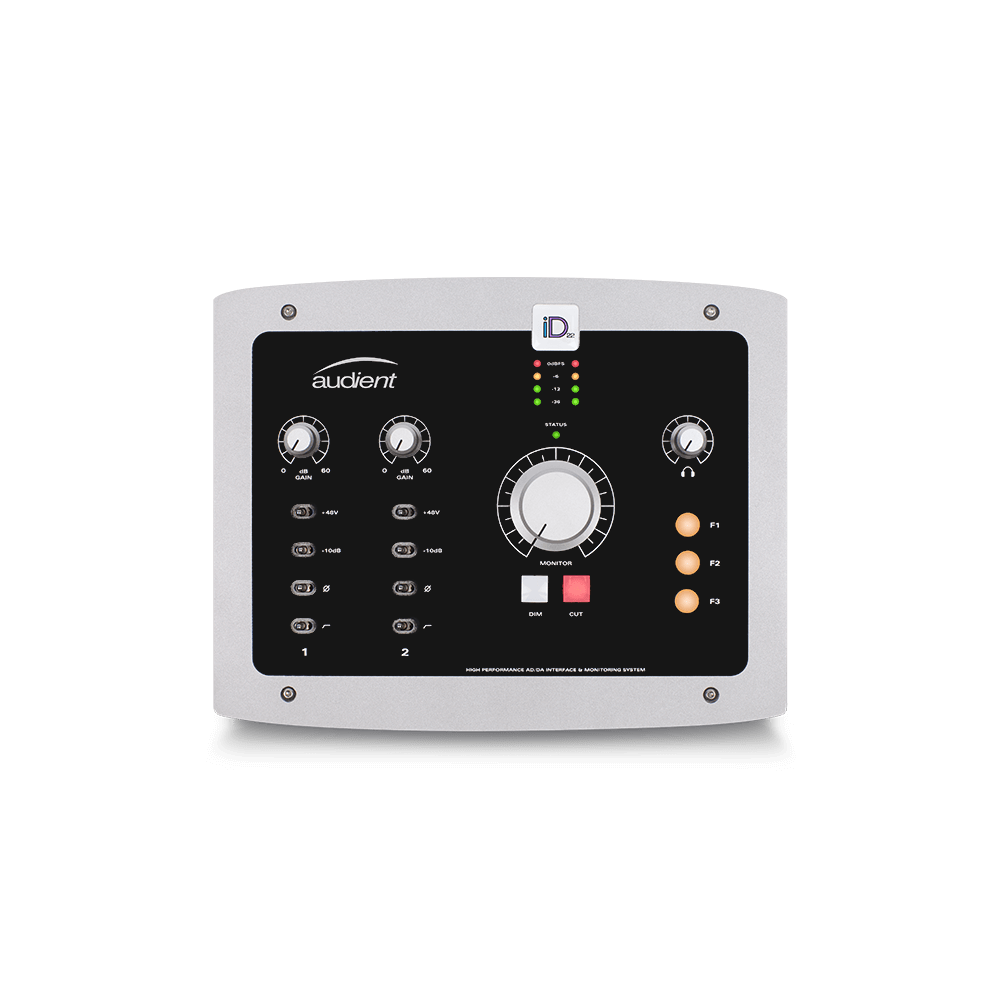
Using the Audient iD14, you’ll see it has an LED VU meter. It has a scale of -36 to “0,” with color coded dot indicators. Green, yellow and red. Green between -36dB and -12dB, Yellow between -9dB and -3dB and a single dot of red at zero. Ideally, when recording, you want to keep your modulation peaking between -6 and -4dB. All you have to know is: bounce in the green and yellow and avoid hitting “red.” You don’t want to stay in the green. You want to constantly modulate into the yellow as far as you can without hitting the red. That scale makes it easy to set up your levels with you or you and your guest before you even hit “record.”
4. Setting Proper Input Levels.
Setting Proper Input Levels/strong
4. Setting Proper Input Level para
Depending on your podcast format, how you record, how many guests you have and what microphone set-up you have, the time to set levels is up front. Hit “Record” and watch the waveform as each participant speaks into the mic. if it’s too soft, raise the gain on that mic channel until you get proper levels.
Too loud, take the input gain down. If its just you, with no guest and no one is “engineering” your recording, I suggest you “set-it-and-forget-it.” You really don’t want to pay attention to those levels while you are delivering your content. The iD14 also has an input and playback software with VU meters that you can use to set the levels.
Start your recording and maintain proper mic technique throughout. An engineer can monitor the input and adjust the levels on the fly. What we call “Riding The Levels.”
Setting Levels With Multiple Mics.
Setting Levels With Multiple Mics.
5. Setting Levels With Multiple Mics
If it’s just you and a single guest or two co-hosts to your podcast, connect the individual mics to the two channels on the iD14. How you set the input channels in your recording software differs by whether you’re a “Mac” or a “PC” person and your specific recording software.
The iD14 “mixer” software also allows you to assign these as well. Different software platforms tend to give you different interface options like which channel to assign the mic as well. You can set some software to record each mic on a different channel which allows you to balance the levels in post.
If you have more than two mics, you will require an external, independent mixer with more inputs and a more complex set up that I’ll get into in a later article.
The Audient iD14 is an excellent choice to record your podcast. Its initial, simple set-up can get you up and running quickly, and its’ more complex features give you more versatility when you become familiar with their capabilities.
1st Vid – level Setting
2nd Vid – Levels

About the author
Dan Lenard, “the Knowledgeable Voice” and “The Home Studio Master” Dan Lenard is a Podcast Producer, professional voice artist and is a recognized industry expert and consultant in home Voice over and podcast studio set –up and problem solving.
Our Products
-

Interface audio 2 entrées - 2 sorties
-

Interface audio 10 entrées - 6 sorties
-

10in | 14out Audio Interface
-

Interface audio 20 entrées - 24 sorties
-

24in | 32out Audio Interface
-
Interface audio 10 entrées - 14 sorties
-
Interface audio 10 entrées - 4 sorties
-

Interface audio 2 entrées - 2 sorties
-

Interface audio 4 entrées - 4 sorties
-

24in | 24out Audio Interface
-

Tout ce dont vous avez besoin pour débuter l'enregistrement
-

8 Channel Smart Preamp with AD/DA
-

Préampli micro 8 canaux avec CA/N
-

Préampli micro 8 canaux + Tone Control
-

Console d'enregistrement analogique modulaire
-

Small Format Analogue Recording Console
-

Small Format Analogue Recording Console
-

Immersive Audio Interface and Monitor Controller
-

Contrôleur de monitoring de bureau
-
Contrôleur de monitoring multicanal