


If you’re just starting to dive into the world of recording, then chances are you’re feeling a bit overwhelmed. There’s a lot that goes into capturing clean audio, but it all starts with a high quality microphone. In this article, we’ll go over everything there is to know about choosing the right microphone for the right scenario. After that, we’ll get a little help from the iD14 MKII to learn how to get the most out of your new recording equipment.
The foundation of any recording studio is a microphone. In fact, most studio’s tend to have a varying selection of microphones on hand. This is due to the fact that every type of audio source requires a different approach, and the type of microphone you use dictates the entire process.
As you can imagine, things get very technical very quickly when it comes to microphones and recording audio of any kind. The point of this article is to provide you with some fundamental knowledge about microphones so you can make the right choices for your own needs down the road.
Before we get into the technical stuff, there are a couple of questions you should ask yourself from the beginning.
What Are Your Plans For Your Recordings?
First things first, take a second to sit down and pinpoint what your plans are. What kind of audio are you going to record? Are you starting a podcast/streaming studio or a full blown home recording studio?
Just as an example, if you’re planning on starting up a small podcast studio, then an ultra-sensitive condenser microphone might be overkill. Conversely, if you’re going to start recording intricate vocals in a recording studio, then a USB mic wouldn’t be a wise choice.
Like we went over before, certain recording tasks require a specific approach.
Once you’ve nailed down your plans for your future recordings, then you can use the technical knowledge later on in this article to your advantage. That way you’re setting yourself up for success right from the start.
Where Will You Be Recording?
The physical environment of your studio space plays a huge role in the quality of your recordings. Not only that, but it will also give you a better idea of what kind of microphone you need.
We’re mainly talking about acoustic treatment here. Sonic reflections and other distortions can wreak havoc on your recording process, and treating your room is the first step to combat these issues.
Outside of that, consider how much room you have as well. Can you fit a mic stand, or will you need a boom arm? Do you have the space for a dedicated vocal booth or should you opt for a portable isolation shield?
Once you’ve taken your studio space into account, you’ll be ready to get into the nitty gritty details of microphones.
Types Of Microphones & Their Applications
There are 3 main types of microphones that you need to know about. Sure there are a number of other types out there, but for most recording tasks, these 3 types are the most common. This is especially true for podcast studios, streaming studios, and recording studios.
Dynamic Microphones
These are truly the workhorse of the music industry. Dynamic mics utilize a moving induction coil that’s suspended in a magnetic field. When sound waves come in contact with the thin diaphragm, it moves up and down to create electromagnetic energy.
From there, the signal is sent to your audio interface, and presto! You have captured audio.
Dynamic microphones function very similarly to a loud speaker, just in reverse.
Now, the nature in which dynamic microphones capture audio makes them durable and highly resistant to high sound pressure levels (SPL). This has made them extremely useful for live performances and for recording loud audio sources with harsh frequencies.
On top of that, most dynamic microphones are made to handle extreme punishment.
One of the most popular microphones in history is the Shure SM58, but it’s rare to see one nowadays that doesn’t look like it was run over by a tank. That doesn’t matter though. Chances are, that microphone still works just as well as it did on day one.
Dynamic Mic Applications
Dynamic microphones are somewhat of an anomaly nowadays. The truth is that most modern options can handle just about anything you throw at them.
For instance, the Shure SM7B is a widely popular microphone. In fact, there’s a good chance you’ve seen one used on popular podcasts or YouTube channels.
This can be attributed to the extra-large diaphragm and impeccably durable design.
What’s most surprising is that the SM7B is its level of sensitivity and how well it isolates background noise. This makes it extremely versatile.
Alternatively, the Shure SM57 is one of the best microphones for recording high SPL sound sources like drums and guitar amps.
The SM58 that was mentioned earlier is a commonly used mic for live performances.
It’s no secret that modern dynamic mics can be used in a number of ways for a plethora of different recording tasks.
Here are just a few examples of common applications for dynamic mics:
• Great for recording simple vocals (podcasts, YouTube, streaming, etc.)
• Perfect for recording high SPL instruments (drums, electric guitars, etc.)
• Excellent for live performances and capturing audio in loud environments.
Condenser Microphones
As opposed to electromagnetic energy in dynamic mics, condensers use electrostatic energy to capture and convert sound. Most condenser microphones feature a large, thin membrane that moves back and forth against a backplate when sound waves are introduced.
This process creates what’s called “capacitance” and thus reproduces the source sound into an electrical current.
The larger membrane makes condenser microphones ultra-sensitive and more susceptible to the “speed” and subtleties of the sound waves that a singer creates.
What this means is that condensers are perfect for recording intricate vocal arrangements and for capturing the nuances of the human voice.
As you might have guessed, condenser microphones tend to be much more fragile than their dynamic counterparts. That fact alone means that these microphones should remain static as much as possible.
Also, it’s worth pointing out that condenser mics (especially large-diaphragm condensers) require mic preamps with 48v Phantom Power to work properly. More on that later.
Now, there are 2 different types of condenser microphones to consider. Let’s break those down.
Large-Diaphragm Condensers
These are the best examples of a recording studio microphone. Most large-diaphragm condenser microphones come equipped with multiple pickup patterns and dB pads, which makes them the most universally useful type of microphone on the market.
That said, vocal recordings in a well-treated studio environment is where large-diaphragm condensers truly shine. The amount of detail they can capture is astonishing and they’re capable of bringing the best out of your vocal recordings.
Outside of that, you can record pretty much anything that’s acoustic with an LDC. String, brass and percussion instruments are just a few examples of what an LDC can handle. There are even some options made to record kick drums.
Small-Diaphragm Condensers
Small-diaphragm condenser microphones use the same method of capturing audio as their larger counterparts, but everything is scaled down into a smaller, pencil-like design.
These are the microphones of choice for recording higher SPL audio sources with sharp transients. You can use SDC’s to record hi-hats, acoustic instruments or really anything that requires an excellent transient response.
Small-diaphragm condensers have a tendency to introduce more internal noise and they do suffer in terms of sensitivity. With that, SDC’s have a small use-case and shouldn’t be used outside of that.
Condenser Mic Applications
One of the most popular condenser microphones on the market is the Audio-Technica AT2020. It’s an affordable microphone that has been used by home producers everywhere to capture great vocal arrangements.
This microphone is an exception to the fact that condensers usually have a hefty price-tag.
In most cases, condenser microphones are a premium option for serious producers or audio engineers.
Moreover, certain condenser microphones have a certain tone that’ll sound different from the rest. We’ll get into that in more detail later on though.
For now, here are the common applications for condenser microphones:
• Large-diaphragm condensers are absolutely essential for capturing high-fidelity vocal recordings in a well-treated studio environment.
• Large-diaphragm condensers can be used to record a long list of acoustic instruments.
• Small-diaphragm condensers are ideal for recording snare drums, hi-hats and other instruments with sharp transients.
Ribbon Microphones
Although they’re much less common than they used to be, ribbon mics are starting to gain popularity once again.
Ribbon mics function similarly to dynamic mics in that they utilize a long ribbon-shaped membrane that’s suspended between two magnetic poles. The membrane is designed to respond to the velocity of air molecules rather than the air displacement.
What this means is that ribbon microphones are highly sensitive and the design of the ribbon membrane makes for a unique sound signature.
Ribbon microphones used to be a staple in the broadcasting industry. The problem was that they were notoriously delicate. The ribbon membrane had a tendency to rip apart very easily and as studios progressed, ribbon mics lost their appeal.
Nowadays, companies like Royner have set out to make ribbon mics more durable and much more reliable than they used to be.
Producers and audio engineers who’ve gravitated towards ribbon mics praise them for their warm, vintage tone and their ability to catch an amazing amount of detail.
They’ve also seen increasing use among certain artists in “lo-fi” genres like lo-fi hip-hop, synthwave and chillwave.
Ribbon Mic Applications
Modern ribbon mics are what some would consider a “niche item” in that they only are used for certain recording tasks. That said, most options will come equipped with a bi-directional (or figure-8) polar pattern, which is great for recording vocal duets and multiple guitars.
Outside of that, if you want some added warmth to your audio signal, then you can record just about anything with a ribbon mic. It’s still recommended to stay away from super harsh frequencies like drum cymbals though.
Also, they were once the standard in the golden-age of radio, so you can easily use a ribbon mic to level-up your podcast studio.
• Great for some added warmth to your recordings.
• Their bi-directional polar pattern makes them great for recording vocal duets.
• Ribbon mics are excellent for podcast studios.
Polar Patterns
This is a specification that you’re sure to come across, and it’s one that’s pretty important. The polar pattern of a microphone dictates the direction in which it “hears” sound.
For the sake of simplicity, let’s break down all of the most common polar patterns offered on microphones and talk about them individually.
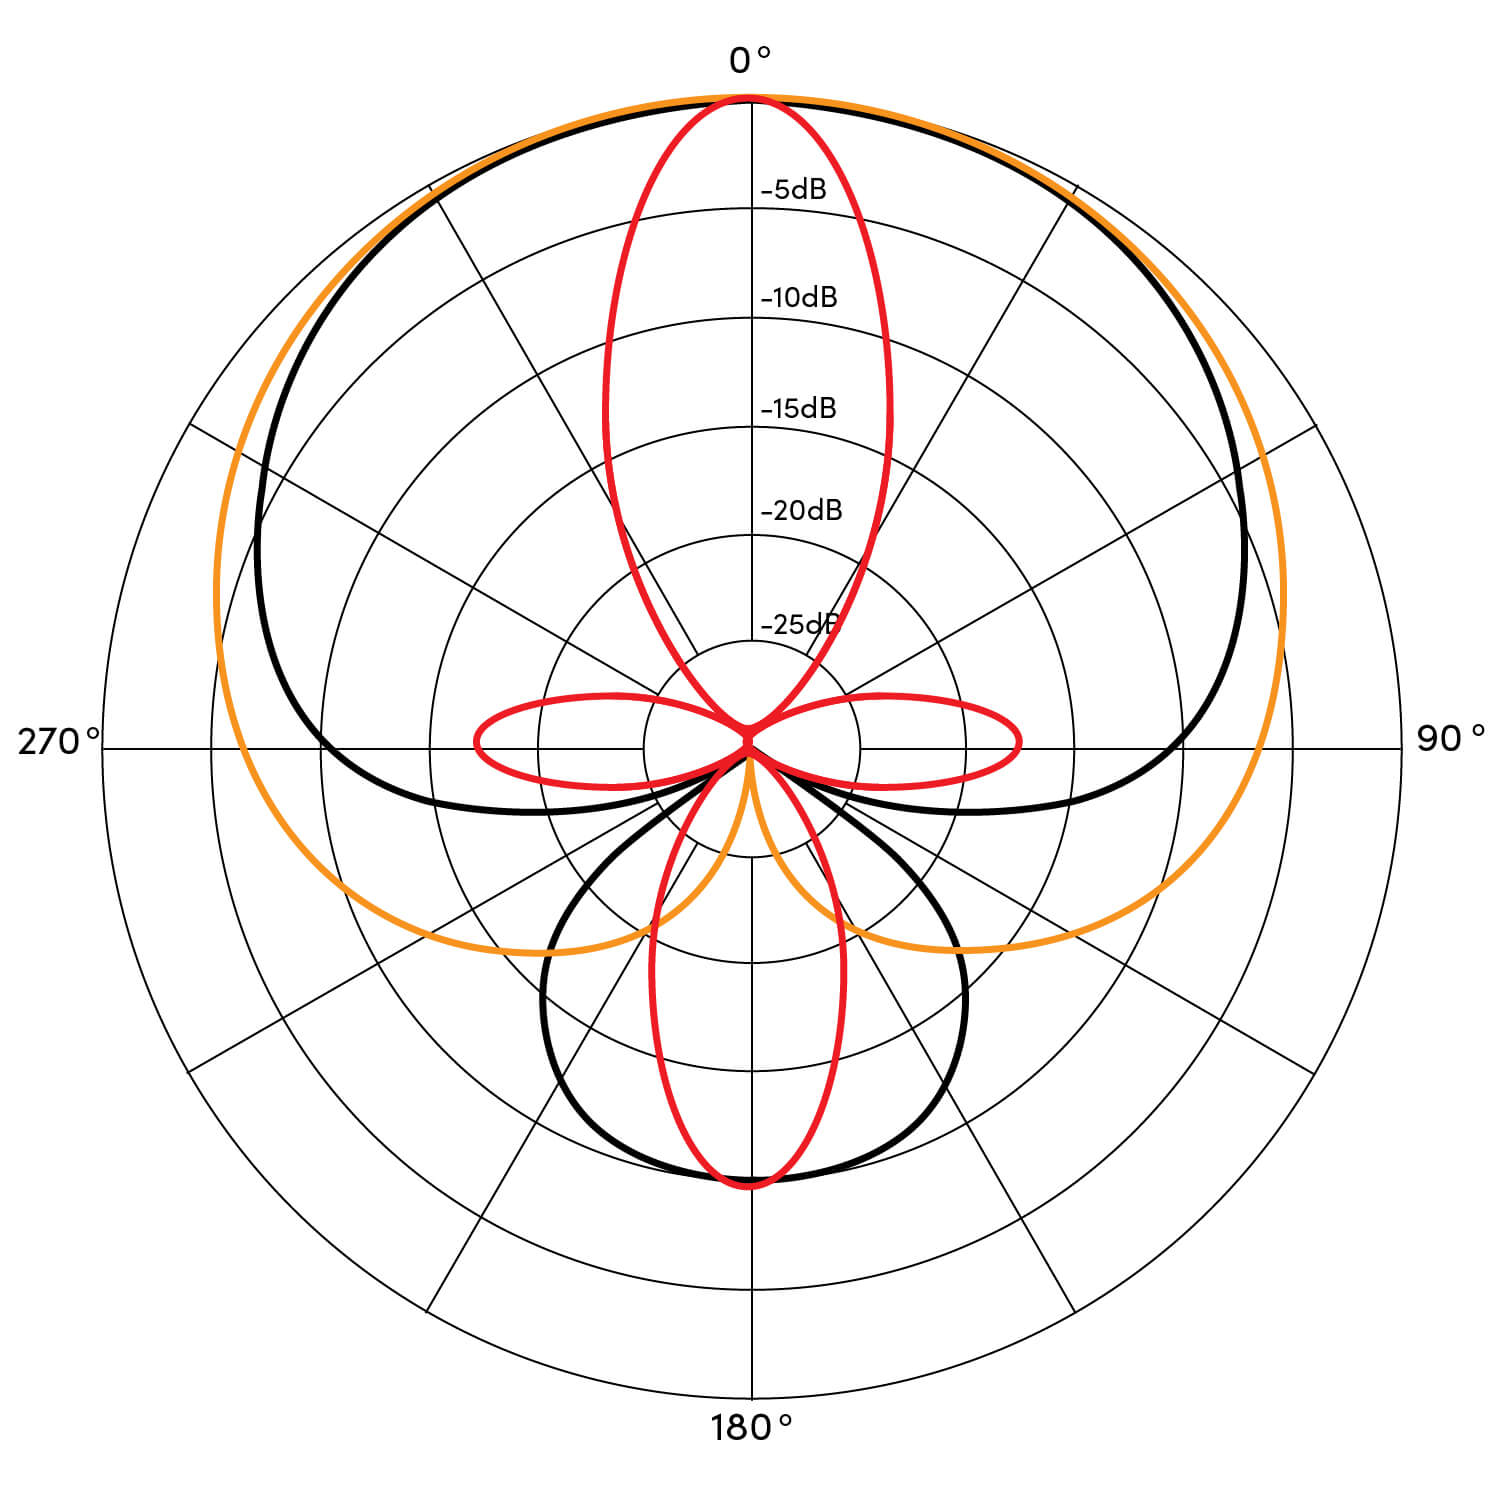
Cardioid
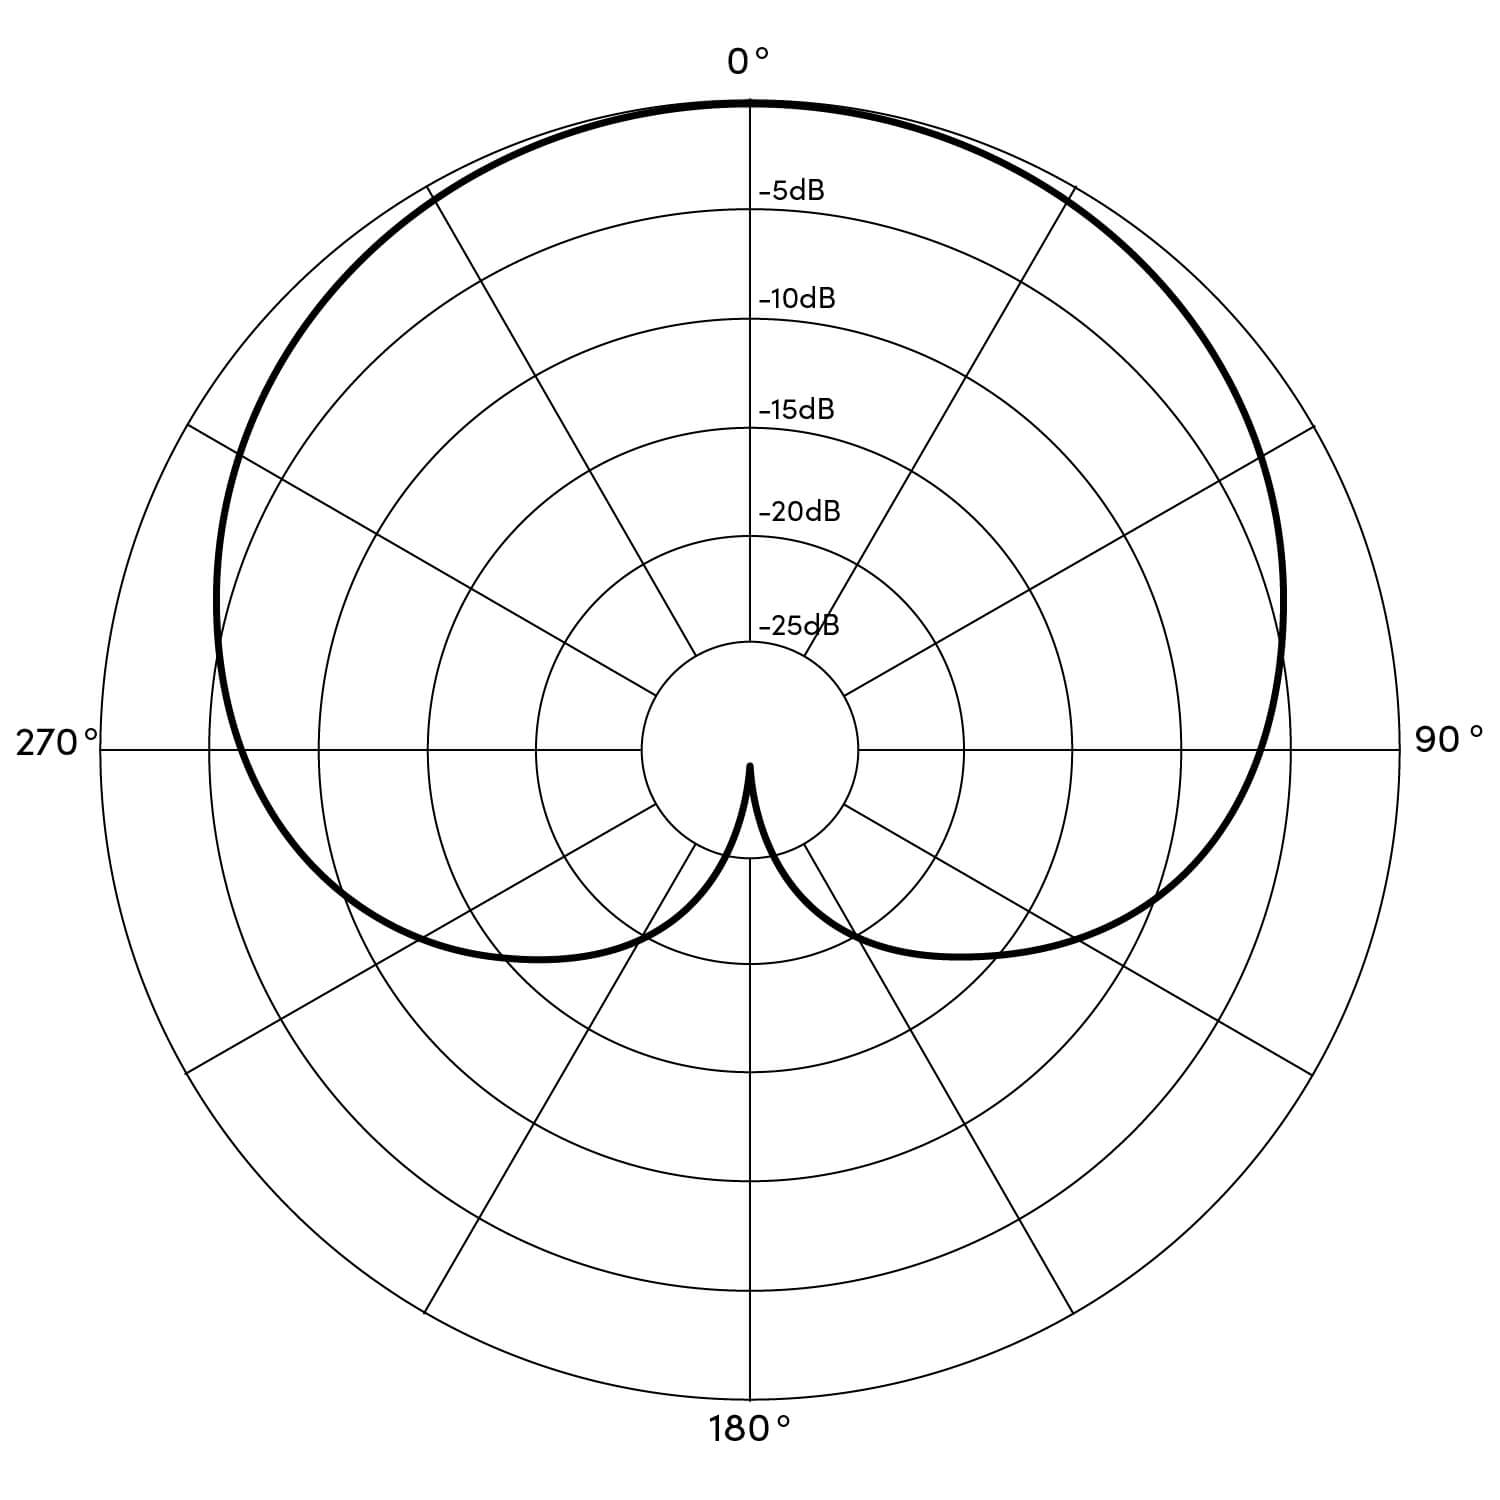
The root of the word means “heart-shaped” in Latin. As you might have guessed, this polar pattern is designed to pick up the audio source directly from the front while blocking out any sound in the rear.
This is easily the most common type of polar pattern found among modern microphones. This shape is perfect for pinpointing on vocals and instruments while also canceling out any unwanted ambient noise.
Supercardioid & Hypercardioid
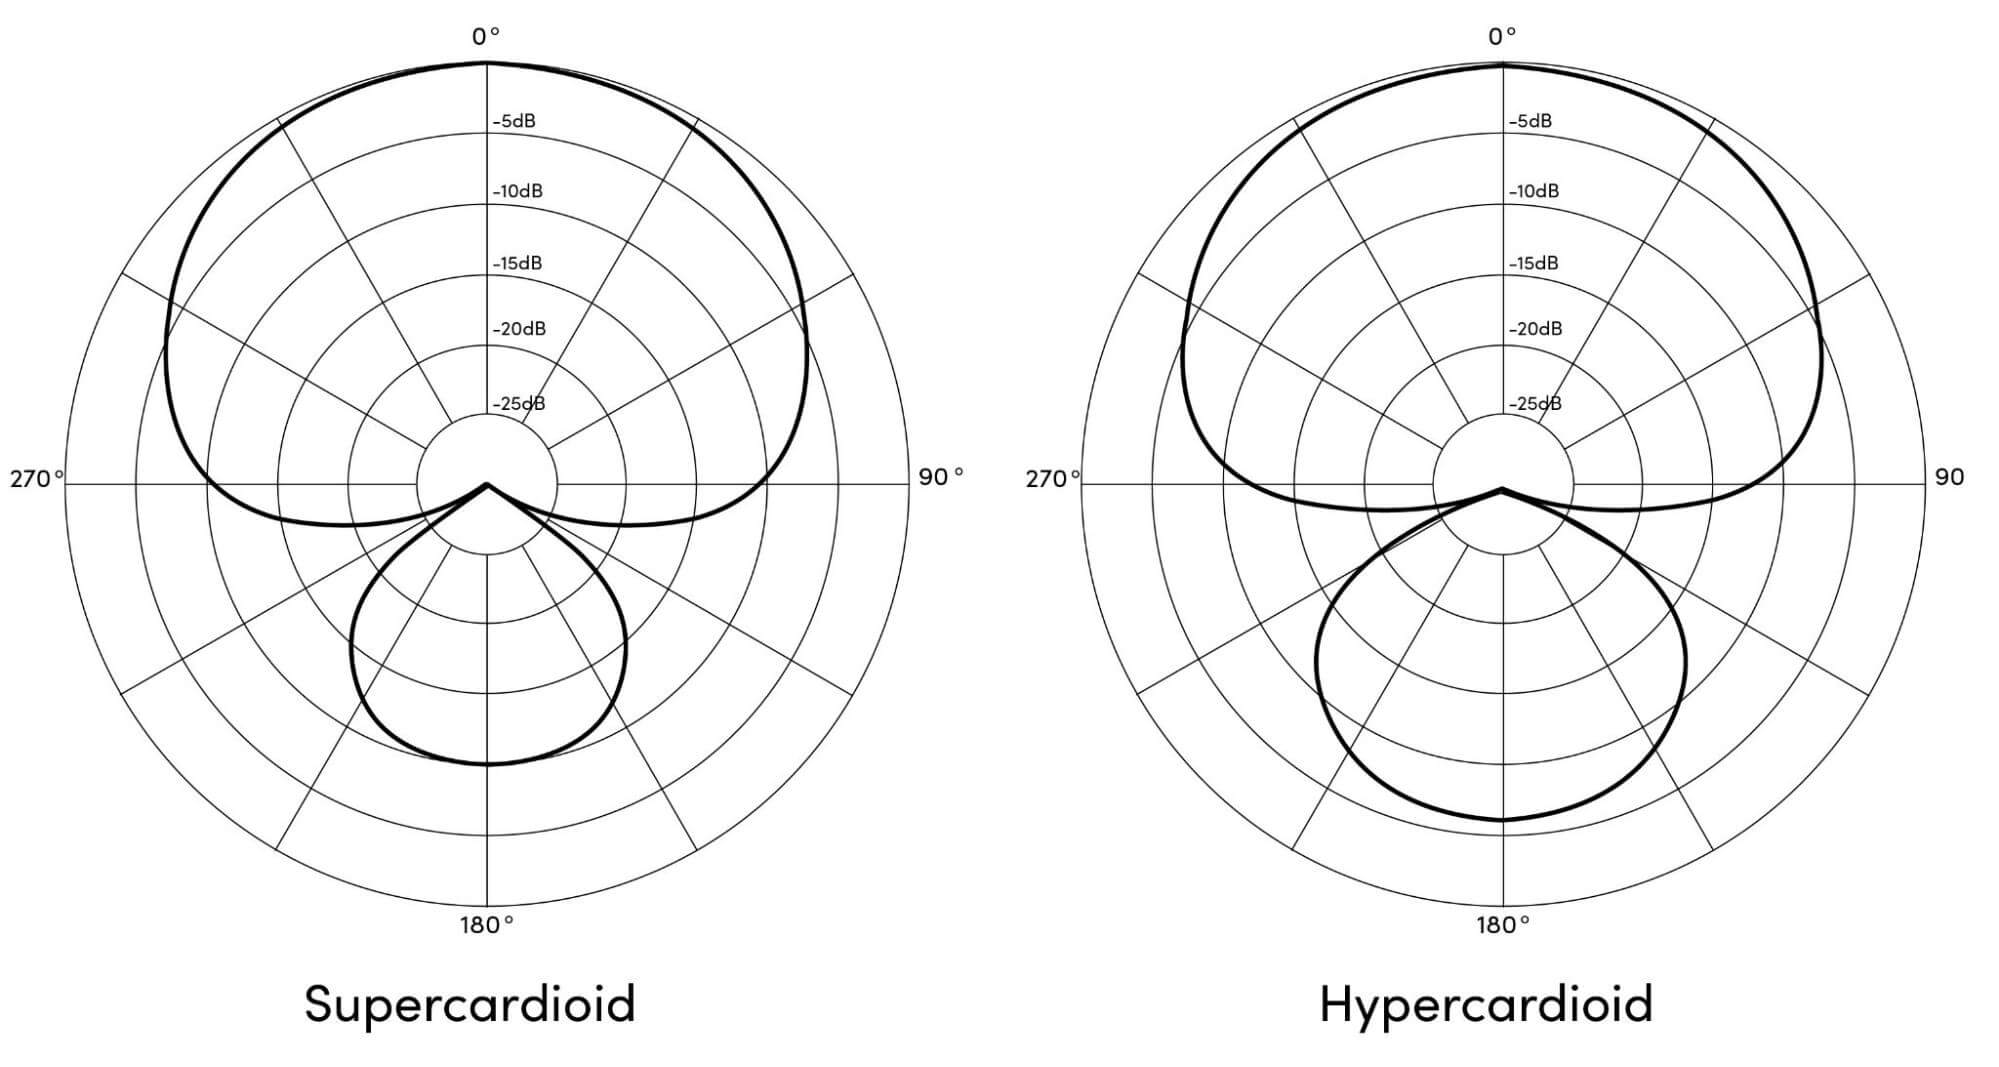
Obviously, this polar pattern is similar to a standard cardioid shape. The difference is that these patterns are highly-directional. Also, this polar pattern has some added sensitivity in the rear lobes, which in turn makes mic positioning difficult.
Omnidirectional
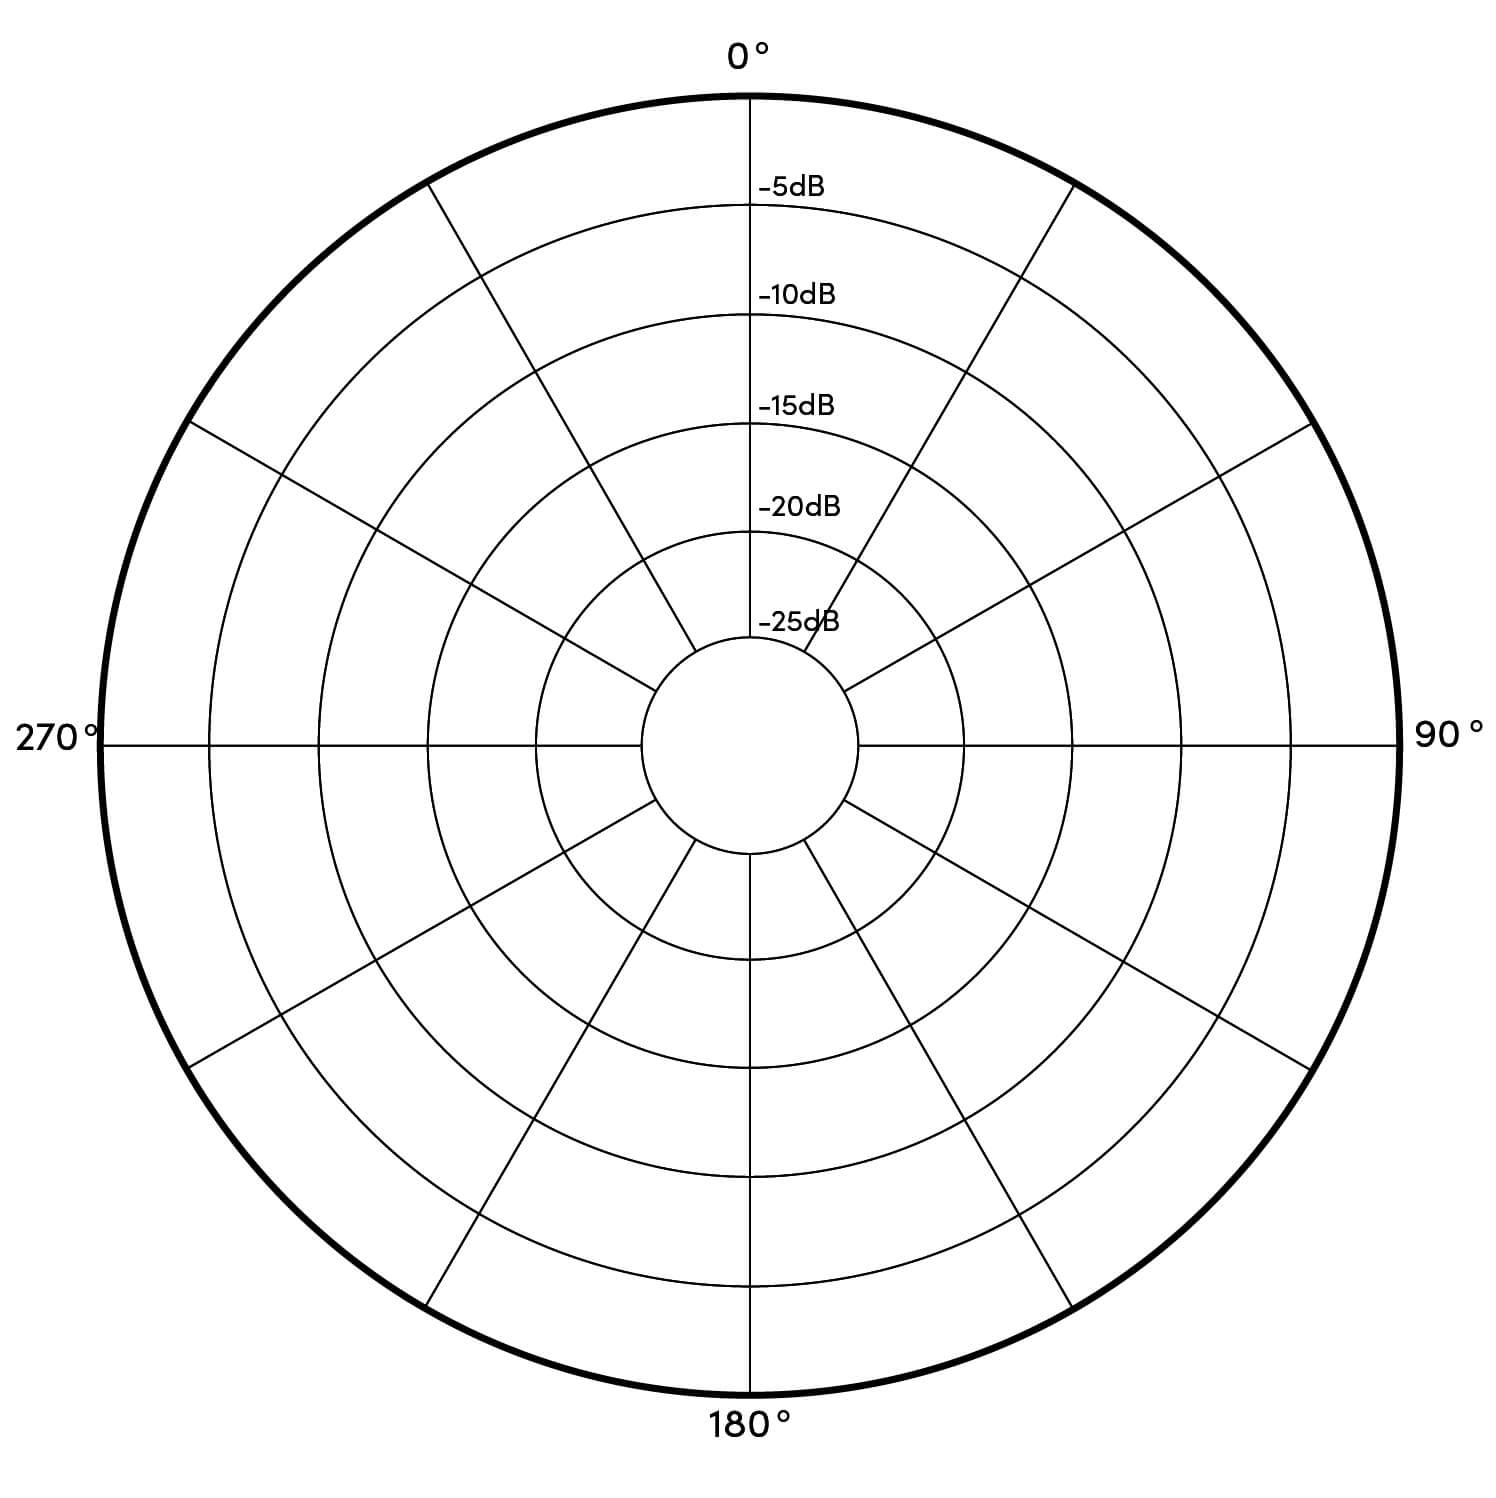
As the name suggests, this polar pattern is made to capture sound evenly from all directions. Since there is no blocking whatsoever, omnidirectional microphones come in handy for live recordings of vocal ensembles or for recording multiple instruments at once.
This design does make them very susceptible to feedback, so tread carefully.
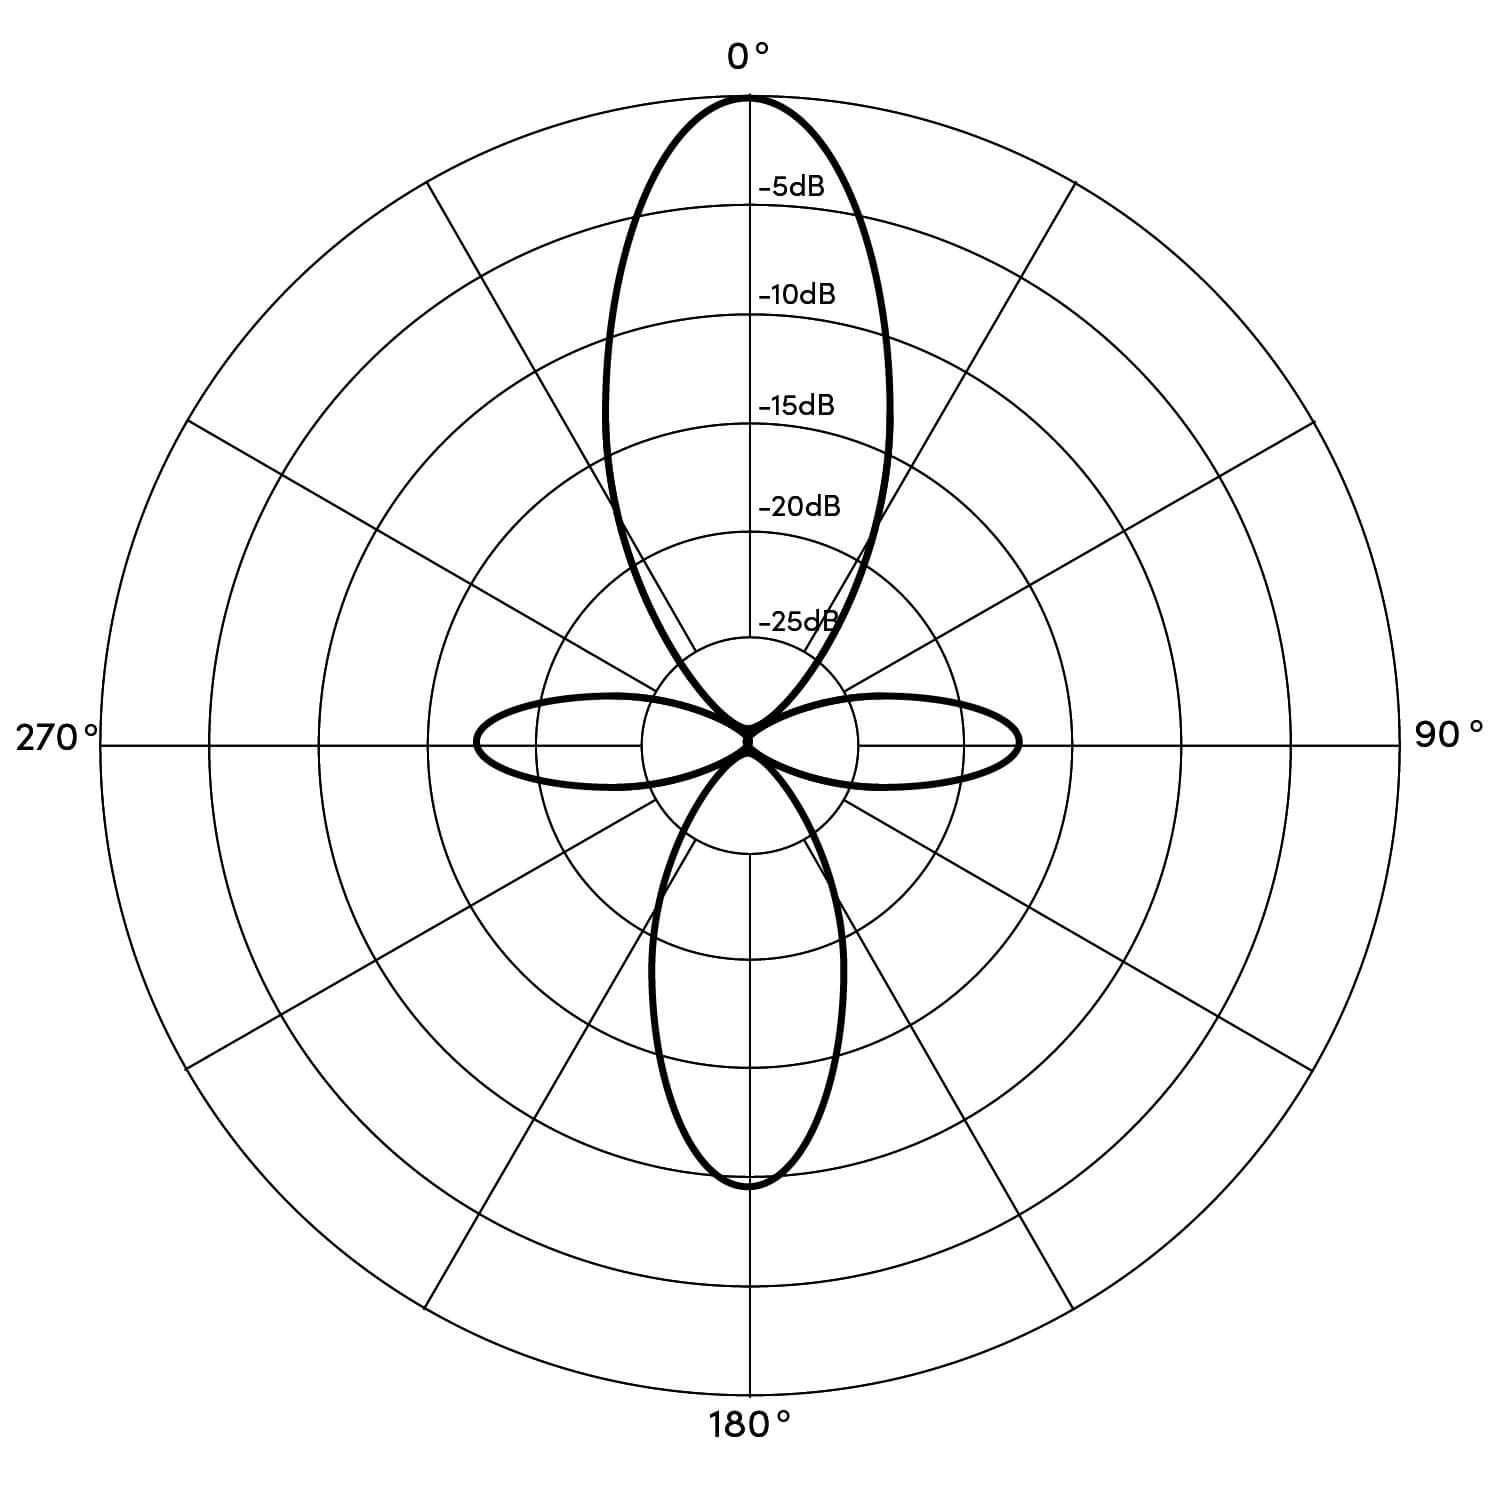
Figure-8
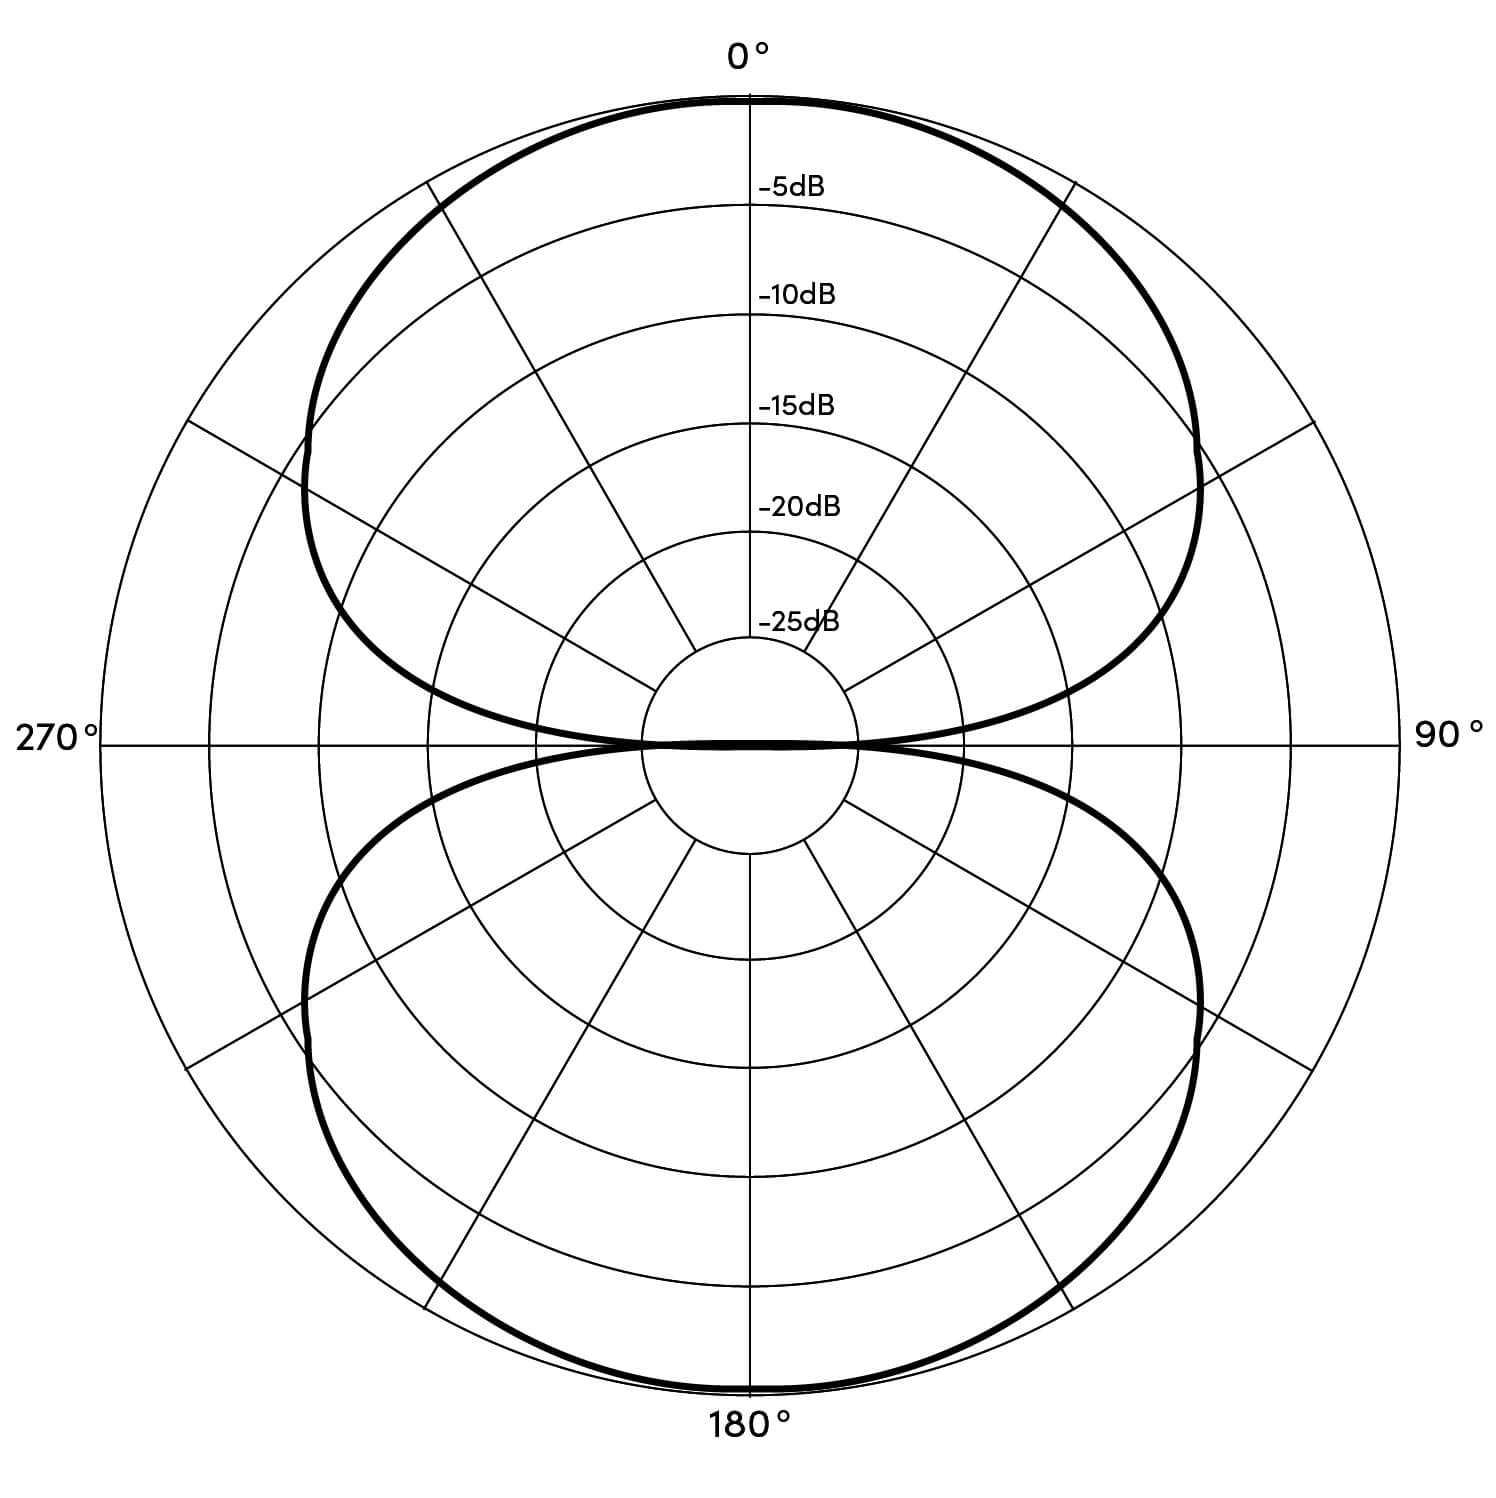
This polar pattern is made to “hear” the audio source on the front and rear equally while cutting out both sides entirely. This polar pattern is especially useful for vocal duets or for capturing two guitars at the same time. This polar pattern is commonly found on ribbon microphones.
Shotgun
Otherwise known as “line” or “gradient,” this polar pattern has a tube-like area of sensitivity. This makes for a super fine directional accuracy that’s even more pinpointed than hyper-cardioid. Microphones with a shotgun pickup pattern are mostly used for film and theater, but they’re not entirely useless in a recording studio.
Multi-Pattern
High-tier condenser microphones are sometimes equipped with switchable polar patterns. Most commonly the options are cardioid, omnidirectional and figure-8. Those options can vary though.
Either way, a microphone that features switchable polar patterns can add even more versatility to your workflow. Mics with this feature are typically pretty expensive, but it’s definitely worth it.
Proximity Effect
Since we were just talking about polar patterns, it makes sense to talk a little bit about the proximity effect. Proximity effect is the increase in low-frequency response (or bass) when the microphone is close to the sound source.
This is a more common occurrence among male voices. It’s something you’re sure to have heard before if you listen to podcasts and the male guest leans into the mic a little too close. His voice becomes very deep, very quickly and it’s almost hard to hear them. Well, that’s the proximity effect.
Now, all non-omnidirectional microphones will suffer from the proximity effect, it’s just the nature of how microphones work. That said, some polar patterns will exhibit the proximity effect more than others.
In some cases, the proximity effect can add a cool effect to your vocals if you want to “thicken” up the sound a bit.
Just keep in mind that the proximity effect enhances the mic’s ability to pick up unwanted consonants like p, t, k, and b sounds. To counteract this, simply use a pop filter.
Frequency Response
This is a topic that could easily be covered in a separate article, but as long as you know the basics, you’ll be able to identify this specification.
In a nutshell, frequency response defines the range of frequencies that a microphone can reproduce. Frequency response also dictates how well the microphone can reproduce sound in terms of output variations.
In a perfect scenario, a microphone would be able to pick up and reproduce sound perfectly, or in other words, a one-to-one reproduction. Unfortunately, the nature of electrical currents and the manner in which signals flow in a series of components makes that impossible.
Certain frequencies simply get lost in the mix, pun intended.
There is a way to determine the sound signature of a microphone though, and that’s with a frequency response graph. The typical frequency response specification will list something like “40Hz-20kHz” which isn’t very helpful.
You’ll likely have to head over to the manufacturer’s website to find the frequency response graph of a particular microphone.
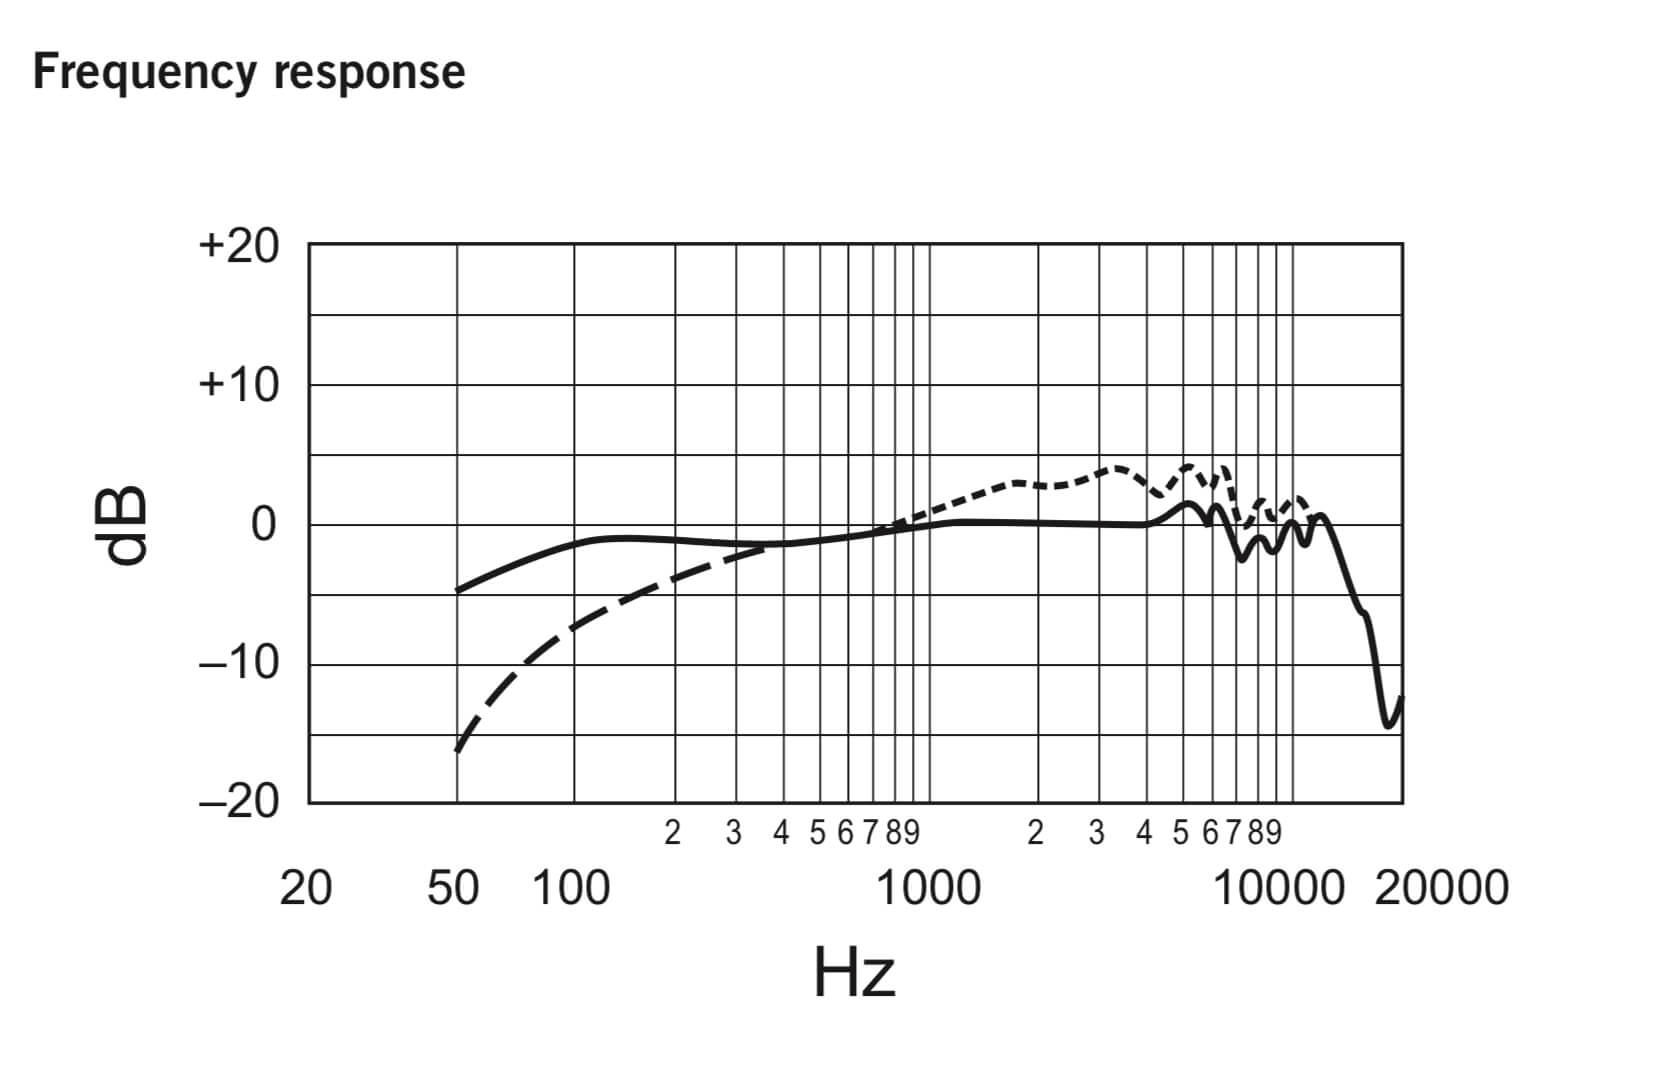
The horizontal numbers represent the frequency range (measured in frequencies, typically 20Hz to 20kHz) and the vertical numbers represent the relative responses in decibels (labeled as dB).
So, when looking at a graph, you’ll see a series of peaks and valleys along its frequency response line. What you’re looking for is a line that’s as smooth as possible, especially for recording vocals.
That doesn’t mean that you should look for a line that’s flat by any means. Many microphones have a boost in the upper mid-range, usually between 3,000 and 6,000 Hz which can add some clarity and “punch” to vocals and instruments.
Also, some microphones offer an adjustable frequency response so you can fine-tune the sound for certain applications.
Point is, look for a smooth frequency response in a microphone. Minor embellishments won’t hurt anything, but definitely avoid microphones that have abrupt peaks and valleys.
Sound Pressure Level
SPL has been mentioned many times thus far, so it’s about time we talk about what it is exactly.
Sound pressure level describes the maximum volume level that a microphone can handle (measured in dB) before distortion is introduced.
The average SPL rating is around 100 dB, while a high SPL rating is considered to be anything higher than 130 dB.
Let’s use the Shure SM57 as an example again.
At 1kHz, the SM57 can handle around 160 dB of sound, which is absolutely insane. This should tell you that this microphone can handle pretty much any type of sound pressure that exists in a studio environment.
In fact, that’s what makes it so great for recording drums, which is by far one of the loudest instruments you could possibly record.
The thing to keep in mind here is to pay attention to the SPL rating of your microphone. If you try to record something that’s too loud for it, then you run the risk of distorting your signal, or worse, busting the membrane.
Preamps & Their Effect On Recording Quality
Mic preamps have one job, and that’s to increase gain. Moreover, they take a weak signal — like the one from your dynamic or condenser microphone — and bring it to line-level.
It’s important to note that preamps only increase gain, which is not the same thing as increasing volume.
Moving on, let’s look at the typical signal flow to see where a mic preamp plays its part:
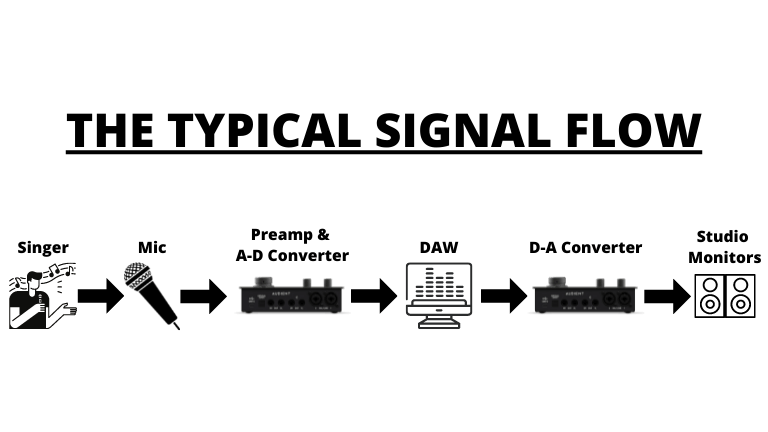
The goal of the mic preamp is to allow the microphone to capture sound as transparently and as clearly as possible. This is only possible when the microphone and the preamp work in unison and do their jobs in the signal flow.
So, everytime an amplifier is used in a signal path it’s called a “gain stage” Every gain stage boosts the gain of the signal so it’s useful to the next component along the path.
In both dynamic and condenser microphones, the signal is far too weak to be adequately processed by your Digital Audio Workstation (DAW) and reproduced by your studio monitors. The mic preamp steps in and increases the voltage of your microphone so that everything works properly
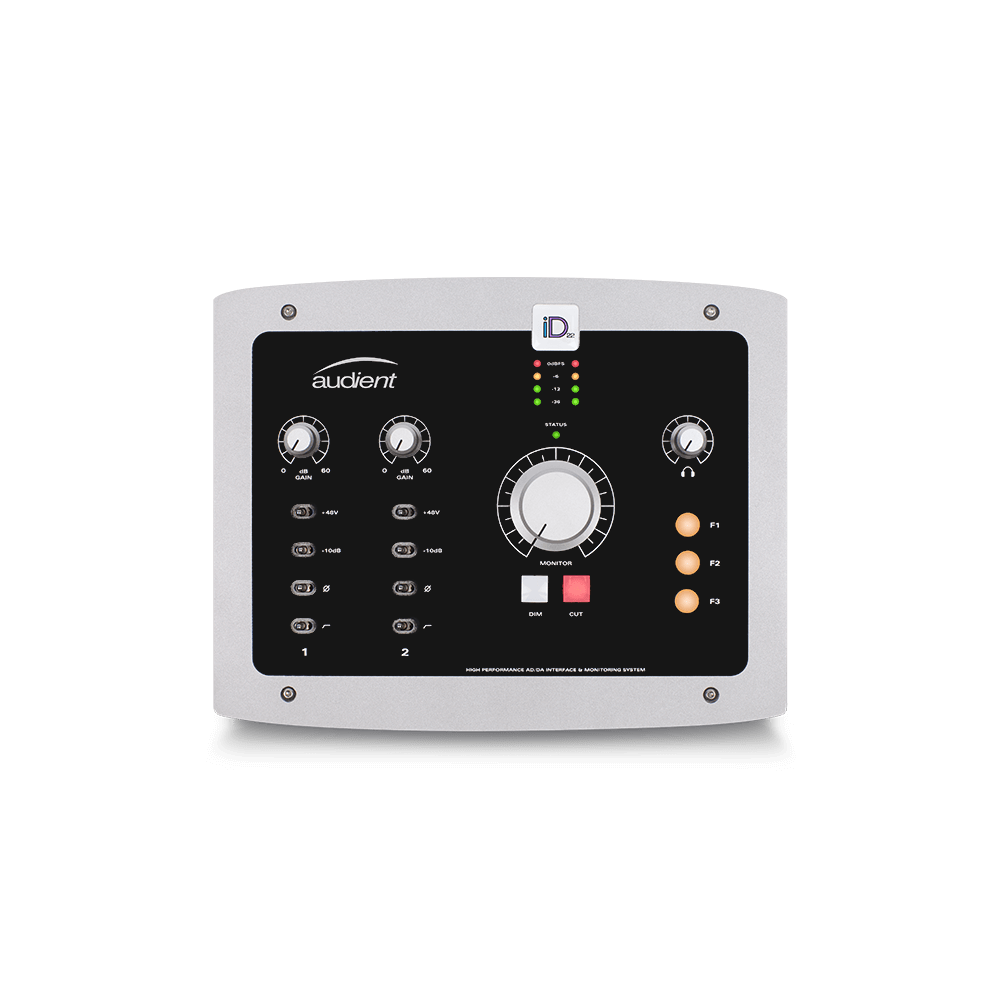
How The iD14 MKII Can Improve Your Recording Quality
Now that we understand how mic preamps work, we can talk about how high-quality preamps can improve your recordings.
Overall, a typical mic preamp colors the audio source to a far lesser degree than you’d think. That said, there are certainly some mic preamps out there that are designed to color a sound. You don’t want a lot of added color, but it can sound quite nice when done right.
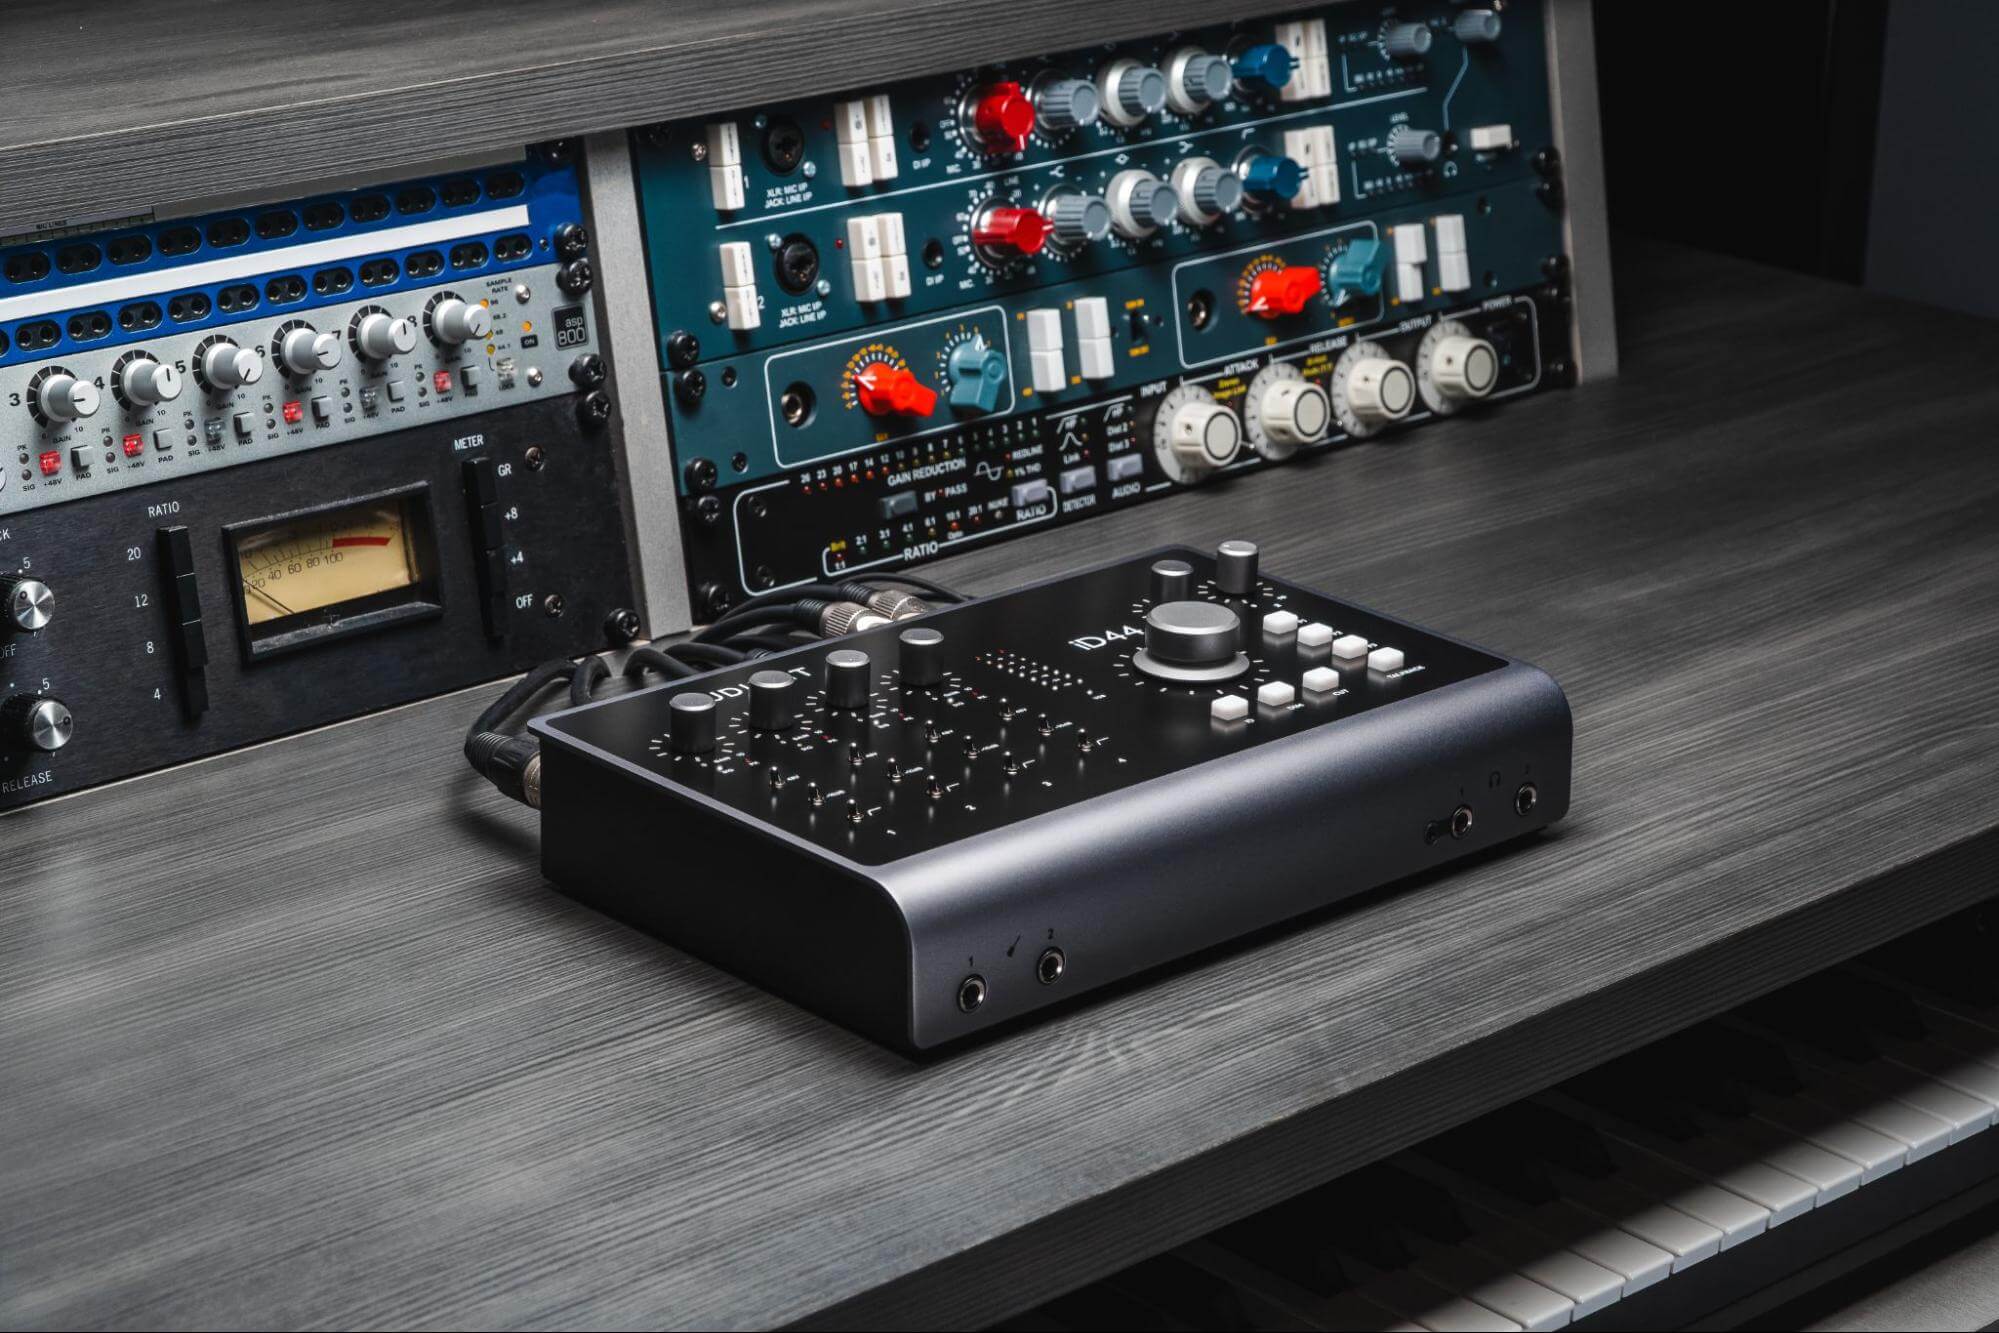
For example, the iD14 MKII uses two Audient Class A console mic preamps with true 48v Phantom Power. These world-class preamps are designed to deliver ultra-low noise and little to no distortion.
On top of that, they add just a touch of analog warmth to your recordings.
All of this is just to say that the mic pres in the iD14 MKII are made to bring the most out of your microphone. Once you have a high-quality microphone added on to your list of studio equipment, then it’s time to compliment it with a top-notch mic preamp.
What Does All Of This Mean For You?
So, now that we’ve covered just about everything you need to know about choosing a microphone, it’s time to summarize what we’ve learned.
The easiest way to do this is to break down different recording applications and attach the appropriate microphone to it. That way everything is clear and concise.
Vocal Recordings
Recording vocals from a singer can be a tricky task with a lot of ingredients. In order to properly capture the subtleties of a human voice, you first need adequate acoustic treatment.
Outside of that, a lot of this really depends on the type of voice the singer has.
If the source voice is dark and wooly, then maybe a brighter mic can capture some of the detail. If the source voice is super bright/thin or and needs taming, consider using a ribbon mic.
Fundamentally speaking, an LDC is the perfect choice for most vocalists.
From there, it’s all about the rest of your gear.
Here’s all of the right equipment you’ll need to record vocals:
• Large-Diaphragm Cardioid Condenser Microphone
• High-quality XLR mic cable
• Audio interface equipped with true 48v Phantom Power preamps (like the iD14 MKII)
• Any modern DAW
• Studio monitors and studio headphones
• Pop filter
Recording Acoustic Instruments (Strings, Brass, Etc.)
Each of the top 3 types of microphones will give you good results when recording acoustic instruments. That said, an LDC will probably produce the highest recording quality in this case.
Here’s an overview of the equipment you’ll need to record acoustic instruments:
• Large-Diaphragm Cardioid Condenser Microphone
• High-quality XLR mic cable
• Audio interface equipped with true 48v Phantom Power preamps (like the iD14 MKII)
• Any modern DAW
• Studio monitors and studio headphones
Recording Electric Guitar Amps
There are a handful of LDC’s that can handle the high SPL’s that come from guitar amps, but the better choice would be a dynamic mic or an SDC. If you have to choose, go for a dynamic mic though.
With that, here’s a short list of equipment you’ll need to record electric guitar amps:
• Dynamic microphone
• High-quality XLR mic cable
• Audio interface equipped with high-quality mic preamps (like the iD14 MKII)
• Any modern DAW
• Studio monitors and studio headphones
• Small mic stand
Recording Drums
When recording a drum kit, you’ll need a few different types of microphones for certain parts of the kit.
For example, to record cymbals you’ll need overhead drum mics attached to a tall mic stand. Those typically come in the form of a small-diaphragm condenser microphone.
To record the snare drum and toms, you should opt for a dynamic mic.
Use a SDC to record the hi-hats.
Lastly, there are microphones specifically made for recording kick drums and those are what you should stick with.
To further clarify this, here’s a list of equipment you’ll need to record drums:
• Cymbals: Small-Diaphgram Cardioid or Supercardioid Condenser Mics
• Snare Drum & Toms: Dynamic mics with high SPL ratings
• Hi-hats: Small-Diaphragm Cardioid or Supercardioid Condenser Mic
• Kick Drum: Use a mic specifically made for recording kick drums, typically in the form of a dynamic mic or an LDC
• High-quality XLR mic cables
• Audio interface equipped with true 48v Phantom Power preamps (like the iD14 MKII)
• Any modern DAW
• Studio monitors and studio headphones
• Mic stands and drum mic clips
Podcast
A podcast studio doesn’t need to be as elaborate as a recording studio. You’ll need a few key pieces of equipment and a good microphone and that’s really it.
Here’s the gear you’ll need to start a podcast studio:
• Large-Diaphragm Cardioid Dynamic Microphone
• High-quality XLR mic cable
• Audio interface equipped with high-quality mic preamps (like the iD14 MKII)
• Any modern DAW
• Studio headphones
• Desktop mic stand or boom arm
• Pop filter
• High resolution webcam for video podcasts
Final Thoughts
Like we talked about at the beginning, choosing the right microphone boils down to what your plans are more than anything else. At the end of the day, the whole point of this article is to give you all the information you need to make the right choice on a microphone for any scenario.
Sure, everything starts with your microphone, but the rest of your studio equipment plays a huge role in achieving ultimate fidelity in your recordings as well. The iD14 MKII is just one piece of equipment that you can add to your signal path to help you reach that standard.
All in all, with the knowledge that you’ve hopefully gained from this article, you should be more than ready to make the right choice on a microphone for your specific needs.

About The Author
Jeremy Bongiorno has been a musician for over 15 years. From touring the country in a 5-piece band, to producing his own sounds at home, he’s seen all sides of the industry. When he’s not working on a new song, you’ll most likely find him writing about all things related to home studios on his site Studio Frequencies.
Our Products
-

Interface audio 2 entrées - 2 sorties
-

Interface audio 10 entrées - 6 sorties
-

10in | 14out Audio Interface
-

Interface audio 20 entrées - 24 sorties
-
Interface audio 10 entrées - 14 sorties
-

Interface audio 2 entrées - 2 sorties
-

Interface audio 4 entrées - 4 sorties
-

Tout ce dont vous avez besoin pour débuter l'enregistrement
-
Interface audio 10 entrées - 4 sorties
-

Préampli micro 8 canaux avec CA/N
-

Préampli micro 8 canaux + Tone Control
-

Console d'enregistrement analogique modulaire
-

Small Format Analogue Recording Console
-

Small Format Analogue Recording Console
-

Immersive Audio Interface and Monitor Controller
-

Contrôleur de monitoring de bureau
-
Contrôleur de monitoring multicanal